1. Introduction
The Thermaltake V100 Mid-Tower Chassis is designed to accommodate ATX motherboards and a wide range of PC hardware, including high-end GPU solutions. It features a perforated side panel and a preinstalled 120mm rear fan to enhance airflow and cooling performance. This manual provides detailed instructions for setting up, operating, and maintaining your V100 computer case.
2. Key Features
- ATX Mid-Tower Chassis: Supports motherboards up to standard ATX size.
- Enhanced Airflow: Features a perforated side panel and one preinstalled 120mm rear fan.
- Gaming-Oriented Design: Heightened foot-stands for improved airflow and a side window panel for interior visibility.
- Built-in PSU Cover: Full-length PSU cover with vent holes for cable management and better airflow.
- Outstanding Expandability: Supports CPU coolers up to 160mm, VGA up to 400mm (without HDD rack), and various liquid cooling configurations.
- Durable Construction: Crafted from high-strength steel sheets with a corrosion-resistant powder coating.
Video 1: Thermaltake V100 Product Overview. This video provides a visual introduction to the key features and design elements of the V100 chassis.
3. Setup
3.1 Preparing the Case
Before beginning installation, ensure you have a clean, static-free workspace. Carefully remove the side panels of the chassis.

Image 1: Internal view of the Thermaltake V100 chassis with the side panel detached, revealing the interior layout and pre-installed rear fan.
3.2 Motherboard Installation
- Install the I/O shield into the motherboard tray opening from the inside of the chassis.
- Align the motherboard with the standoffs inside the chassis. Ensure all standoff holes on the motherboard match the pre-installed standoffs.
- Secure the motherboard using the appropriate screws.
3.3 Power Supply Unit (PSU) Installation
- Position the PSU into the dedicated compartment at the bottom rear of the chassis.
- Align the PSU with the screw holes on the rear of the chassis.
- Secure the PSU using the provided screws.
3.4 Expansion Card (GPU, etc.) Installation
- Remove the necessary expansion slot covers from the rear of the chassis. Note that these covers are designed to be removed permanently by bending them until they detach.
- Insert your expansion card (e.g., graphics card) into the corresponding PCIe slot on the motherboard.
- Secure the expansion card with a screw.
3.5 Drive Bay Installation
The V100 chassis supports various drive configurations:
- 3.5" HDD: Install hard drives in the hidden drive bays located beneath the PSU shroud.
- 2.5" SSD: Mount solid-state drives on the designated mounting points on the motherboard tray.
- 5.25" Optical Drive: Utilize the external 5.25" bays at the front of the chassis for optical drives or other accessories.
3.6 Cable Management
Utilize the space behind the motherboard tray and the PSU shroud to route and organize cables. This improves airflow and maintains a clean interior aesthetic.
3.7 Front I/O Connections
Connect the front panel cables (USB, audio, power, reset) to the corresponding headers on your motherboard. The front panel features:
- 2 x USB 2.0 Ports
- 1 x USB 3.0 Port
- HD Audio Jacks (Microphone & Headphone)
- Power Button
- Reset Button
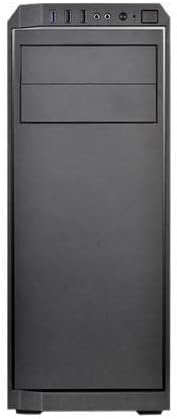
Image 2: Front view of the Thermaltake V100 chassis, highlighting the accessible front I/O ports including USB, audio jacks, and power/reset buttons.
4. Operating the System
Once all components are securely installed and connected, replace the side panels. Connect your monitor, keyboard, mouse, and power cable to the system.
- Press the Power Button on the front I/O panel to turn on your computer.
- To restart the system, press the Reset Button on the front I/O panel.
5. Maintenance
5.1 Dust Filter Cleaning
Regularly clean the dust filters to maintain optimal airflow and prevent dust buildup inside the chassis. The V100 features dust filters on the perforated side panel and potentially other intake areas.
- Gently remove the dust filters from their mounting locations.
- Clean the filters using compressed air or by rinsing them with water (ensure they are completely dry before reinstallation).
- Reattach the clean dust filters to the chassis.

Image 3: Side view of the Thermaltake V100 chassis, showing the perforated panel designed for enhanced airflow and dust filtration.
5.2 General Cleaning
Use a soft, dry cloth to wipe down the exterior of the chassis. Avoid using harsh chemicals or abrasive materials that could damage the finish.
6. Troubleshooting
6.1 System Not Powering On
- Ensure the power cable is securely connected to both the PSU and the wall outlet.
- Verify that the PSU switch is in the 'ON' position.
- Check all internal power connections, especially the 24-pin ATX and 8-pin CPU power cables to the motherboard.
- Confirm that the front panel power button cable is correctly connected to the motherboard header.
6.2 Poor Airflow or Overheating
- Clean all dust filters and fans to ensure unobstructed airflow.
- Verify that all installed fans are spinning correctly.
- Ensure proper cable management to prevent obstruction of airflow paths.
- Consider adding additional fans to the available mounting points for improved cooling.
6.3 Difficulty Installing PSU
Some users have noted that the PSU area can be tight for cable routing. Ensure you route cables before fully securing the PSU if space is limited.
7. Specifications
| Feature | Detail |
|---|---|
| Model Name | V100 Perforated Computer Case |
| Case Type | Mid Tower |
| Motherboard Compatibility | ATX |
| Dimensions (L x W x H) | 20.2"D x 9.7"W x 21.7"H (51.3cm x 24.6cm x 55.1cm) |
| Item Weight | 13.35 Pounds (6.06 kg) |
| Material | Plastic, Steel |
| Cooling Method | Air |
| Pre-installed Fans | 1 x 120mm Rear Fan |
| Expansion Slots | 7 |
| Drive Bays | 6 (various 3.5", 2.5", 5.25" configurations) |
| Front I/O Ports | 2 x USB 2.0, 1 x USB 3.0, HD Audio |
8. Warranty & Support
For warranty information and technical support, please refer to the official Thermaltake website or contact their customer service. Keep your proof of purchase for warranty claims.


