
TYLER TTV706-10
Tyler TTV706 10" Portable Widescreen 1080P LCD TV
User Instruction Manual
Introduction
Thank you for purchasing the Tyler TTV706 10" Portable Widescreen 1080P LCD TV. This manual provides essential information for setting up, operating, and maintaining your new portable television. Please read this manual thoroughly before using the device to ensure proper function and longevity.
What's in the Box
Upon unpacking, please ensure all items listed below are present and in good condition:
- Tyler TTV706 Portable TV Unit
- Remote Control
- Batteries (for remote)
- AC/DC Power Adapter
- Car Charger
- Detachable Antennas (3 included)
- RCA AV Cable
- Tabletop Stand
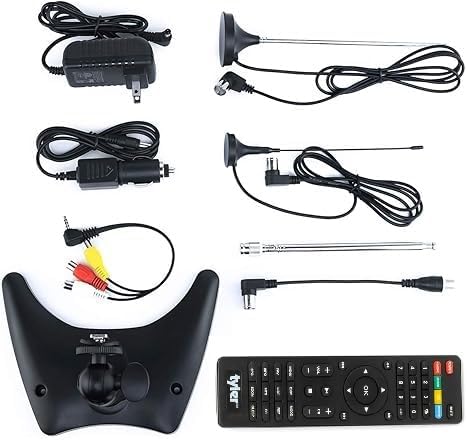
Image: All components included with the Tyler TTV706 portable TV.
Product Overview
The Tyler TTV706 is a versatile 10-inch portable LCD TV designed for on-the-go entertainment. It features a 1080P display, built-in digital tuner for over-the-air broadcasts, and multiple input options including HDMI, USB, and RCA. Its integrated rechargeable battery provides extended viewing time, making it ideal for travel, camping, or as a backup TV.
Key Features & Components

Image: Front view of the Tyler TTV706 TV with its remote control, showcasing the screen and control buttons.
Front Panel & Remote: The TV features a clear 10-inch LCD screen and intuitive control buttons on the front panel. The included remote control provides full functionality for easy navigation and settings adjustment.

Image: Rear view of the Tyler TTV706 TV, highlighting the HDMI and USB input ports on the side.
Connectivity Ports: On the side and rear, you'll find essential ports including HDMI for high-definition input, USB for media playback, and RCA AV inputs for older devices. A card input slot is also available for additional media options.

Image: Rear view of the Tyler TTV706 TV, showing the connection point for the detachable antenna.
Antenna Connection: The TV comes with multiple detachable antennas to optimize signal reception for over-the-air digital broadcasts. The antenna port is conveniently located for easy attachment.

Image: Side view of the Tyler TTV706 TV, illustrating the integrated kickstand for stable tabletop placement.
Integrated Stand: A sturdy, adjustable kickstand is built into the TV's design, allowing for stable placement on various surfaces without the need for additional support.
Setup Guide
1. Initial Charging
Before first use, fully charge the TV's built-in lithium-ion battery. Connect the AC/DC power adapter to the DC 12V input port on the TV and plug it into a wall outlet. The charging indicator light will illuminate. A full charge typically takes 2-3 hours.
2. Attaching the Antenna
Screw one of the provided detachable antennas into the antenna input port on the TV. For optimal reception, extend the antenna fully and position it vertically. Experiment with different antenna types and placements to find the best signal in your location.
3. Powering On & Initial Scan
- Press the POWER button on the TV or remote control to turn on the unit.
- Upon first power-on, the TV may automatically guide you through an initial setup wizard. Follow the on-screen prompts.
- Select your language and country/region.
- Initiate an Auto Scan for channels. This will detect available digital TV and FM radio stations in your area. This process may take several minutes.
- Once the scan is complete, you can begin watching TV.
4. Connecting External Devices
- HDMI: Connect an HDMI cable from your external device (e.g., game console, streaming stick) to the HDMI IN port on the TV. Select the HDMI input using the MODE button on the TV or remote.
- USB: Insert a USB flash drive into the USB port to view photos, play music, or watch videos. Select the USB input using the MODE button.
- RCA AV: Use the provided RCA AV cable to connect older devices (e.g., DVD player) to the AV IN ports. Select the AV input using the MODE button.
Operating Instructions
Basic Operation
- Power On/Off: Press the POWER button.
- Volume Control: Use the VOL+/- buttons on the TV or remote.
- Channel Selection: Use the CH+/- buttons to change channels sequentially. You can also enter channel numbers directly using the remote's number pad.
- Input Source: Press the MODE button to cycle through available input sources (TV, AV, HDMI, USB).
- Menu Navigation: Press the MENU button to access settings. Use the arrow keys and OK button to navigate and confirm selections. Press EXIT to leave the menu.
FM Radio Operation
To switch to FM Radio mode, press the MODE button until "FM Radio" is selected. The TV will automatically scan for and store available FM stations during the initial setup. Use the CH+/- buttons to tune between saved stations.
Maintenance
- Cleaning: Use a soft, dry cloth to clean the TV screen and body. For stubborn marks, slightly dampen the cloth with water. Avoid using abrasive cleaners, waxes, or solvents.
- Battery Care: To prolong battery life, avoid fully discharging the battery frequently. Recharge the TV regularly, even if not in use for extended periods (e.g., once every 3 months). Store the TV in a cool, dry place.
- Storage: When not in use for a long time, disconnect the power adapter and store the TV in a safe, dry environment away from direct sunlight and extreme temperatures.
Troubleshooting
| Problem | Possible Cause | Solution |
|---|---|---|
| TV does not power on. | Battery is drained or power adapter is not connected. | Connect the AC/DC adapter and allow the battery to charge. Ensure the power outlet is functional. |
| No signal or poor picture quality. | Antenna not connected, poor antenna position, or weak broadcast signal. | Ensure antenna is securely connected and fully extended. Adjust antenna position. Perform a channel auto-scan. Consider an amplified antenna in weak signal areas. |
| No sound. | Volume is too low or muted. | Increase volume using VOL+ button. Check if the TV is muted (press MUTE button on remote). |
| Remote control not working. | Batteries are dead or incorrectly inserted. Obstruction between remote and TV. | Replace remote batteries, ensuring correct polarity. Remove any obstructions. Point remote directly at the TV's IR sensor. |
| Cannot play media from USB. | Unsupported file format or corrupted USB drive. | Ensure media files are in supported formats (check manual for specifics). Try a different USB drive. |
Specifications
| Feature | Detail |
|---|---|
| Brand | TYLER |
| Model Number | TTV706-10 |
| Screen Size | 10 Inches (26 cm visible diagonal) |
| Display Technology | LCD, LED |
| Resolution | 1080p |
| Aspect Ratio | 16:9 |
| Refresh Rate | 60 Hz |
| Connectivity Technology | USB, HDMI, RCA AV |
| Speaker Type | Built-In |
| Power Source | AC/DC (12 Volts), Built-in Lithium Ion Battery |
| Item Weight | 1.5 Pounds |
| Package Dimensions | 11.02 x 8.31 x 4.69 inches |
Warranty and Support
The Tyler TTV706 Portable TV comes with a standard manufacturer's warranty. For specific warranty terms, registration, and technical support, please refer to the warranty card included in your product packaging or visit the official TYLER website. Keep your purchase receipt as proof of purchase for any warranty claims.
For additional assistance, you may contact TYLER customer service directly through their official channels.
Ask a question about this manual
Ask about setup, troubleshooting, compatibility, parts, safety, or missing instructions. Manuals+ will review the question and use this page’s manual context to help answer it.