1. Introduction
This manual provides detailed instructions for the installation, operation, and maintenance of your Dynavin N7-VT7 PRO Radio Navigation System. This system is designed as a direct replacement for the factory radio in VW Touareg models from 2003 to 2009, integrating seamlessly with your vehicle's existing systems.
Key features include:
- 7-inch capacitive LCD touch screen display (1024 x 600 resolution)
- Integrated GPS navigation with maps for North America, Europe, or Australia
- Bluetooth for hands-free calling and audio streaming
- Apple CarPlay and Android Auto compatibility via USB
- USB and Micro SD card media playback
- AM/FM radio tuner
- Backup camera readiness
- Integration with vehicle's DSP processor (if equipped)
2. Safety Information
Important Legal Disclaimer:
- Installation must be performed by a trained specialist.
- Ensure the vehicle is de-energized before beginning installation.
- In some cases, the vehicle battery may need to be disconnected. Consult your vehicle manufacturer's guidelines.
- Modifying vehicle electronics may affect manufacturer warranty.
Always prioritize safety during installation and operation. Avoid operating the system's complex functions while driving to prevent distractions.
3. Setup and Installation
The Dynavin N7-VT7 PRO is designed for plug-and-play installation, integrating with your vehicle's factory wiring and controls. Professional installation is highly recommended to ensure proper functionality and to avoid damage to the unit or vehicle.
3.1 Package Contents
Verify that all components are present in the package:
- Dynavin N7-VT7 PRO Head Unit
- GPS Antenna
- USB Cable
- Wiring Harnesses (vehicle-specific)
- User Manual (this document)
- External Microphone (if included)
3.2 Installation Overview
The unit replaces the existing factory radio. Specific steps for removal of the old unit and installation of the new Dynavin system will vary slightly depending on your vehicle's trim. Refer to a qualified installer or vehicle-specific guides for detailed instructions.

Figure 3.1: The Dynavin N7-VT7 PRO unit seamlessly integrated into a Volkswagen Touareg dashboard, demonstrating its OEM-look design.
After physical installation, connect all wiring harnesses, the GPS antenna, and any external accessories like a backup camera or SiriusXM tuner (sold separately).
4. Operating Instructions
The Dynavin N7-VT7 PRO features an intuitive touchscreen interface. Most functions are accessible via the main menu or dedicated physical buttons.
4.1 Main Interface Overview
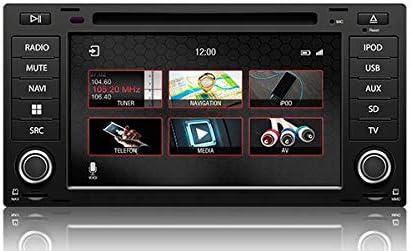
Figure 4.1: The main menu screen displaying various function icons such as Radio, Navigation, Telephone, Media, and AV input.
From the main screen, tap on the desired icon to access functions like Radio, Navigation, Bluetooth (Telefon), Media (USB/SD), and AV input.
4.2 Radio Operation
Tap the "Radio" icon from the main menu or press the physical "RADIO" button. You can tune to AM/FM stations, save presets, and access features like RDS (Radio Data System) where available.

Figure 4.2: The radio interface showing station presets and current frequency. Users can navigate between stations using the on-screen arrows or physical controls.
For SiriusXM compatibility, an SXV300 Tuner (sold separately) is required. Once installed, access SiriusXM through the dedicated icon or source selection.

Figure 4.3: The SiriusXM interface displaying channel information and presets, allowing access to satellite radio content.
4.3 Navigation System
Tap the "Navigation" icon to launch the integrated GPS navigation software. The system comes pre-loaded with maps for North America, Europe, or Australia, depending on your region.
- Destination Entry: Enter addresses, points of interest, or coordinates.
- Route Guidance: Follow turn-by-turn voice prompts and on-screen directions.
- Map View: Switch between 2D and 3D views, adjust zoom levels.
4.4 Bluetooth Connectivity
Pair your smartphone via Bluetooth for hands-free calling and audio streaming.
- Go to the "Telefon" (Bluetooth) menu.
- Enable Bluetooth on your smartphone and search for available devices.
- Select "Dynavin" from the list on your phone and confirm the pairing code.
- Once paired, you can make/receive calls and stream music.
4.5 Apple CarPlay & Android Auto
Connect your compatible smartphone via USB to use Apple CarPlay or Android Auto. This allows you to access select phone apps directly on the Dynavin display.

Figure 4.4: The Apple CarPlay interface displaying common applications like Phone, Music, Maps, and Messages, integrated with the Dynavin unit.
Ensure your phone's operating system is up to date for optimal performance with CarPlay or Android Auto.
4.6 Media Playback (USB/SD)
Insert a USB drive or Micro SD card into the designated ports. The system supports various audio and video formats. Tap the "Media" icon to browse and play content.
4.7 Sound Settings
Access the sound settings to adjust audio output, equalizer, and balance/fader controls. The system integrates with your vehicle's DSP processor if equipped.

Figure 4.5: The sound settings interface, allowing users to adjust audio parameters such as balance, fader, and specific sound profiles within the vehicle cabin.
Additional sound options may include confirmation tones, PDC (Park Distance Control) and warning tones, and settings for factory amplifiers.
4.8 System Settings
The system settings menu allows you to configure various aspects of the unit, including:
- Region: Set the geographical region for radio and navigation.
- Color: Adjust display color schemes.
- Camera: Configure backup camera settings.
- Brightness: Manually adjust screen brightness.
- Time Zone: Set the correct time zone.
- Reverse: Configure reverse camera and PDC integration.

Figure 4.6: The system settings interface, showing options for region, display color, camera settings, brightness adjustment, time zone, and reverse camera configuration.
5. Maintenance
5.1 Cleaning the Display
Use a soft, lint-free cloth to gently wipe the touchscreen. For stubborn smudges, slightly dampen the cloth with water or a screen-safe cleaner. Avoid abrasive materials or harsh chemicals.
5.2 Firmware Updates
Periodic firmware updates may be released to improve performance, add features, or address issues. Check the official Dynavin website or contact your distributor for information on available updates and instructions for installation.
6. Troubleshooting
If you encounter issues with your Dynavin N7-VT7 PRO, refer to the following common solutions:
- No Power: Check all wiring connections and vehicle fuses. Ensure the vehicle battery is properly connected.
- No Sound: Verify speaker connections. Check volume levels and mute settings. Ensure the correct audio source is selected.
- GPS Signal Loss: Ensure the GPS antenna is properly installed and has a clear view of the sky.
- Bluetooth Pairing Issues: Delete previous pairings from both the unit and your phone. Restart both devices and attempt pairing again.
- Touchscreen Unresponsive: Perform a soft reset (refer to specific instructions from Dynavin support if available).
- Apple CarPlay/Android Auto Not Connecting: Ensure your phone is compatible and its operating system is updated. Try a different USB cable.
For persistent issues, contact Dynavin customer support or your authorized dealer for assistance.
7. Specifications
| Feature | Specification |
|---|---|
| Model Number | N7-VWTG-PRO |
| Display Size | 7 Inches |
| Display Resolution | 1024 x 600 |
| Display Type | Capacitive LCD, Anti-glare Touchscreen |
| Operating System | DynOS |
| Connectivity | USB, Bluetooth |
| Map Type | North America, Europe, or Australia (region-specific) |
| Vehicle Service Type | Car (VW Touareg 2003-2009) |
| Package Dimensions | 13 x 11 x 9 inches |
8. Warranty and Support
For warranty information, please refer to the documentation provided with your purchase or contact your authorized Dynavin dealer. J&T Distributing is the official distributor of Dynavin in North America and can provide support for products purchased through their channels.
For technical assistance, troubleshooting, or inquiries regarding firmware updates, please visit the official Dynavin website or contact their customer support.


