
1. Introduction
The ANDYCINE A6 Plus V2 is a 6-inch on-camera field monitor designed to enhance your video production workflow. It features a 1920x1080 IPS touchscreen display with HDR support and 4K HDMI input/output. This monitor integrates professional monitoring tools such as 3D LUTs, Waveform, Vectorscope, Peaking Focus, and Zebra exposure assistance, providing precise control and analysis of your footage. Its compact and lightweight design makes it suitable for various camera setups.
2. Package Contents
Please verify that all items listed below are included in your package:
- ANDYCINE A6 Plus V2 6-inch On-Camera Monitor
- Sunhood
- Mini HDMI to HDMI Cable
- Micro HDMI to HDMI Cable
- Tilt Arm Mount
- Carry Case
- User Manual (this document)

Image 2.1: Contents of the ANDYCINE A6 Plus V2 package.
3. Product Overview
3.1 Monitor Layout and Dimensions
The A6 Plus V2 monitor is designed for portability and ease of use. Its compact dimensions and lightweight construction make it an ideal companion for various camera setups.
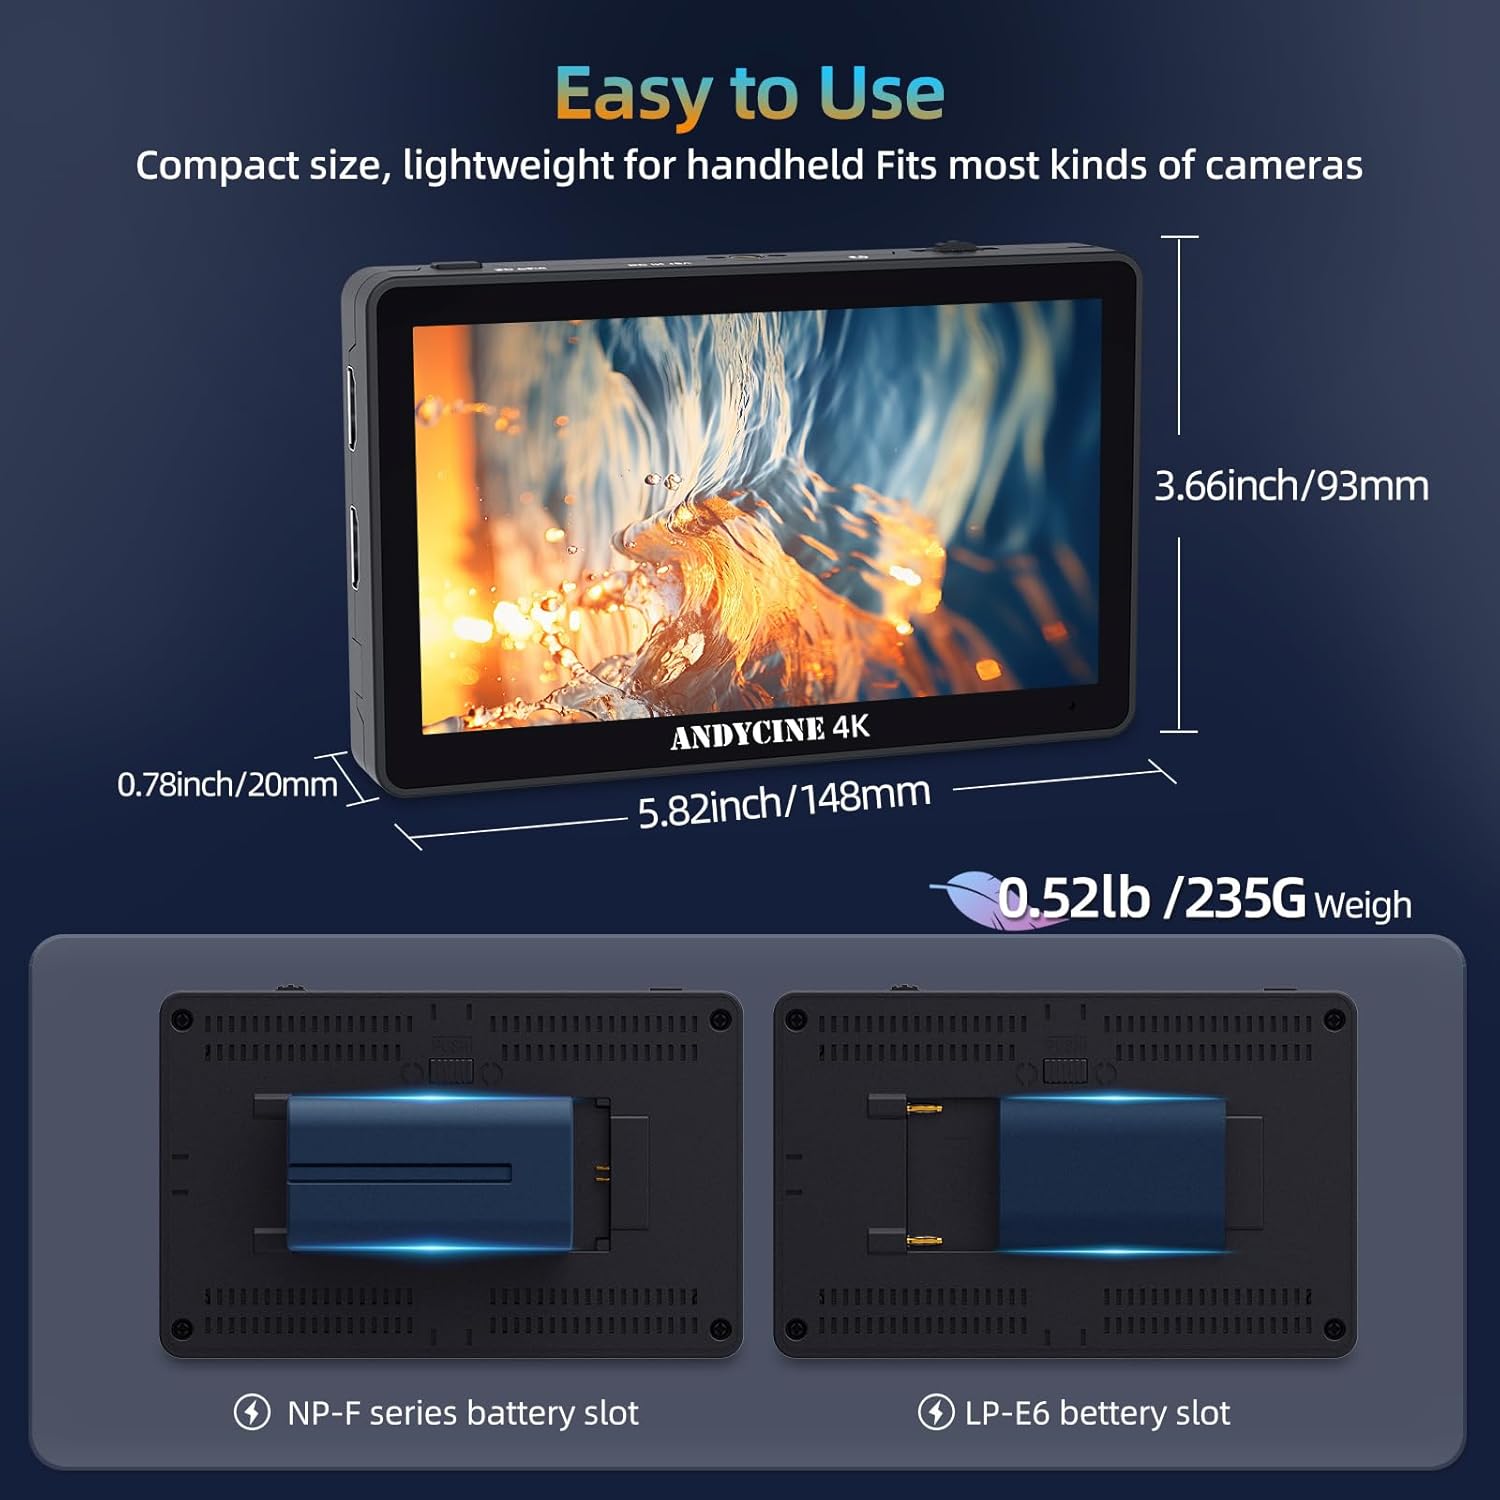
Image 3.1: Monitor dimensions and battery plate options.
- Dimensions: Approximately 5.83 x 3.66 x 0.79 inches (148mm x 93mm x 20mm)
- Weight: Approximately 8.8 ounces (235g)
- Screen: 6.0-inch diagonal touchscreen display
3.2 Ports and Controls
Familiarize yourself with the various ports and controls on the monitor:

Image 3.2: Monitor ports and controls.
- HDMI IN: Connects to your camera's HDMI output.
- HDMI OUT: For looping out the video signal to another monitor or device.
- DC OUT 8V: Provides power to compatible camera accessories.
- DC IN 5V (Type-C): USB-C input for power supply.
- Headphone Jack: 3.5mm output for audio monitoring.
- SD Card Slot: For importing 3D LUTs.
- DC IN 12V: Barrel connector input for external power supply.
- Power Button: Turns the monitor on/off.
- 1/4" Screw Thread: Mounting points for accessories (top, bottom, side).
- Menu Wheel Key: Navigates and confirms menu selections.
4. Setup
4.1 Powering the Monitor
The A6 Plus V2 offers multiple power options:

Image 4.1: Power supply options for the monitor.
- NP-F/LP-E6 Battery: Attach a compatible NP-F series or LP-E6 battery to the battery plate on the rear of the monitor. Ensure the battery is securely locked into place.
- USB-C Power: Connect a 5V 3A USB-C power adapter to the DC IN 5V (Type-C) port.
- DC 12V Power: Connect a 12-18V DC power adapter to the DC IN 12V barrel connector port.
Press and hold the Power Button to turn the monitor on or off.
4.2 Connecting to a Camera
Use the provided HDMI cables to connect your camera to the monitor.

Image 4.2: HDMI loop-out functionality.
- Connect one end of an HDMI cable to your camera's HDMI output port.
- Connect the other end of the HDMI cable to the HDMI IN port on the A6 Plus V2 monitor.
- If you need to output the signal to another display, connect an HDMI cable from the monitor's HDMI OUT port to the input of the secondary display.
5. Operating Instructions
5.1 Basic Operation and Touchscreen Interface
The A6 Plus V2 features a responsive touchscreen for intuitive navigation.

Image 5.1: Touchscreen menu navigation.
- Power On/Off: Press and hold the power button on the top edge of the monitor.
- Menu Access: Double-tap the screen to bring up the main menu. Alternatively, use the Menu Wheel Key.
- Navigation: Swipe left/right or up/down on the touchscreen to navigate through menu options. Tap to select.
- Adjusting Settings: Once an option is selected, use swipe gestures or the Menu Wheel Key to adjust values.
- Quick Access: Swipe from the edges of the screen for quick access to common functions like volume and brightness.
5.2 Professional Monitoring Features
The A6 Plus V2 includes a suite of tools to assist with accurate exposure, focus, and color.

Image 5.2: Professional auxiliary monitoring tools.
- Waveform (Y/YUV/RGB Parade): Displays the luminance and chrominance levels of your video signal, helping to ensure proper exposure and color balance.
- Vectorscope: Visualizes the color information of your image, allowing for precise color correction and grading.
- Histogram (Y-RGB): Shows the distribution of tones (luminance) and color channels (RGB) in your image, aiding in exposure control.
- False Color: Converts image luminance into a spectrum of colors, making it easy to identify overexposed or underexposed areas.
- Peaking Focus: Highlights sharp edges in the image with a selectable color, assisting in achieving critical focus.
- Zebra Exposure: Displays zebra-stripe patterns over areas that exceed a set exposure threshold, preventing overexposure.
- 3D LUT Support: Import up to 50 user LUT cube files via the SD card slot to preview your footage with custom color grades or camera log conversions.
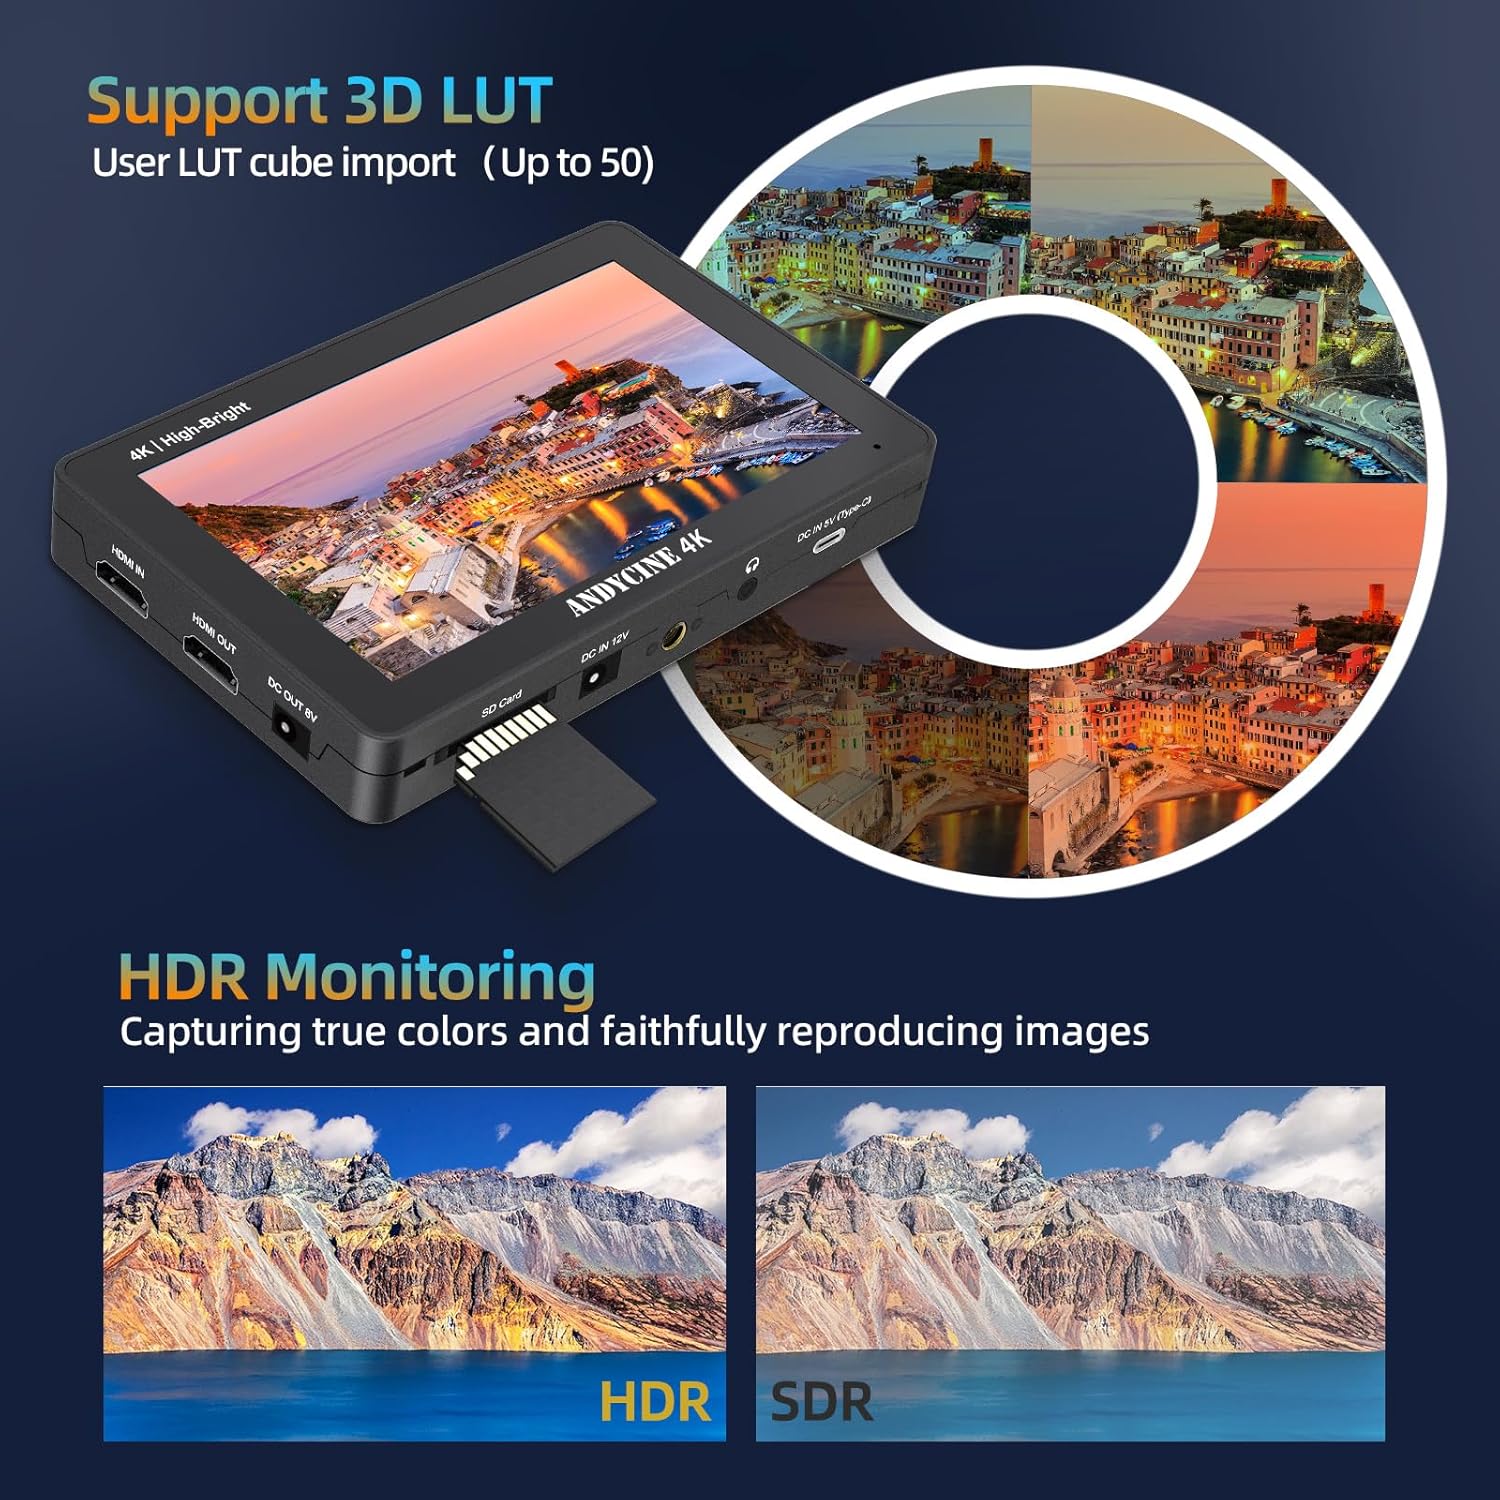
Image 5.3: 3D LUT and HDR monitoring capabilities.
- HDR Monitoring: Supports HDR (High Dynamic Range) for capturing true colors and faithfully reproducing images with greater detail in highlights and shadows.
- Zoom and Nine Grid: Use pinch-to-zoom gestures on the touchscreen to magnify parts of the image for detailed focus checks. The Nine Grid overlay assists with composition.

Image 5.4: Nine Grid and Zoom functions for detailed viewing.
6. Maintenance
- Cleaning: Use a soft, dry cloth to clean the monitor's exterior. For the screen, use a microfiber cloth specifically designed for electronics displays. Do not use liquid cleaners directly on the screen.
- Storage: When not in use, store the monitor in its carry case to protect it from dust and physical damage. Avoid extreme temperatures and humidity.
- Battery Care: If using external batteries, follow the manufacturer's guidelines for charging and storage to prolong battery life.
7. Troubleshooting
- No Signal Displayed:
- Ensure the HDMI cable is securely connected to both the camera and the monitor.
- Verify that your camera's HDMI output is active and configured correctly.
- Check if the monitor's input source is set to HDMI.
- Try a different HDMI cable to rule out cable issues.
- Monitor Does Not Power On:
- Ensure the battery is charged and properly inserted, or the external power adapter is connected and functioning.
- Press and hold the power button for a few seconds.
- Touchscreen Unresponsive:
- Restart the monitor.
- Ensure the screen is clean and free of debris.
- Image Quality Issues:
- Check monitor settings such as brightness, contrast, and color temperature.
- If using LUTs, ensure the correct LUT is applied or disable it for testing.
8. Specifications
| Feature | Specification |
|---|---|
| Screen Size | 6.0 Inches |
| Resolution | 1920 x 1080 (FHD 1080p) |
| Aspect Ratio | 16:9 |
| Contrast Ratio | 1000:1 |
| Pixels Per Inch (PPI) | 400 |
| Viewing Angle | 160° IPS |
| Color Gamut | Rec.709 |
| Input Ports | HDMI IN |
| Output Ports | HDMI OUT, DC OUT 8V, 3.5mm Headphone Jack |
| Power Input | DC IN 12V, DC IN 5V (Type-C), NP-F/LP-E6 Battery Plate |
| Dimensions | 5.83 x 3.66 x 0.79 inches (148 x 93 x 20 mm) |
| Weight | 8.8 ounces (235g) |
| Features | Touchscreen, HDR, 3D LUT, Waveform, Vectorscope, Histogram, False Color, Peaking Focus, Zebra, Zoom, Nine Grid |
9. Warranty and Support
ANDYCINE products are covered by a limited warranty. For detailed warranty information, technical support, or service inquiries, please refer to the warranty card included with your product or visit the official ANDYCINE website. Please retain your proof of purchase for warranty claims.


