1. Introduction
This manual provides detailed instructions for the safe and effective operation of the BSIDE ADMS7 Digital Multimeter. The ADMS7 is a high-precision, automatic induction smart multimeter designed for measuring DC/AC voltage, resistance, frequency, and other electrical parameters. It features an intelligent identification function and True RMS measurement capabilities, making it suitable for various electrical testing applications.
2. Safety Information
WARNING: To avoid electric shock or personal injury, read and understand all safety information before using this product.
- Always ensure the multimeter is in the correct measurement mode before connecting test leads to a circuit.
- Do not apply voltage or current that exceeds the maximum specified limits for the multimeter. Maximum voltage allowed at the measuring end: 600V DC, 600V AC.
- Exercise extreme caution when working with live circuits. Avoid contact with bare wires or terminals.
- Inspect test leads for damage before each use. Do not use if insulation is compromised.
- Replace batteries immediately when the low battery indicator appears to ensure accurate readings.
- Do not operate the multimeter if it appears damaged or is not functioning properly.
- This device is designed for use at working heights up to 2000m.
3. Product Overview
The BSIDE ADMS7 Digital Multimeter is a compact and intelligent testing device. Familiarize yourself with its components:

Figure 3.1: BSIDE ADMS7 Multimeter, including the main unit, red and black test leads, a wrist strap, and the product packaging.

Figure 3.2: Front view of the ADMS7 Multimeter, highlighting its 3.5-inch vibrant HD display and button layout.
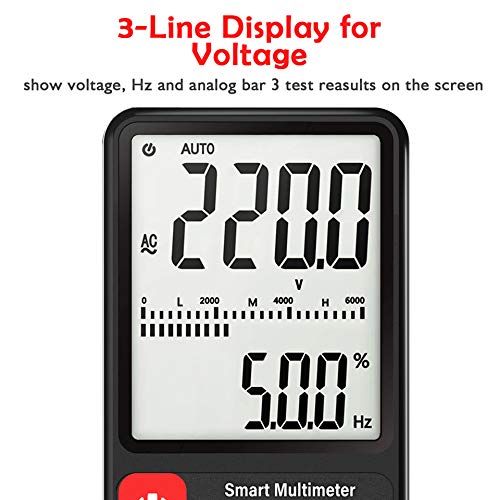
Figure 3.3: Detailed view of the multimeter's LCD, illustrating the 3-line display for voltage, frequency (Hz), and analog bar graph results.
Key Components:
- LCD Display: Large screen for clear readings, including main value, secondary value, and analog bar graph. Maximum display value: 6000 digits.
- Power Button: To turn the device on or off.
- V-Alert/LIVE Button: Activates non-contact voltage detection and live wire detection.
- HOLD Button: Freezes the current reading on the display.
- Input Jacks: For connecting test leads (COM and VΩHz).
- Test Leads: Red (positive) and Black (common) leads for measurements.
4. Setup
4.1 Battery Installation
- Ensure the multimeter is powered off.
- Locate the battery compartment cover on the back of the device.
- Use a screwdriver to open the battery compartment.
- Insert two AAA 1.5V batteries, observing the correct polarity (+/-). Batteries are not included.
- Replace the battery compartment cover and secure it with the screw.
4.2 Connecting Test Leads
- Insert the black test lead into the "COM" (Common) input jack.
- Insert the red test lead into the "VΩHz" input jack for voltage, resistance, and frequency measurements.
5. Operating Instructions
5.1 Power On/Off
Press the Power Button (red circle with line) to turn the multimeter on. The device will automatically enter intelligent identification mode. To turn off, press and hold the Power Button. The device also features an automatic shutdown time of 15 minutes to conserve battery life.
5.2 Automatic Identification Mode
Upon power-on, the ADMS7 automatically detects the type of measurement (AC/DC voltage, resistance, continuity) and selects the appropriate range. This simplifies operation by eliminating manual range selection.
5.3 Measuring Voltage (AC/DC)
- Ensure the multimeter is powered on and in automatic identification mode.
- Connect the black test lead to the common point of the circuit and the red test lead to the point where voltage is to be measured.
- The display will show the voltage reading (DC or AC) and frequency (Hz) if applicable.
5.4 V-Alert (Non-Contact Voltage Detection) and LIVE Function
The V-Alert function allows for non-contact detection of AC voltage, indicating the presence of live electrical fields without direct contact. The LIVE function helps identify live wires.

Figure 5.1: The V-Alert function in use, showing the multimeter detecting voltage near various electrical outlets. The display indicates the presence of voltage, and an audible alarm sounds.
- Press the V-Alert/LIVE Button. The display will show "V-Alert" or "LIVE".
- For V-Alert, bring the top of the multimeter near the conductor or outlet. The device will beep and the bar graph on the LCD will indicate the strength of the detected voltage field.
- For LIVE, insert the red test lead into the suspected live wire and the black test lead into the neutral or ground. The display will indicate "LIVE" and provide a voltage reading if a live wire is detected.
5.5 HOLD Function
Press the HOLD Button to freeze the current reading on the display. This is useful for recording measurements in difficult-to-read situations. Press the button again to release the hold function.
6. Maintenance
6.1 Cleaning
Wipe the multimeter casing with a damp cloth and mild detergent. Do not use abrasives or solvents. Ensure the device is completely dry before use.
6.2 Battery Replacement
When the battery under-voltage indication (battery icon) appears on the LCD, replace the batteries as described in Section 4.1. Prompt battery replacement ensures continued accuracy and proper operation.
7. Troubleshooting
- No Display: Check battery installation and ensure batteries are not depleted.
- Inaccurate Readings: Ensure test leads are properly connected. Check battery level. Verify the multimeter is in the correct mode (though automatic, ensure it's not stuck in a specific function).
- "OL" or Overload Indication: The measured value exceeds the multimeter's range. Disconnect immediately to prevent damage.
- No V-Alert Detection: Ensure the V-Alert function is activated. The multimeter needs to be close enough to the AC voltage source.
8. Specifications
| Parameter | Value |
|---|---|
| Maximum Display Value | 6000 digits |
| Polarity Indication | Automatic indication |
| Unit Display | Function, power unit display |
| Automatic Shutdown Time | 15 minutes |
| Working Power Supply | 2 x AAA 1.5V battery (not included) |
| Battery Under-voltage Indication | LCD display |
| Temperature Coefficient | Less than 0.1 x accuracy / °C |
| Working Temperature | 0 - 40 °C |
| Storage Temperature and Humidity | 10 - 60 °C |
| Maximum Voltage Allowed | 600V DC, 600V AC |
| Working Height | Up to 2000m |
| Overload Protection | Full range |
| Dangerous Voltage Alarm | Two grades |
9. Warranty and Support
For warranty information and technical support, please refer to the documentation provided with your purchase or contact the manufacturer directly. Keep your purchase receipt as proof of purchase.


