1. Introduction
The FLYDIGI Stinger CapAir Mapping Gaming Trigger is designed to enhance your mobile gaming experience on both Android and iPhone devices. Utilizing CapAir Mapping technology, these triggers provide a physical connection to your screen, offering precise and responsive control without the need for Bluetooth pairing or complex software installations. This manual provides essential information for setup, operation, maintenance, and troubleshooting to ensure optimal performance.
2. Product Overview
The FLYDIGI Stinger trigger features a compact design with a physical button that translates presses into screen touches via CapAir Mapping technology. Each trigger is equipped with a micro-USB charging port and an indicator light.
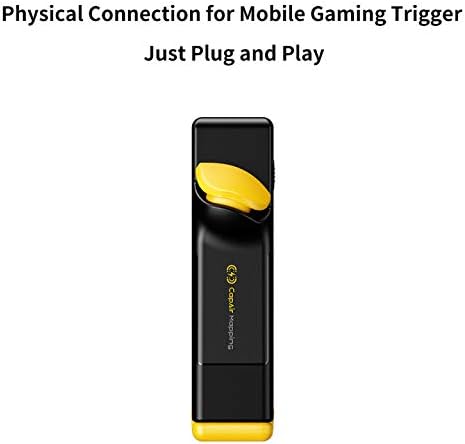
Figure 1: Individual FLYDIGI Stinger CapAir Mapping Gaming Trigger.

Figure 2: Side view of the trigger showing its attachment mechanism to a smartphone.
3. Setup Instructions
- Charge the Triggers: Before first use, fully charge each Stinger trigger using the provided micro-USB cable. Refer to the 'Charging' section for details.
- Attach to Smartphone: Gently slide the Stinger trigger onto the top edge of your smartphone. Ensure the conductive pad on the trigger makes direct contact with the desired area on your screen.
- Adjust Position: Adjust the trigger's position to align with the in-game buttons you wish to map (e.g., fire, scope). The trigger's design allows for slight horizontal adjustment.
- Secure Fit: Ensure the trigger is securely clipped to your phone. The internal rubber padding helps prevent scratches and provides a stable grip.
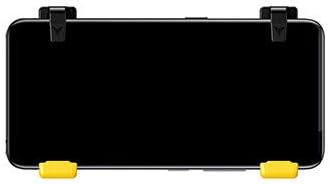
Figure 3: A smartphone with two Stinger triggers correctly attached for gameplay.

Figure 4: Top view illustrating the adjustable mechanism of the Stinger trigger on a smartphone.
Note: For optimal performance, it is recommended to use the triggers without a phone case, or with a very slim case, as thicker cases may interfere with proper contact or fit.
4. Operating Instructions
4.1 Basic Operation
- Once attached and aligned, simply press the physical button on the Stinger trigger. This action will simulate a touch on the corresponding area of your screen.
- Ensure your in-game controls are customized to place the desired action buttons directly under where the Stinger trigger makes contact.
4.2 CapAir Mapping Technology
The Stinger triggers utilize CapAir Mapping technology, which creates a capacitive field that mimics a finger touch on the screen. This ensures high responsiveness and compatibility with most touchscreen devices without requiring any software installation or Bluetooth connection.

Figure 5: Visual representation of CapAir Mapping technology creating touch points on the screen.

Figure 6: Illustrates the internal capacitive grid interaction when the trigger is pressed.
4.3 Auto-Tap Function
The Stinger triggers feature an auto-tap function. To activate, press and hold the trigger button. This will simulate rapid, repeated taps on the screen, which can be beneficial for certain in-game actions like rapid firing with semi-automatic weapons.
5. Charging
- Connect the micro-USB charging cable to the charging port on the Stinger trigger and to a compatible USB power source.
- The indicator light on the trigger will illuminate during charging and turn off or change color when fully charged (behavior may vary slightly by model).
- Important: Use a charger with a voltage of 5V and an amperage of 1A or less. Using chargers with higher voltage or amperage (e.g., fast chargers) can damage the trigger's internal components and lead to inconsistent performance or complete failure.
- A full charge typically provides up to 120 hours of battery life.
6. Maintenance
- Cleaning: Use a soft, dry cloth to clean the exterior of the triggers. Avoid using harsh chemicals or abrasive materials.
- Storage: Store the triggers in a cool, dry place away from direct sunlight and extreme temperatures.
- Handling: Handle the triggers with care. Avoid dropping them or applying excessive force, which could damage the internal components or the clip mechanism.
7. Troubleshooting
- Trigger Not Responding:
- Ensure the trigger is fully charged.
- Verify the conductive pad is making direct and firm contact with the screen.
- Check if your phone screen protector (if any) is too thick or interfering with capacitive touch.
- Confirm the in-game button is directly under the trigger's contact point.
- Restart your phone and try again.
- Inconsistent Firing/Tapping:
- This can be a symptom of low battery. Recharge the trigger.
- Ensure the charging voltage and amperage are within recommended limits (5V @ 1A max). Overcharging or using an incompatible charger can cause damage.
- Clean the screen and the trigger's contact surface to remove any dirt or oils.
- Trigger Does Not Fit with Phone Case:
- The Stinger triggers are designed for direct attachment to the phone screen. Thicker phone cases may prevent a proper fit or contact.
- Consider removing your phone case during gameplay for optimal fit and performance.
- No Battery Level Indicator:
- The FLYDIGI Stinger triggers do not feature an explicit battery level indicator. Monitor usage time and charge regularly to avoid unexpected power loss during gameplay.
8. Specifications
| Feature | Detail |
|---|---|
| Product Dimensions | 5.7 x 2.36 x 1.97 inches |
| Item Weight | 7.4 ounces |
| Batteries | 1 Lithium Polymer battery required (included) |
| First Available Date | April 2, 2019 |
9. Product Video
Video 1: Demonstrates the installation and physical connection of the Flydigi Stinger trigger during Call of Duty Mobile gameplay. This video highlights the ease of setup and direct input without additional software or Bluetooth.
10. Safety Information
- Keep out of reach of small children.
- Do not expose to water or extreme temperatures.
- Do not attempt to disassemble or modify the product.
- Dispose of batteries according to local regulations.


