1. Introduction
The myTouchSmart In-Wall Push-Button Countdown Timer Switch (Model 40953) is designed to simplify your routine by providing convenient automation for indoor or outdoor lighting and various appliances. This timer replaces any standard single-pole light switch and offers preset countdown times to automatically turn off connected devices. It is compatible with LED, CFL, incandescent, and halogen bulbs.

The product packaging displays the in-wall digital countdown timer switch, highlighting its key features such as preset countdown times and compatibility with various bulb types.
2. Safety Information
Before beginning installation, read all instructions carefully. Improper installation can result in electrical shock or fire. Always consult a qualified electrician if you are unsure about any part of the installation process.
- TURN OFF POWER at the circuit breaker or fuse box before wiring.
- This device is intended for installation in accordance with the National Electric Code and local regulations.
- Use only copper wire.
- NEUTRAL WIRE REQUIRED for operation.
3. Installation
3.1 Tools Required
- Screwdriver (Phillips and Flathead)
- Wire Strippers
- Electrical Tape
- Voltage Tester (recommended)
3.2 Wiring Instructions
- Turn off power to the switch location at the circuit breaker or fuse box. Verify power is off using a voltage tester.
- Remove the existing wall plate and switch from the wall box.
- Carefully disconnect the wires from the old switch. Identify and label the LINE (hot), LOAD, NEUTRAL, and GROUND wires. The timer requires a neutral wire for proper operation.
- Connect the wires to the myTouchSmart timer using the screw terminals:
- Connect the LINE (hot) wire to the terminal labeled 'LINE'.
- Connect the LOAD wire (to the light/appliance) to the terminal labeled 'LOAD'.
- Connect the NEUTRAL wire (typically white) to the terminal labeled 'NEUTRAL'.
- Connect the GROUND wire (typically bare copper or green) to the terminal labeled 'GROUND'.
- Ensure all wire connections are secure.
- Carefully push the wired timer into the wall box.
- Mount the timer to the wall box using the provided screws.
- Attach the desired color faceplate (White or Light Almond included, wallplate not included).
- Restore power at the circuit breaker.

The rear view of the timer, displaying the screw terminals for Line, Load, Neutral, and Ground connections, essential for proper installation.

A side profile of the timer, showing its depth and how it fits into a standard electrical wall box, with wiring connections visible.
4. Operating Instructions
The myTouchSmart timer features an ON/OFF door panel that conceals preset buttons and LEDs when closed. Opening the door provides access to all countdown options.
4.1 Activating a Countdown
- Open the front door panel to reveal the preset buttons.
- Press the desired countdown button: 5 Min, 10 Min, 30 Min, 60 Min, 2 Hour, or 4 Hour.
- A blue LED indicator light next to the selected button will illuminate, confirming the countdown is active. The connected device will turn on and remain on for the selected duration, then automatically turn off.
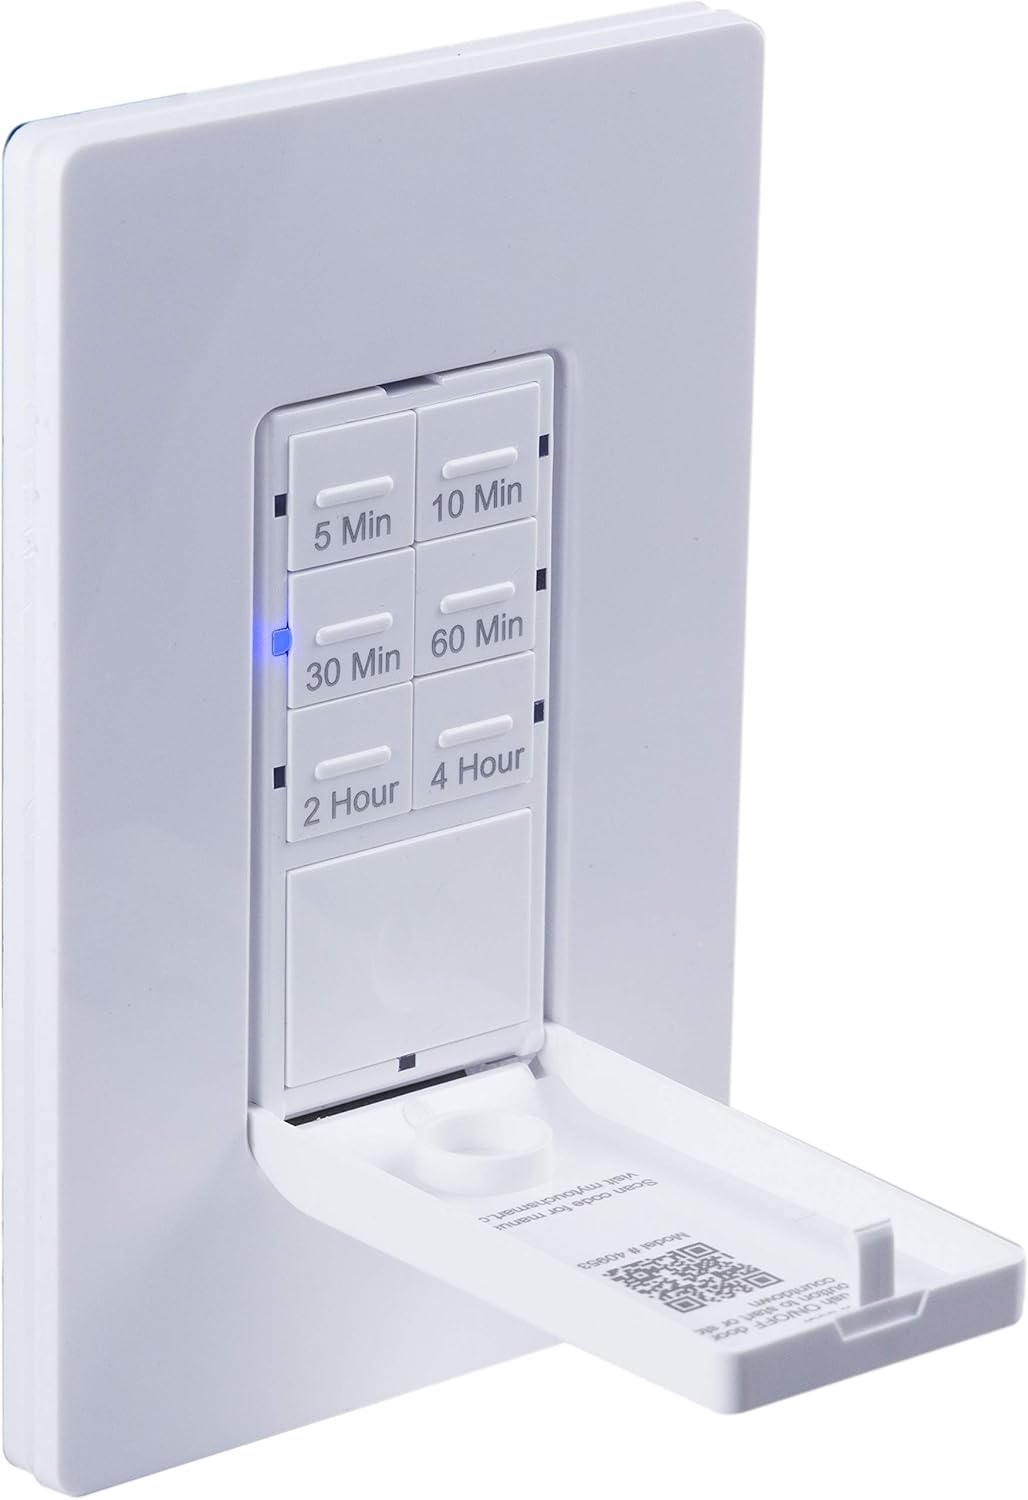
A close-up view of the timer with its front door panel open, exposing the six preset countdown buttons (5, 10, 30, 60 minutes, 2, and 4 hours) and the manual ON/OFF button.

The in-wall timer with its door open, showing the preset buttons and a blue LED illuminated next to the '30 Min' button, indicating an active countdown.

A hand pressing one of the preset countdown buttons on the timer, demonstrating user interaction.
4.2 Manual ON/OFF Override
- To manually turn the connected device ON or OFF at any time, press the large ON/OFF button located at the bottom of the timer (this button is also the door panel when closed).
- Pressing this button will override any active countdown. If no countdown is active, it functions as a standard ON/OFF switch.
4.3 Applications
This timer is suitable for a variety of applications, including:
- Indoor and outdoor lighting
- Exhaust fans
- Heaters
- Other compatible appliances

An image illustrating various applications for the timer, including controlling indoor/outdoor lights, ceiling fans, and exhaust fans.
5. Maintenance
The myTouchSmart timer requires minimal maintenance. Follow these guidelines:
- Cleaning: Disconnect power at the circuit breaker before cleaning. Wipe the surface with a soft, damp cloth. Do not use harsh chemicals or abrasive cleaners.
- Inspection: Periodically check for any loose connections or damage to the switch. If any damage is observed, discontinue use and consult a qualified electrician.
6. Troubleshooting
If you experience issues with your myTouchSmart timer, refer to the following common problems and solutions:
| Problem | Possible Cause | Solution |
|---|---|---|
| Timer does not turn on/off. | No power to the switch; Incorrect wiring (Line/Load reversed); Loose connections. | Check circuit breaker. Verify wiring connections (Line to Line, Load to Load, Neutral, Ground). Ensure all wires are securely fastened. |
| Countdown does not activate. | Button not fully pressed; Faulty unit. | Ensure the desired countdown button is pressed firmly until the blue LED illuminates. If issue persists, contact customer support. |
| LED indicators not working. | No power; Unit malfunction. | Check power supply. If the timer functions but LEDs do not, contact customer support. |
| Intermittent operation. | Loose wiring; Overload. | Check all wiring connections for tightness. Ensure the connected load does not exceed the timer's electrical ratings. |
If troubleshooting steps do not resolve the issue, please contact customer support.
7. Specifications
| Feature | Specification |
|---|---|
| Model Number | 40953 |
| Operation Mode | Automatically, Off, Push Button |
| Current Rating | 15 Amps |
| Operating Voltage | 120 VAC, 60 Hz |
| Resistive Load | 15A |
| Tungsten Load | 1200W |
| Motor Rating | 1/2 HP |
| Compatible Bulbs | LED, CFL, Incandescent, Halogen |
| Mounting Type | Wall Mount |
| Dimensions (L x W x H) | 2.75 x 4.85 x 6.85 inches |
| Item Weight | 5.9 ounces |
| Neutral Wire | Required |
| Included Components | In-Wall Timer, White/Light Almond Door Panels |
8. Warranty and Support
For warranty information and technical support, please refer to the manufacturer's official website or contact their customer service department. Keep your purchase receipt as proof of purchase.
Manufacturer: myTouchSmart
UPC: 030878409537
Website: www.mytouchsmart.com (Please check the official website for the most current support information.)


