Product Overview
The OLIGHT PL-Mini 2 Valkyrie is a highly compact and powerful weaponlight designed for tactical applications. It features a 600-lumen output, magnetic USB charging, and an adjustable rail system for broad compatibility with various firearms, including subcompacts. Its robust aluminum construction ensures durability and water resistance.

Image: The OLIGHT PL-Mini 2 Valkyrie, a compact black weaponlight with its adjustable rail mount visible.
Key Features
- Adjustable Rail (Authorized Patent): Slide the rail adapter freely to fix the light in the desired position for your specific firearm, ensuring compatibility with most pistols, including subcompacts.
- Luxe Performance: Delivers 600 lumens with a 100-meter throw, offering performance comparable to mid-sized weaponlights.
- Convenient Magnetic Charging: Charges by connecting the light directly with the included magnetic USB cable, eliminating the need to remove a battery or use a port that may wear out.
- GL and 1913 Rails Included: Compatible with both GL (insert already installed) and Picatinny sized rails (insert included in the package).
- Install in One Second: Quick installation and removal within one second; ultra-compact and lightweight design.
Specifications
| Brand | OLIGHT |
| Model | PL-Mini 2 Valkyrie (AM-OL-PLmini 2-Black) |
| Special Feature | Magnetic, Lightweight, Rechargeable, Compact, Adjustable |
| Color | Black |
| Power Source | Battery Powered |
| Light Source Type | LED |
| Material | Aluminum |
| White Brightness | 600 Lumens |
| Light Path Distance | 100 Meters |
| Runtime | 1 hour and 30 minutes |
| Water Resistance Level | Waterproof |
| Item Weight | 2.56 ounces |
| Product Dimensions | 2.07"D x 1.26"W x 1.28"H |
Setup
The PL-Mini 2 Valkyrie is designed for quick and tool-free installation. It comes with both GL and 1913 Picatinny rail inserts to ensure compatibility with a wide range of firearms.
Attaching to a Firearm
- Select Rail Insert: The GL insert is pre-installed. If your firearm uses a 1913 Picatinny rail, replace the GL insert with the included 1913 insert.
- Open Clamp: Lift the quick-release lever on the side of the weaponlight to open the rail clamp.
- Position Light: Slide the weaponlight onto the accessory rail of your firearm. The adjustable sliding rail allows you to position the light forward or backward to achieve optimal placement relative to the trigger guard.
- Secure Clamp: Once positioned, push the quick-release lever down firmly until it locks into place. This secures the light to the rail without the need for additional tools.

Image: Diagram illustrating the adjustable sliding rail feature, showing the light moving forward and backward on a rail.

Image: Technical drawing showing the required installation space on a firearm rail for the PL-Mini 2, which is between 1.023 in and 1.614 in.
Operating
The PL-Mini 2 Valkyrie features ambidextrous switches for easy activation and mode selection.
Light Activation
- Momentary On: Press and hold either of the ambidextrous switches. The light will remain on as long as the switch is held, and turn off upon release.
- Constant On/Off: Quickly press and release either switch to toggle the light on or off.

Image: Close-up view of the ambidextrous switches on the rear of the PL-Mini 2, indicating where to push down to activate.
Charging
The PL-Mini 2 features a convenient magnetic charging system.
- Connect Charger: Attach the magnetic USB charging cable to the charging port located on the bottom of the weaponlight. The magnetic connection ensures proper alignment.
- Charging Indicator: A small indicator light on the weaponlight will turn red when the battery is below 10%, signaling that charging is required. The light will change color (typically green) when fully charged.
- Charging Flexibility: The magnetic charging system allows the light to be charged while still mounted on the firearm, providing added convenience.

Image: The PL-Mini 2 connected to its magnetic USB charging cable, highlighting the magnetic charging system.

Image: A diagram showing the low power warning indicator (red light) on the PL-Mini 2, which illuminates when power is below 10%.
Maintenance
To ensure the longevity and optimal performance of your OLIGHT PL-Mini 2 Valkyrie, follow these maintenance guidelines:
- Cleaning: Regularly clean the lens and body of the weaponlight with a soft, clean cloth. Avoid using abrasive materials or harsh chemicals that could damage the finish or optics.
- Charging Port: Keep the magnetic charging port clean and free of debris to ensure a reliable connection.
- Storage: Store the weaponlight in a cool, dry place when not in use. If storing for extended periods, ensure the battery is partially charged (around 50%) to prolong battery life.
- Water Resistance: The PL-Mini 2 is waterproof. However, after exposure to water, especially saltwater, it is recommended to wipe it dry to prevent corrosion.
Troubleshooting
If you encounter issues with your PL-Mini 2 Valkyrie, consider the following common troubleshooting steps:
- Light Not Turning On:
- Check battery level: If the low power indicator is red, charge the device.
- Ensure switches are clean and free of obstruction.
- Charging Issues:
- Verify the magnetic charging cable is securely attached and the charging port is clean.
- Try a different USB power source.
- Loose Mounting:
- Ensure the quick-release lever is fully engaged and locked.
- Confirm the correct rail insert (GL or 1913) is being used for your firearm.
For further assistance, please refer to the Warranty & Support section.
Compatibility
The OLIGHT PL-Mini 2 Valkyrie is designed for broad compatibility with various firearms. Below are tables detailing compatible builds and holster options.
Compatible Firearm Builds

Image: A comprehensive table listing various firearm brands and models compatible with the PL-Mini 2, including GL, Sig Sauer, Walther, CZ, Taurus, Smith & Wesson, and Springfield Armory.
Holster Compatibility
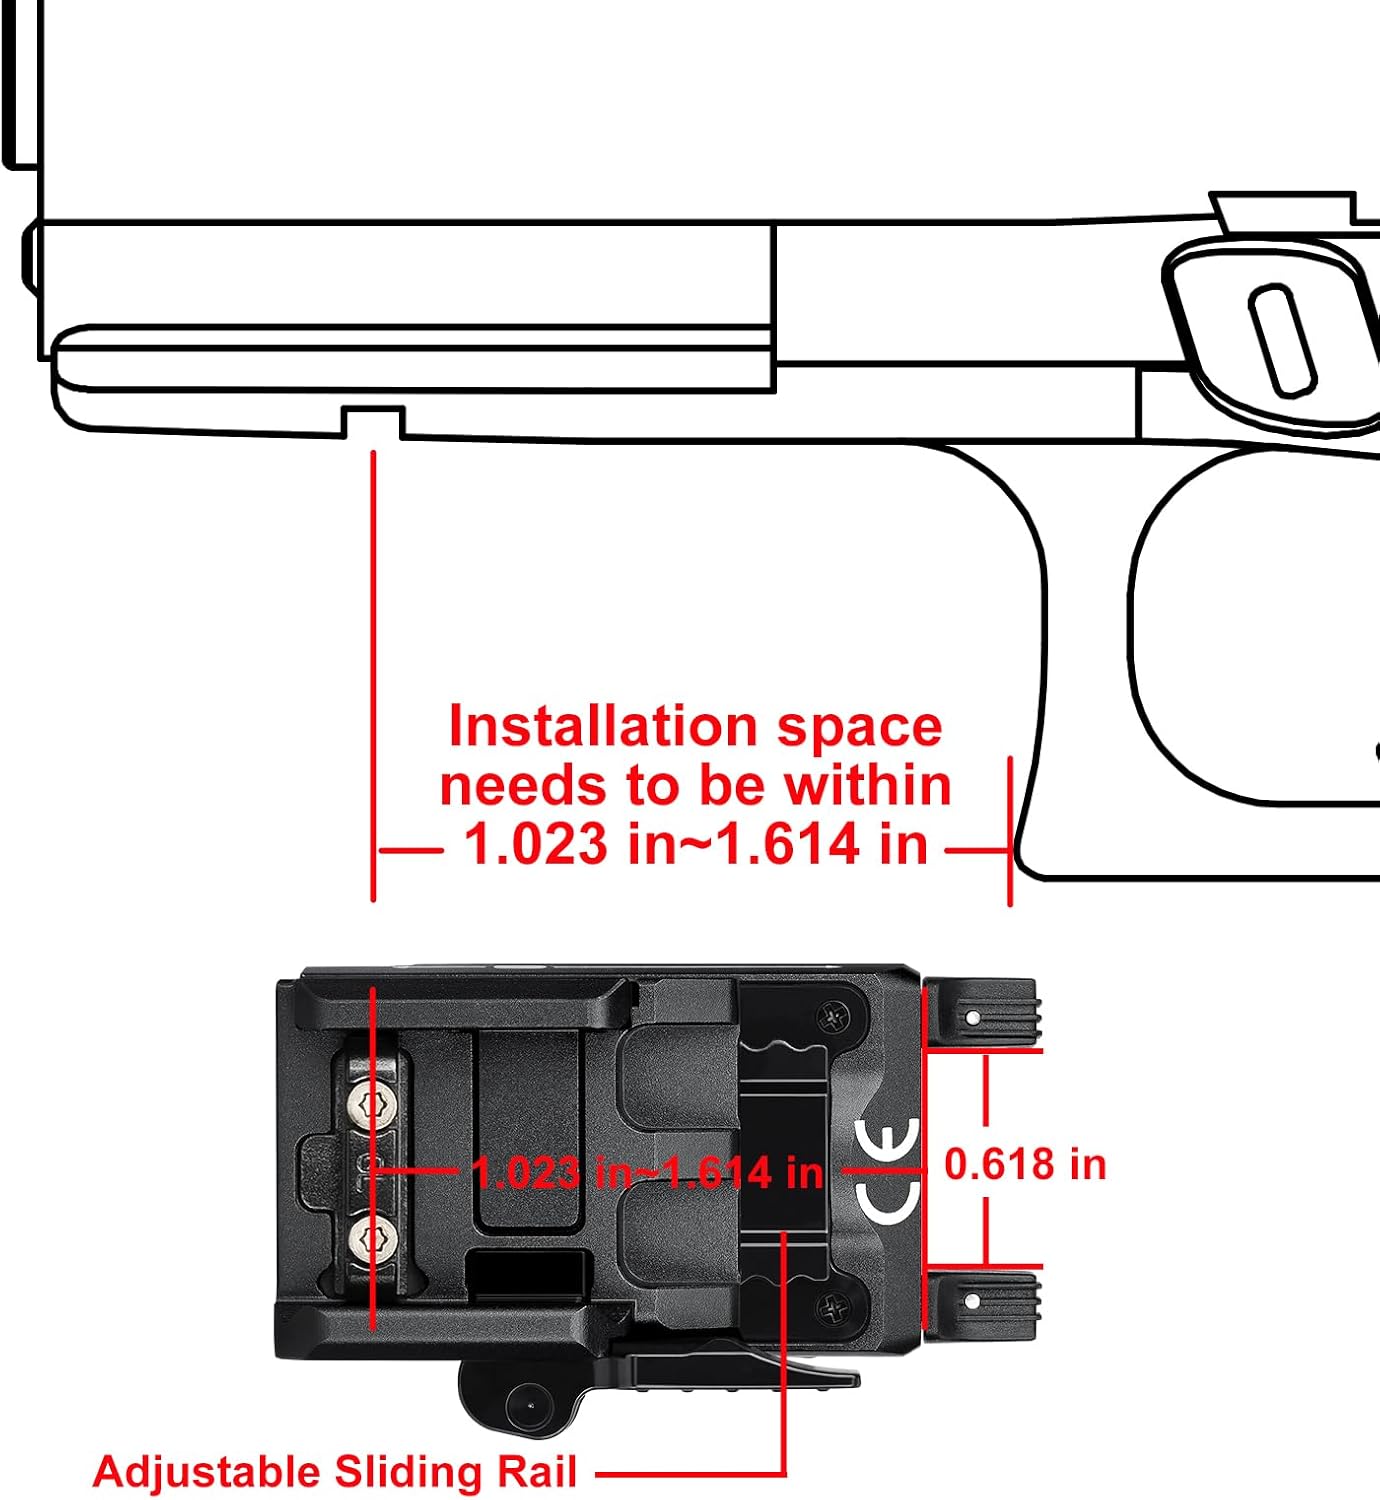
Image: A table showing holster options from Alien Gear and Crossbreed compatible with firearms equipped with the PL-Mini 2, specifying models for Glock, Sig Sauer, and Smith & Wesson.
Official Product Videos
Watch these official videos from OLIGHT for more information on the PL-Mini 2 Valkyrie.
OLIGHT PL-MINI 2 New
Video: An official product video showcasing the new features and design of the OLIGHT PL-MINI 2.
Warranty & Support
OLIGHT provides a lifetime warranty for products purchased after January 1st, 2023. For detailed warranty information and support, please refer to the official OLIGHT website or contact customer service.
- Warranty Type: Lifetime warranty (for products purchased after January 1st, 2023).
- User Manual (PDF): Download PDF Manual
- OLIGHT Store: Visit the Official OLIGHT Store on Amazon


