
1. Introduction
The Petwant PF-102 Automatic Pet Feeder is designed to provide scheduled and portion-controlled meals for your cats and dogs. This device helps maintain a consistent feeding routine, promoting healthy eating habits for your pet. Please read this manual thoroughly before operating the feeder to ensure proper use and maintenance.
2. Safety Instructions
- Always place the feeder on a flat, stable surface to prevent tipping.
- Do not immerse the main unit in water or any other liquid.
- This appliance is intended for indoor use only.
- Keep out of reach of children and pets when not in use or during assembly.
- Use only dry pet food with a kibble size appropriate for the feeder's dispenser mechanism.
- Ensure the power adapter cable is not chewed by pets. If damaged, discontinue use immediately.
- Unplug the feeder before cleaning.
3. Package Contents
Please check the package to ensure all items are present:
- Petwant PF-102 Automatic Pet Feeder Main Unit
- Food Tray
- Power Adapter
- User Manual (this document)
4. Product Diagram
Familiarize yourself with the main components of your Petwant PF-102 feeder:
- Food Hopper: Top compartment for storing dry pet food.
- Lid: Covers the food hopper, often with a locking mechanism.
- Control Panel: Buttons and display for setting schedules and functions.
- Food Outlet: Where food dispenses from the hopper.
- Food Tray: Detachable tray where dispensed food collects.
- Power Port: For connecting the power adapter.
- Battery Compartment: For backup battery power (if applicable).

Image: The main unit of the Petwant PF-102 Automatic Pet Feeder, showing its overall design and components.
5. Setup
5.1 Attaching the Food Tray
- Locate the food tray and the main feeder unit.
- Align the tray with the base of the feeder.
- Gently slide the tray into place until it clicks securely. Ensure it is firmly attached to prevent accidental detachment by your pet.
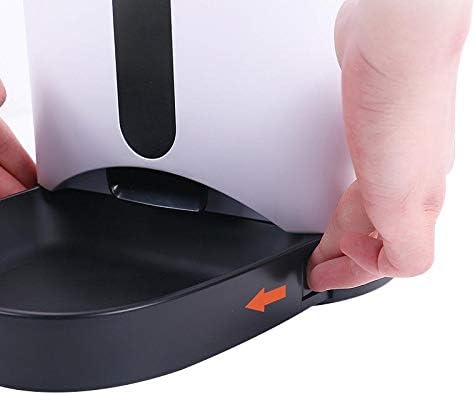
Image: A close-up view of hands attaching the food tray to the base of the Petwant PF-102 automatic pet feeder, indicating the correct alignment and sliding motion.
5.2 Powering the Feeder
The feeder can be powered by the included power adapter or by backup batteries (not included).
- AC Power: Plug the power adapter into the feeder's power port and then into a standard wall outlet.
- Battery Backup: For power outages, install 3 D-size alkaline batteries (not included) into the battery compartment at the bottom of the feeder. This ensures continuous operation even if AC power is lost.
5.3 Filling the Food Hopper
- Press the lid release button (if present) or gently lift the lid to open the food hopper.
- Pour dry pet food into the hopper. Do not overfill.
- Close the lid securely to keep food fresh and prevent pets from accessing it.
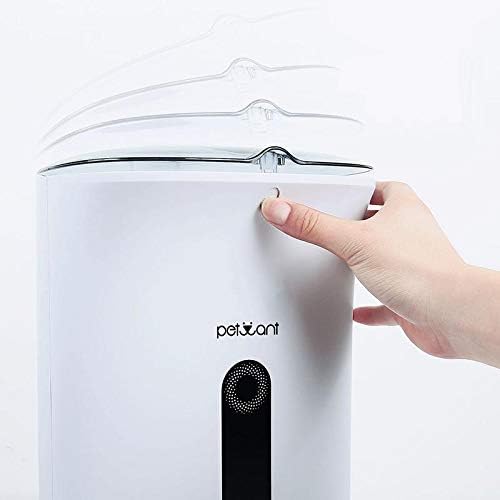
Image: A hand pressing a button to open the top lid of the Petwant PF-102 automatic pet feeder, revealing the food hopper opening.
6. Operating Instructions
6.1 Setting the Current Time
Refer to the control panel and display. Typically, there will be a 'SET' or 'CLOCK' button. Press and hold it, then use 'UP'/'DOWN' or arrow buttons to adjust the hour and minute. Press 'SET' again to confirm.
6.2 Programming Feeding Schedules
The PF-102 allows you to set multiple feeding times per day and customize portion sizes.
- Enter Program Mode: Press the 'PROGRAM' or 'MEAL' button. The display will show 'Meal 1' or similar.
- Set Meal Time: Use 'UP'/'DOWN' buttons to set the desired feeding time for Meal 1. Press 'SET' to confirm.
- Set Portion Size: After setting the time, the display will prompt for portion size. Use 'UP'/'DOWN' to select the number of portions (e.g., 1-9 portions). Each portion typically corresponds to a specific volume of food. Press 'SET' to confirm.
- Repeat for Additional Meals: Repeat steps 2 and 3 for Meal 2, Meal 3, and so on, as supported by your feeder model.
- Exit Program Mode: Once all desired meals are set, press 'PROGRAM' or 'EXIT' to save settings and return to the main display.
6.3 Manual Feeding
To dispense food immediately outside of scheduled times, press the 'MANUAL' or 'FEED' button. This will typically dispense one portion. Press multiple times for additional portions.
7. Maintenance
7.1 Cleaning the Feeder
Regular cleaning is essential for hygiene and proper operation. The manufacturer recommends Hand Wash Only for detachable parts.
- Unplug the feeder from the power outlet and remove any batteries.
- Empty any remaining food from the hopper.
- Detach the food tray. Wash the food tray and food hopper (if detachable) with warm, soapy water. Rinse thoroughly.
- Wipe the main unit with a damp cloth. Do not submerge the main unit in water.
- Ensure all parts are completely dry before reassembling and refilling with food.
7.2 Food Storage
Store dry pet food in a cool, dry place. Ensure the feeder's lid is always securely closed to maintain food freshness and prevent pests.
8. Troubleshooting
| Problem | Possible Cause | Solution |
|---|---|---|
| Feeder not dispensing food. | No power; food jammed; hopper empty; incorrect settings. | Check power connection/batteries. Clear any food blockages. Refill hopper. Verify feeding schedule and portion settings. |
| Food portions are inconsistent. | Kibble size too large/small; food jammed; feeder not level. | Ensure kibble is appropriate size. Clear blockages. Place feeder on a level surface. |
| Display is blank. | No power; batteries depleted. | Check power adapter connection. Replace batteries if using battery backup. |
| Pet cannot access food. | Food tray not attached correctly. | Ensure the food tray is securely attached to the main unit. |
9. Specifications
| Feature | Detail |
|---|---|
| Brand | Petwant |
| Model | PF-102 |
| Target Species | Cat, Dog |
| Operation Mode | Automatic |
| Style | Modern |
| Care Instructions | Hand Wash Only |
| Recommended for | Medium Breeds, Small Breed |
| Unit Count | 1.0 Count |
10. Warranty and Support
For warranty information or technical support, please refer to the documentation included with your purchase or contact Petwant customer service through their official website. Keep your purchase receipt as proof of purchase for warranty claims.


