
1. Introduction
Thank you for purchasing the Emerson ER100116 Dual Alarm Clock Radio. This device combines a digital FM radio, dual alarm clock, Bluetooth speaker, and a USB charging port, all presented on a large mirror display. This manual provides detailed instructions for setup, operation, and maintenance to ensure optimal performance and longevity of your product.

Figure 1: The Emerson ER100116 Dual Alarm Clock Radio, showcasing its large mirror display, top controls, and a smartphone connected for USB charging. The display shows '12:38 AM' and 'SAT'.
2. Important Safety Information
- Read all instructions before operating the appliance.
- Keep these instructions for future reference.
- Do not use this apparatus near water.
- Clean only with a dry cloth.
- Do not block any ventilation openings. Install in accordance with the manufacturer's instructions.
- Do not install near any heat sources such as radiators, heat registers, stoves, or other apparatus (including amplifiers) that produce heat.
- Protect the power cord from being walked on or pinched, particularly at plugs, convenience receptacles, and the point where they exit from the apparatus.
- Only use attachments/accessories specified by the manufacturer.
- Unplug this apparatus during lightning storms or when unused for long periods of time.
- Refer all servicing to qualified service personnel. Servicing is required when the apparatus has been damaged in any way, such as power-supply cord or plug is damaged, liquid has been spilled or objects have fallen into the apparatus, the apparatus has been exposed to rain or moisture, does not operate normally, or has been dropped.
3. Package Contents
Please check that the following items are included in your package:
- Emerson ER100116 Dual Alarm Clock Radio
- AC Power Adapter
- User Manual (this document)
4. Product Overview
4.1 Top Panel Controls
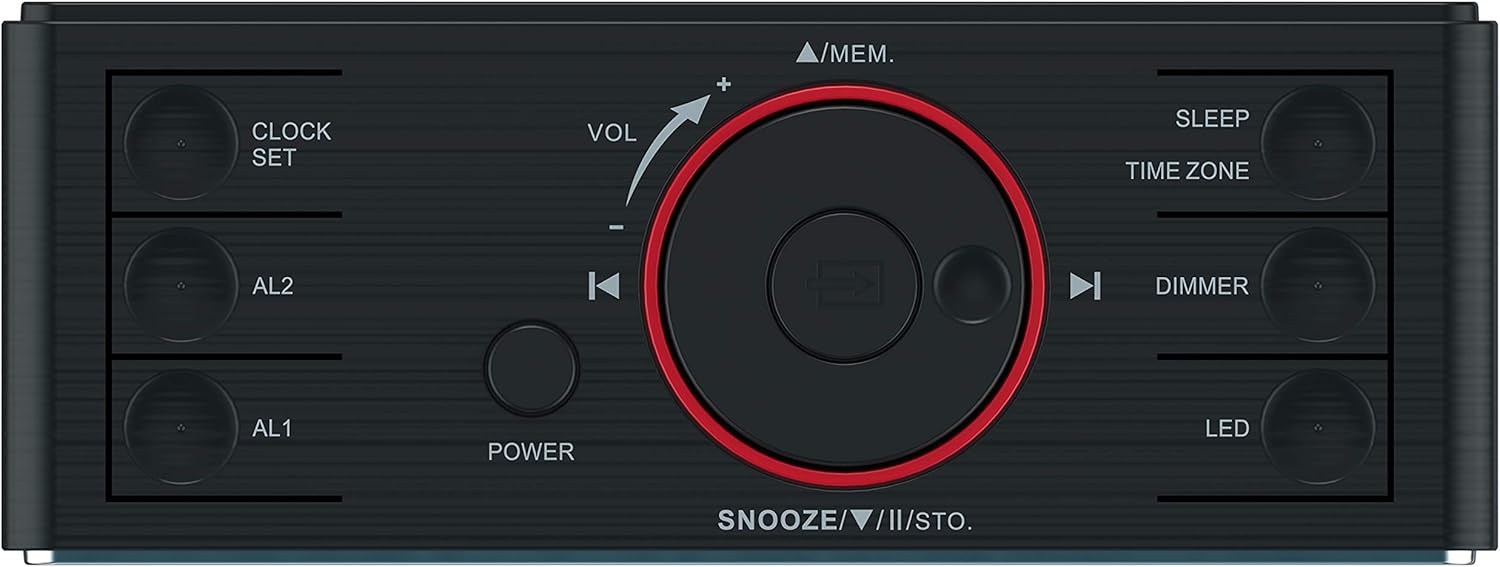
Figure 2: Detailed view of the top control panel, showing buttons for CLOCK SET, AL1, AL2, POWER, VOL, SNOOZE/II/STO, SLEEP, TIME ZONE, DIMMER, and LED.
- CLOCK SET: Press to set the time.
- AL1 / AL2: Press to set Alarm 1 or Alarm 2.
- POWER: Press to turn the unit on or off.
- VOL +/-: Adjusts the volume.
- ▲ / MEM.: In FM mode, press to tune up. Press and hold to auto-scan. In time setting mode, adjusts value up. Press to save FM presets.
- ▼ / MEM.: In FM mode, press to tune down. Press and hold to auto-scan. In time setting mode, adjusts value down. Press to save FM presets.
- SNOOZE / ►► / STO.: Press to snooze an alarm. In FM mode, press to skip to next preset. Press and hold to store current FM station.
- SLEEP: Activates or adjusts the sleep timer.
- TIME ZONE: Adjusts the time zone.
- DIMMER: Adjusts the display brightness (4 levels).
- LED: Controls the LED decor light.
4.2 Rear Panel Connections
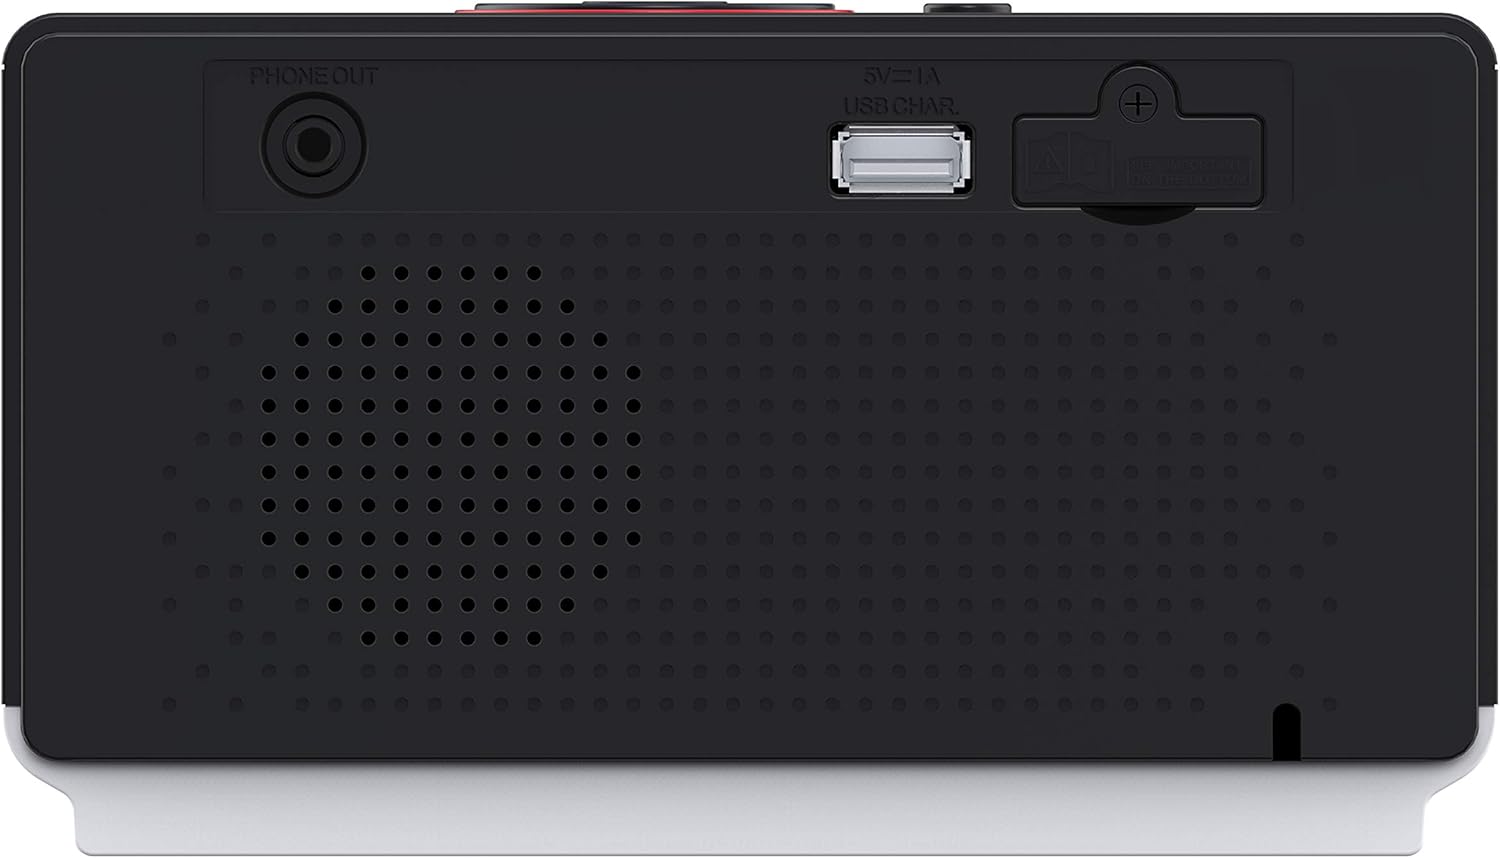
Figure 3: Rear panel connections, including the 'PHONE OUT' (earphone jack) and '5V=1A USB CHAR' (USB charging port).
- PHONE OUT: 3.5mm earphone jack for private listening.
- 5V=1A USB CHAR: USB port for charging external devices (e.g., smartphones).
- DC IN: Power input for the AC adapter.
5. Setup
5.1 Power Connection
- Insert the small end of the AC power adapter into the DC IN jack on the rear of the unit.
- Plug the other end of the AC power adapter into a standard wall outlet.
- The unit will automatically set itself to the correct year, month, date, day, and time upon initial power-up and after any power interruption.
5.2 Time Zone Adjustment
If the automatically set time is incorrect due to your location's time zone, you can adjust it:
- Press the TIME ZONE button repeatedly to cycle through available time zones until the correct time is displayed.
6. Operating Instructions
6.1 Setting the Clock Manually
While the unit features automatic time setting, you can manually adjust the time if needed:
- Press and hold the CLOCK SET button until the display flashes.
- Use the ▲ / ▼ buttons to adjust the hour. Press CLOCK SET to confirm.
- Use the ▲ / ▼ buttons to adjust the minute. Press CLOCK SET to confirm.
- Continue to set the year, month, and date using the ▲ / ▼ buttons and confirming each step with CLOCK SET.
6.2 Setting Alarms (AL1 & AL2)
The unit features two independent alarms (AL1 and AL2).
- Press and hold the AL1 or AL2 button until the alarm time flashes.
- Use the ▲ / ▼ buttons to adjust the alarm hour. Press the respective AL button to confirm.
- Use the ▲ / ▼ buttons to adjust the alarm minute. Press the respective AL button to confirm.
- Use the ▲ / ▼ buttons to select the alarm source (Buzzer, FM Radio, or Bluetooth). Press the respective AL button to confirm.
- Use the ▲ / ▼ buttons to select the alarm mode: Every Day, Weekdays Only, or Weekends Only. Press the respective AL button to confirm and exit alarm setting.
To turn an alarm on or off, press the AL1 or AL2 button briefly. The alarm icon will appear or disappear on the display.
When an alarm sounds, press the SNOOZE button to temporarily silence it for 9 minutes. To turn off the alarm completely, press the POWER button.
6.3 FM Radio Operation
The unit has a digital tuning FM radio with 20 station memories.
- Press the POWER button to turn on the unit.
- Press the MODE button (if available, or cycle through sources) until 'FM' is displayed.
- Manual Tuning: Press the ▲ / ▼ buttons briefly to tune the frequency step by step.
- Auto Scan: Press and hold the ▲ / ▼ buttons to automatically scan for the next available station.
- Storing Presets: Tune to your desired station. Press and hold the SNOOZE / STO. button until a preset number flashes. Use ▲ / ▼ to select the preset number, then press SNOOZE / STO. again to save.
- Recalling Presets: Press the SNOOZE / ►► button briefly to cycle through stored preset stations.
6.4 Bluetooth Speaker Pairing
Connect your Bluetooth-enabled device to the ER100116 to stream audio wirelessly.
- Press the POWER button to turn on the unit.
- Press the MODE button (if available, or cycle through sources) until 'BT' (Bluetooth) is displayed and flashing, indicating pairing mode.
- On your mobile device, enable Bluetooth and search for new devices. Select 'ER100116' from the list.
- Once paired, the 'BT' indicator will stop flashing and remain solid. You can now play audio from your device through the clock radio.
6.5 USB Charging
The unit features a USB port for charging your mobile devices.
- Connect your mobile device's USB charging cable to the '5V=1A USB CHAR' port on the rear of the ER100116.
- Ensure the clock radio is powered on and connected to an AC outlet.
- Charging will begin automatically. Note that this port is for charging only and does not support data transfer.
6.6 Display Dimmer
Adjust the brightness of the LED display to your preference.
- Press the DIMMER button repeatedly to cycle through 4 brightness levels (High, Medium, Low, Off).
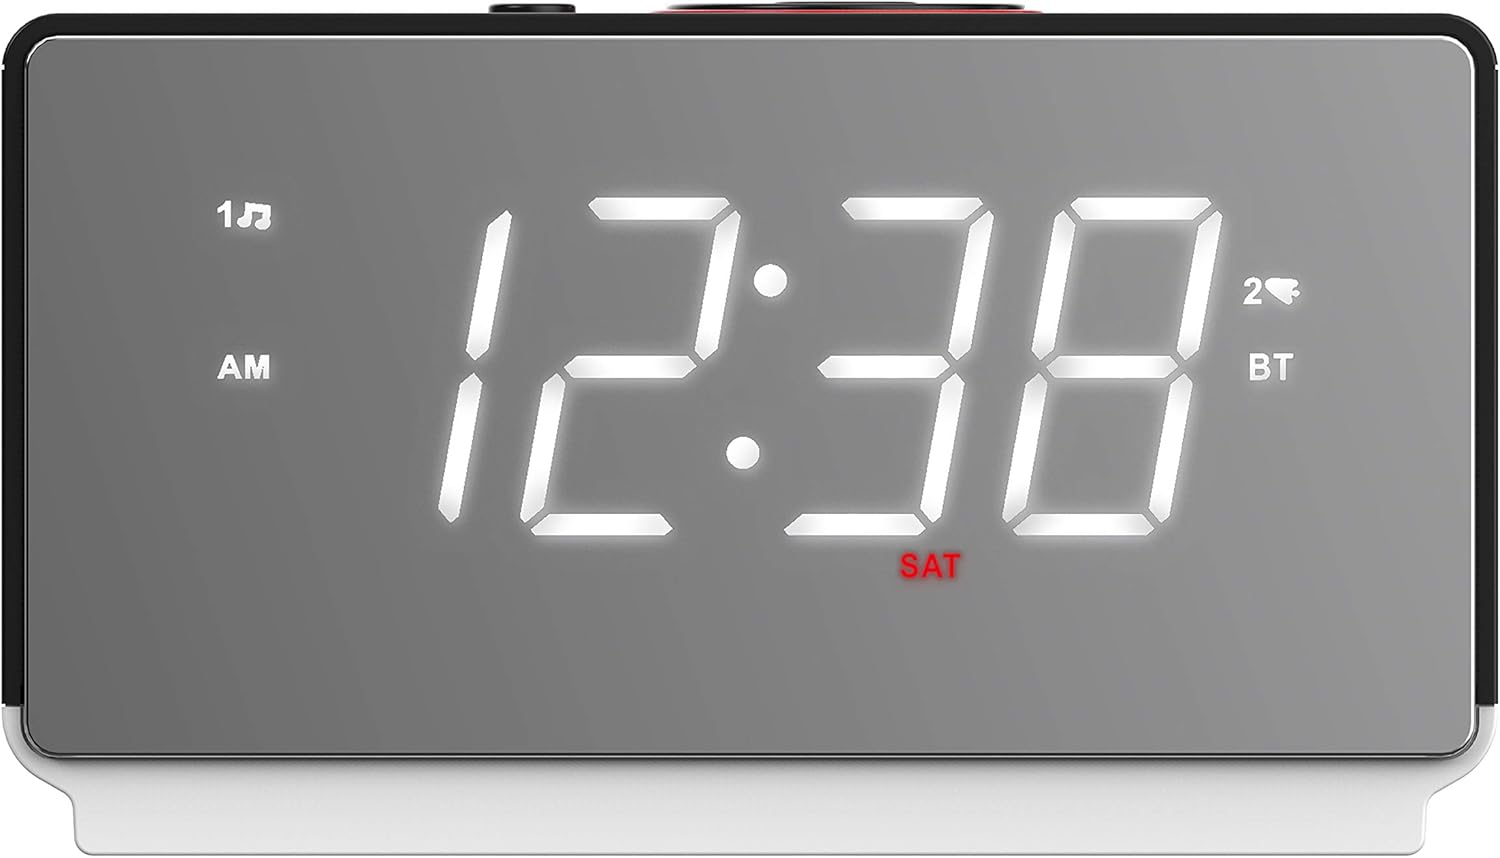
Figure 4: The large, clear mirror display showing the time and day of the week.
6.7 LED Decor Light
The unit features an integrated LED decor light.
- Press the LED button to turn the decor light on or off.
6.8 Earphone Jack Usage
For private listening, connect headphones to the unit.
- Plug any standard 3.5mm stereo earphones into the 'PHONE OUT' jack on the rear of the unit.
- The sound will automatically switch from the speaker to the earphones.
6.9 Sleep Timer
The sleep timer allows the radio or Bluetooth audio to play for a set duration before automatically turning off.
- While the radio or Bluetooth is playing, press the SLEEP button repeatedly to cycle through available sleep times (e.g., 15, 30, 60, 90 minutes, or OFF).
- The unit will automatically turn off after the selected time has elapsed.
7. Maintenance
7.1 Cleaning
- Always unplug the unit from the power outlet before cleaning.
- Use a soft, dry cloth to clean the exterior surfaces.
- Do not use abrasive cleaners, waxes, or solvents as these may damage the finish.
- For the mirror display, use a soft, lint-free cloth specifically designed for electronics screens.
8. Troubleshooting
| Problem | Possible Cause | Solution |
|---|---|---|
| No power | Power adapter not connected or outlet is not active. | Ensure the AC adapter is securely plugged into the unit and a working wall outlet. |
| No sound from radio/Bluetooth | Volume is too low; incorrect source selected; device not paired (Bluetooth). | Increase volume. Ensure FM or BT source is selected. Re-pair Bluetooth device. Check if earphones are plugged in. |
| Poor FM reception | Unit's position; interference. | Adjust the position of the unit. Move away from other electronic devices that may cause interference. |
| Alarm does not sound | Alarm not activated; alarm volume too low; incorrect alarm mode. | Ensure the alarm icon is visible on the display. Increase alarm volume. Check if the alarm mode (e.g., Weekdays Only) matches the current day. |
| USB charging not working | Cable issue; device not compatible; unit not powered. | Try a different USB cable. Ensure the clock radio is powered on. Some devices may draw too much power or be incompatible. |
9. Specifications
- Brand: Emerson
- Model: ER100116
- Display Type: Digital LED Mirror Display
- Display Size: 1.4 inches
- Power Source: Corded Electric
- Radio: Digital Tuning FM Radio (20 station memories)
- Alarms: Dual Alarm (Every Day, Weekdays Only, Weekends Only modes)
- USB Output: 1A for mobile charging
- Connectivity: Bluetooth Speaker, 3.5mm Earphone Jack
- Special Features: 4-level Dimmer, LED Decor Light, Automatic Time Setting, Time Zone Adjustment
- Room Type: Bedroom
10. Warranty and Support
Emerson products are designed for reliability and performance. For specific warranty information, please refer to the warranty card included with your purchase or visit the official Emerson website. If you encounter any issues or require technical assistance, please contact Emerson customer support through the details provided on the product packaging or their official website.
Please retain your proof of purchase for warranty claims.


