Introduction
This instruction manual provides detailed guidance for the safe and proper installation and operation of your USX MOUNT XML006-24K Full Motion TV Wall Mount. This mount is designed to securely hold 42-85 inch televisions with VESA patterns ranging from 200x100mm to 600x400mm and a maximum weight capacity of 110 lbs (50 kg). It is compatible with 16, 18, or 24 inch wood stud spacing, as well as concrete walls.
Please read this manual thoroughly before beginning installation to ensure correct assembly and to prevent potential damage or injury. Keep this manual for future reference.
Safety Information
WARNING: Failure to read and follow these instructions may result in serious personal injury, property damage, or voiding of your warranty.
- Do not install this product into drywall alone. It must be mounted to wood studs or a solid concrete wall.
- Ensure the wall structure can safely support the combined weight of the mount and your television.
- Verify your TV's VESA pattern and weight are within the specified limits of this mount.
- Use all provided hardware. Do not substitute parts.
- If you are unsure about any part of the installation process, consult a qualified professional.
- Keep children and pets away during installation.
Package Contents
Verify that all components are present and undamaged before beginning installation. If any parts are missing or defective, contact USX MOUNT customer support.
- Wall Plate Assembly
- TV Brackets (2 pieces)
- Mounting Hardware Kit (various screws, washers, spacers, concrete anchors if requested)
- Bubble Level
- Mounting Template
- Cable Ties (3 pieces)

Image: Overview of the USX MOUNT XML006-24K Full Motion TV Wall Mount and included accessories.
Specifications
| Model Number | XML006-24K |
| Compatible TV Sizes | 42 - 85 inches |
| Maximum Load Capacity | 110 lbs (50 kg) |
| VESA Compatibility | 200x100mm to 600x400mm |
| Wall Compatibility | 16", 18", 24" Wood Studs, Solid Concrete Wall |
| Tilt Angle | +5° / -15° |
| Swivel Angle | +/- 45° |
| Level Adjustment | +/- 4° |
| Extension from Wall | 2.58 inches (retracted) to 16.67 inches (extended) |
| Material | Alloy Steel |
| UL Listed | Yes |
Setup and Installation
Before you begin, gather the necessary tools (e.g., drill, stud finder, screwdriver, measuring tape) and ensure you have all package contents.
1. Pre-Installation Checks
- Verify TV Size and Weight: Ensure your TV is between 42 and 85 inches and weighs no more than 110 lbs (50 kg).

Image: Confirming TV size (42-85 inches) and weight (max 110 lbs).
- Check VESA Pattern: Locate the four mounting holes on the back of your TV and measure the horizontal and vertical distance between them. This mount supports VESA patterns from 200x100mm to 600x400mm.

Image: Guide to checking your TV's VESA mounting pattern.
- Identify Cable Outlets: Ensure the mounting brackets will not block any essential cable outlets on your TV.

Image: Checking for potential cable outlet obstruction by the TV mount.
- Determine Wall Type: This mount is suitable for 16", 18", or 24" wood studs and solid concrete walls. Do not install on drywall alone. For concrete walls, specific concrete anchors are required (contact customer support if needed).

Image: Compatible wall types for installation.
2. Mounting the Wall Plate
- Locate Studs: Use a stud finder to accurately locate the edges and center of two adjacent wood studs. Mark the center of the studs. For concrete walls, mark your desired drilling locations.
- Position Template: Tape the mounting template to the wall at your desired TV height, ensuring it is level using the included bubble level.
- Drill Pilot Holes: Drill pilot holes at the marked locations. The size and depth of the pilot holes depend on your wall type and the lag bolts used. Refer to the hardware kit instructions for precise drilling specifications.
- Attach Wall Plate: Align the wall plate with the pilot holes and secure it to the wall using the provided lag bolts and washers. Tighten all bolts firmly, but do not overtighten.

Image: Installation of the wall plate onto wood studs or a concrete wall.
3. Attaching Brackets to TV
- Select Screws and Spacers: Choose the correct diameter and length of screws from the hardware kit that fit your TV's VESA holes. Use spacers if necessary to ensure the screws do not bottom out or to create clearance for cables.
- Attach TV Brackets: Carefully attach the two TV brackets to the back of your television using the selected screws and washers. Ensure the brackets are centered and securely fastened.
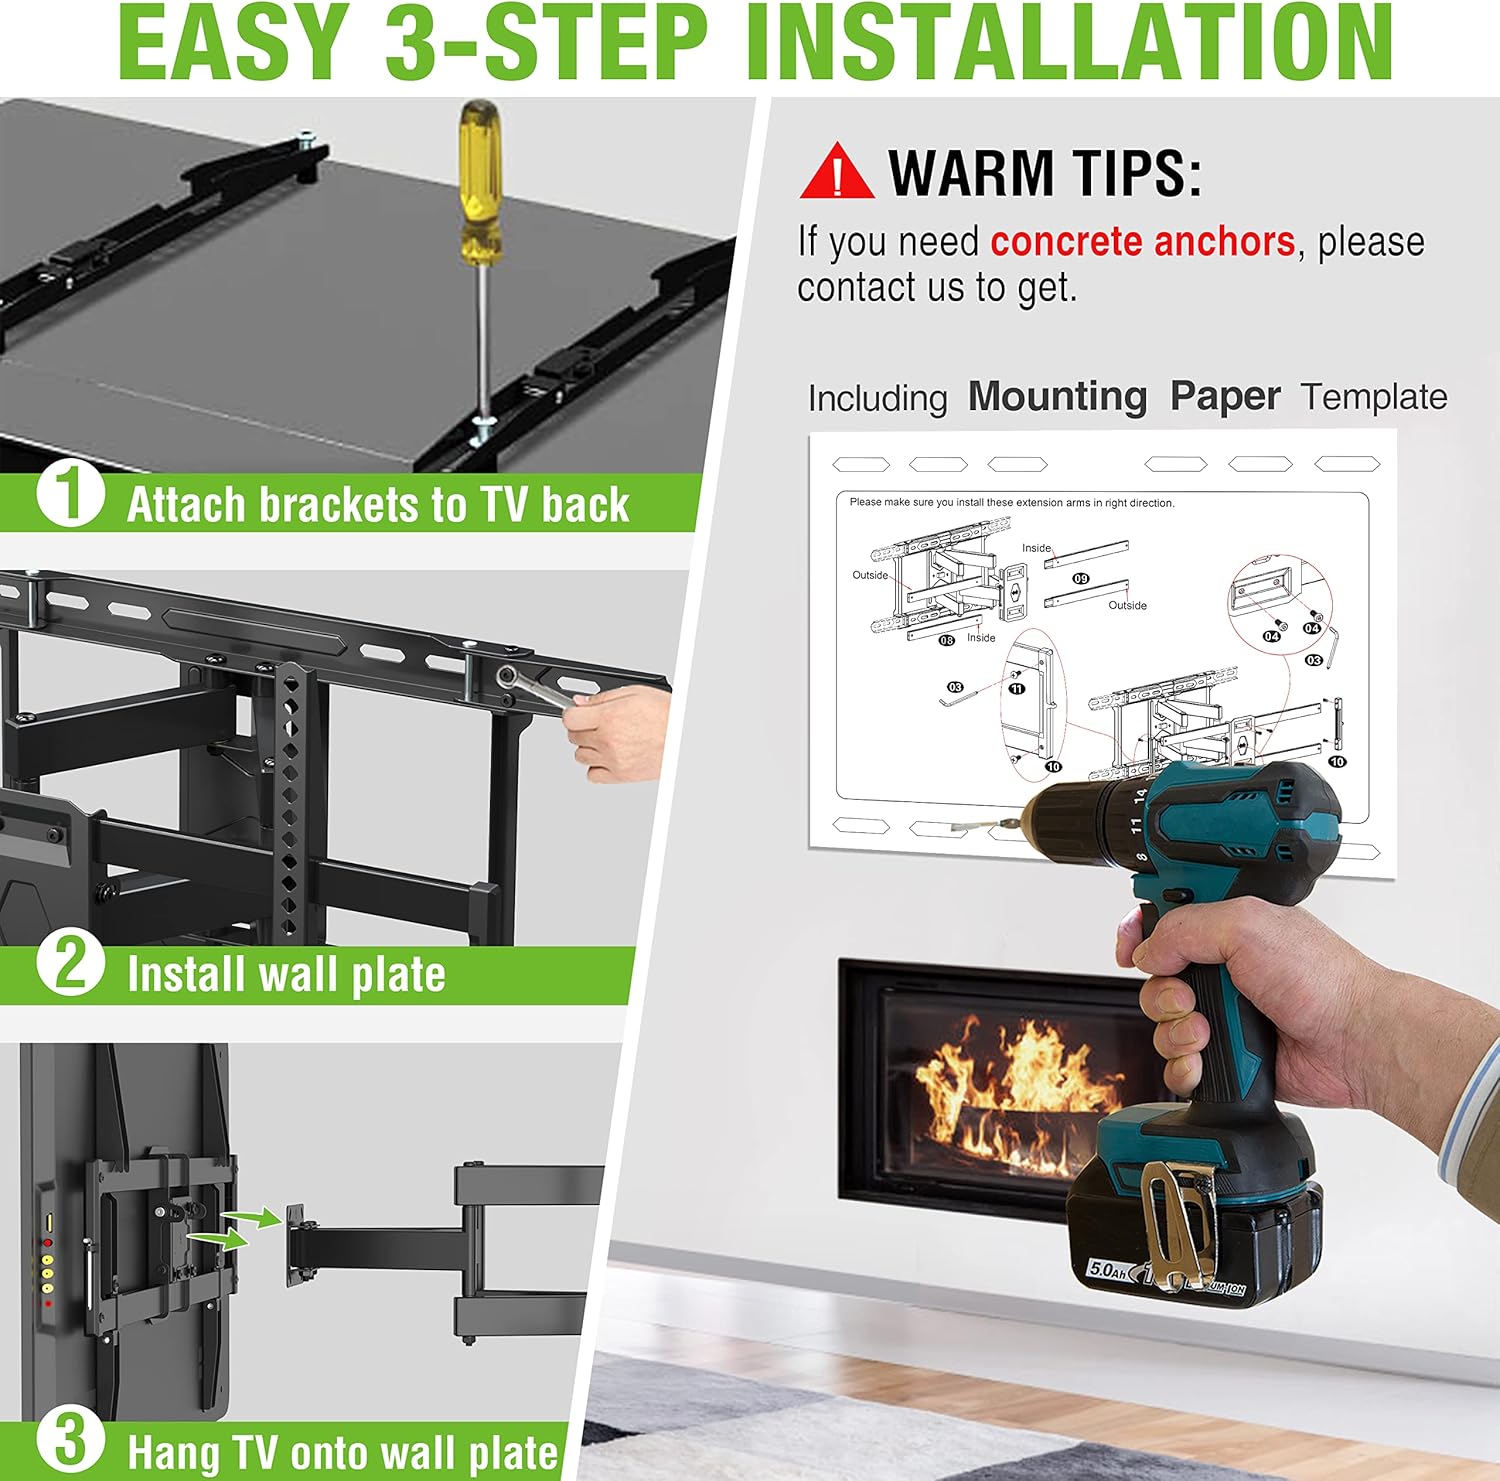
Image: Step 1: Attaching the TV brackets to the back of the television.
4. Hanging the TV
- Hang TV onto Wall Plate: With assistance, carefully lift the television and hook the TV brackets onto the wall plate. Ensure both brackets are properly seated on the wall plate.
- Secure TV: Locate the safety screws or locking mechanisms on the bottom of the TV brackets. Tighten these to secure the TV to the wall plate, preventing accidental dislodgement.
Image: Step 3: Hanging the TV onto the installed wall plate.
Operating Instructions
The USX MOUNT XML006-24K offers full motion capabilities for optimal viewing angles.
- Extension and Retraction: Gently pull the TV away from the wall to extend the articulating arms up to 16.67 inches. Push the TV back towards the wall to retract it to a low profile of 2.58 inches.

Image: Illustrating the extension and retraction range of the TV mount.
- Tilt Adjustment: The mount allows for a tilt range of +5° (upwards) to -15° (downwards). Loosen the tilt adjustment knobs on the TV brackets, adjust to your desired angle, and then re-tighten the knobs to secure the position.

Image: Demonstrating the tilt adjustment range of +5° to -15°.
- Swivel Adjustment: The articulating arms allow the TV to swivel up to +/- 45° left or right, depending on TV size and wall distance. Gently push the TV to the desired swivel angle.

Image: Illustrating the +/- 45° swivel capability of the mount.
- Level Adjustment: If the TV appears slightly unlevel after installation, you can adjust it by +/- 4°. Consult the specific mechanism on your mount for this adjustment, typically involving loosening and re-tightening screws on the TV brackets.

Image: Demonstrating the +/- 4° level adjustment feature.
Maintenance
- Periodically check all screws and connections to ensure they remain tight and secure.
- Clean the mount with a soft, dry cloth. Avoid abrasive cleaners or solvents.
- Do not exceed the maximum weight capacity of 110 lbs (50 kg).
Troubleshooting
| Problem | Possible Cause | Solution |
|---|---|---|
| TV is not level | Wall plate not level during installation; TV brackets not adjusted. | Use the level adjustment feature on the TV brackets to correct the angle. Recheck wall plate level if issue persists. |
| Mount feels unstable | Loose mounting bolts; incorrect wall type; overloaded mount. | Ensure all wall plate bolts are securely tightened. Verify wall type compatibility. Confirm TV weight is within limits. |
| TV cannot be tilted/swiveled | Tilt/swivel knobs are too tight; obstruction. | Loosen tilt adjustment knobs. Check for any cables or objects obstructing movement. |
| Missing hardware | Packaging error. | Contact USX MOUNT customer support for replacement parts. |
Customer Support
USX MOUNT provides a dedicated customer support team based in the US, available to assist you with any inquiries regarding the use or installation of your TV wall mount. Please do not hesitate to contact us if you require assistance or have questions.
For further assistance, please refer to the official USX MOUNT website or contact their customer service directly.


