Introduction
This manual provides instructions for the setup, operation, and maintenance of your Genie GT90-1 or AT90-1 compatible garage door remote. This remote is designed to work with Genie garage door openers that utilize a 12-dip switch coding system.
Important Safety Information
- Always keep garage door remotes out of reach of children.
- Operate the garage door only when it is in full view and free of obstructions.
- Ensure the garage door is fully closed before leaving the premises.
- Do not allow children to play with the remote control or the garage door opener.
Setup and Programming
To program your new remote, you will need to match its dip switch settings to those of your existing working remote or the garage door opener's receiver unit. The dip switches are located inside the remote control.
Step 1: Accessing the Dip Switches
- Locate the small screw on the back of the remote control.
- Using a small screwdriver, carefully remove the screw.
- Gently separate the two halves of the remote casing to reveal the internal circuit board and dip switches.

Image: The remote with its cover open, revealing the 12 dip switches and battery compartment.
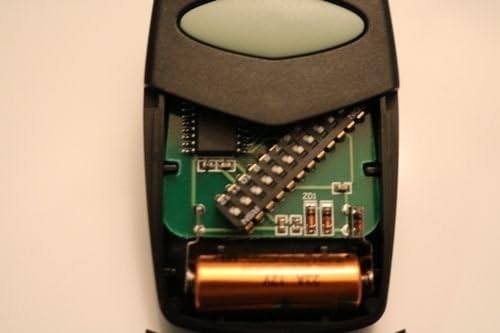
Image: A detailed view of the remote's interior, highlighting the 12 dip switches and the A23 battery.
Step 2: Matching Dip Switch Settings
- Identify the 12 dip switches on your existing working remote or the garage door opener's receiver unit. These switches can be in one of three positions: ON (+), OFF (0), or DOWN (-).
- Carefully adjust the 12 dip switches on your new remote to exactly match the pattern of your existing remote or opener. Use a small, non-metallic tool (like a toothpick) if necessary.
- Ensure each switch is firmly set in its corresponding position.
Step 3: Reassembling the Remote
- Carefully align the two halves of the remote casing.
- Reinsert and tighten the small screw on the back of the remote. Do not overtighten.
Operating Instructions
Once programmed, your remote is ready for use.
- Point the remote control towards the garage door opener.
- Press and hold the large button on the front of the remote.
- The garage door should begin to open or close. Release the button once the door starts moving.
- To stop the door mid-movement, press the button again.

Image: Front view of the remote, showing the main operating button.
Maintenance
Battery Replacement
The remote uses one A23 12V alkaline battery. If the remote's range decreases significantly or the indicator light does not illuminate when the button is pressed, the battery may need replacement.
- Follow Step 1 from the "Setup and Programming" section to open the remote casing.
- Carefully remove the old A23 12V battery from its compartment.
- Insert a new A23 12V alkaline battery, ensuring the positive (+) and negative (-) terminals are correctly oriented.
- Reassemble the remote casing as described in Step 3 of the "Setup and Programming" section.
Note: Dispose of old batteries according to local regulations.
Cleaning
Wipe the remote with a soft, dry cloth. Do not use liquid cleaners or solvents.
Troubleshooting
| Problem | Possible Cause | Solution |
|---|---|---|
| Remote does not operate the garage door. | Incorrect dip switch settings. | Verify that the 12 dip switches in the remote exactly match those in your existing remote or garage door opener receiver. Refer to "Setup and Programming". |
| Dead or low battery. | Replace the A23 12V battery. Refer to "Battery Replacement". | |
| Remote is out of range. | Move closer to the garage door opener. | |
| Reduced operating range. | Weak battery. | Replace the A23 12V battery. Refer to "Battery Replacement". |
| Indicator light does not illuminate. | Dead battery. | Replace the A23 12V battery. Refer to "Battery Replacement". |
Specifications
- Model Compatibility: Genie GT90-1, AT90-1 (12-dip switch systems)
- Power Source: 1 x A23 12V Alkaline Battery (not included)
- Dimensions: Approximately 3 x 1.5 x 0.5 inches (7.6 x 3.8 x 1.3 cm)
- Weight: Approximately 1.76 ounces (50 grams)
- Dip Switches: 12 positions
Warranty and Support
For warranty information or technical support, please refer to the seller's policies or contact the point of purchase. Keep your purchase receipt for warranty claims.
For additional assistance, you may visit the Genie Store on Amazon.


