1. Introduction
Thank you for purchasing the COSTWAY 16-Inch Pedestal Fan. This manual provides important information regarding the assembly, operation, maintenance, and troubleshooting of your new fan. Please read it thoroughly before use and retain it for future reference.

Image 1: The COSTWAY 16-Inch Pedestal Fan with its remote control.
2. Important Safety Instructions
- Read all instructions before using this fan.
- Always unplug the fan before cleaning or servicing.
- Do not operate the fan with a damaged cord or plug.
- Keep fingers and other objects away from the fan blades and grille when in operation.
- Ensure the fan is placed on a stable, level surface to prevent tipping. The weighted base provides stability.
- Do not use the fan near water or in excessively humid environments.
- This fan is for indoor use only.
- Keep children and pets away from the fan during operation.
3. Package Contents
Verify that all components are present before assembly:
- Fan Head Assembly (Motor, Control Panel, Rear Grille)
- Fan Blades (Large and Small)
- Front Grille
- Grille Retaining Ring
- Pedestal Pole (Adjustable Height)
- Weighted Base
- Base Screw and Washer
- Remote Control
- Instruction Manual

Image 2: Overview of fan features and components.
4. Setup and Assembly
Follow these steps to assemble your COSTWAY Pedestal Fan:
- Attach the Pedestal Pole to the Base: Insert the bottom end of the pedestal pole into the weighted base. Secure it from underneath the base using the provided screw and washer.
- Attach the Fan Head Assembly: Place the fan head assembly onto the top of the pedestal pole. Ensure it is firmly seated and tighten any securing knobs or screws.
- Install the Rear Grille: Align the rear grille with the motor housing and secure it in place.
- Install the Fan Blades: First, install the larger main blade onto the motor shaft, ensuring it clicks into place. Then, install the smaller blue blade onto the front of the main blade, securing it with the spinner cap.
- Attach the Front Grille: Place the front grille over the blades and align it with the rear grille. Secure both grilles together using the retaining ring and any clips or screws provided. Ensure the grille is securely fastened to prevent accidental contact with the blades.
For a visual guide on assembly, please refer to the official product video below:
Video 1: Official COSTWAY Pedestal Fan Assembly and Feature Overview. This video demonstrates the step-by-step assembly process and highlights key operational features of the fan.
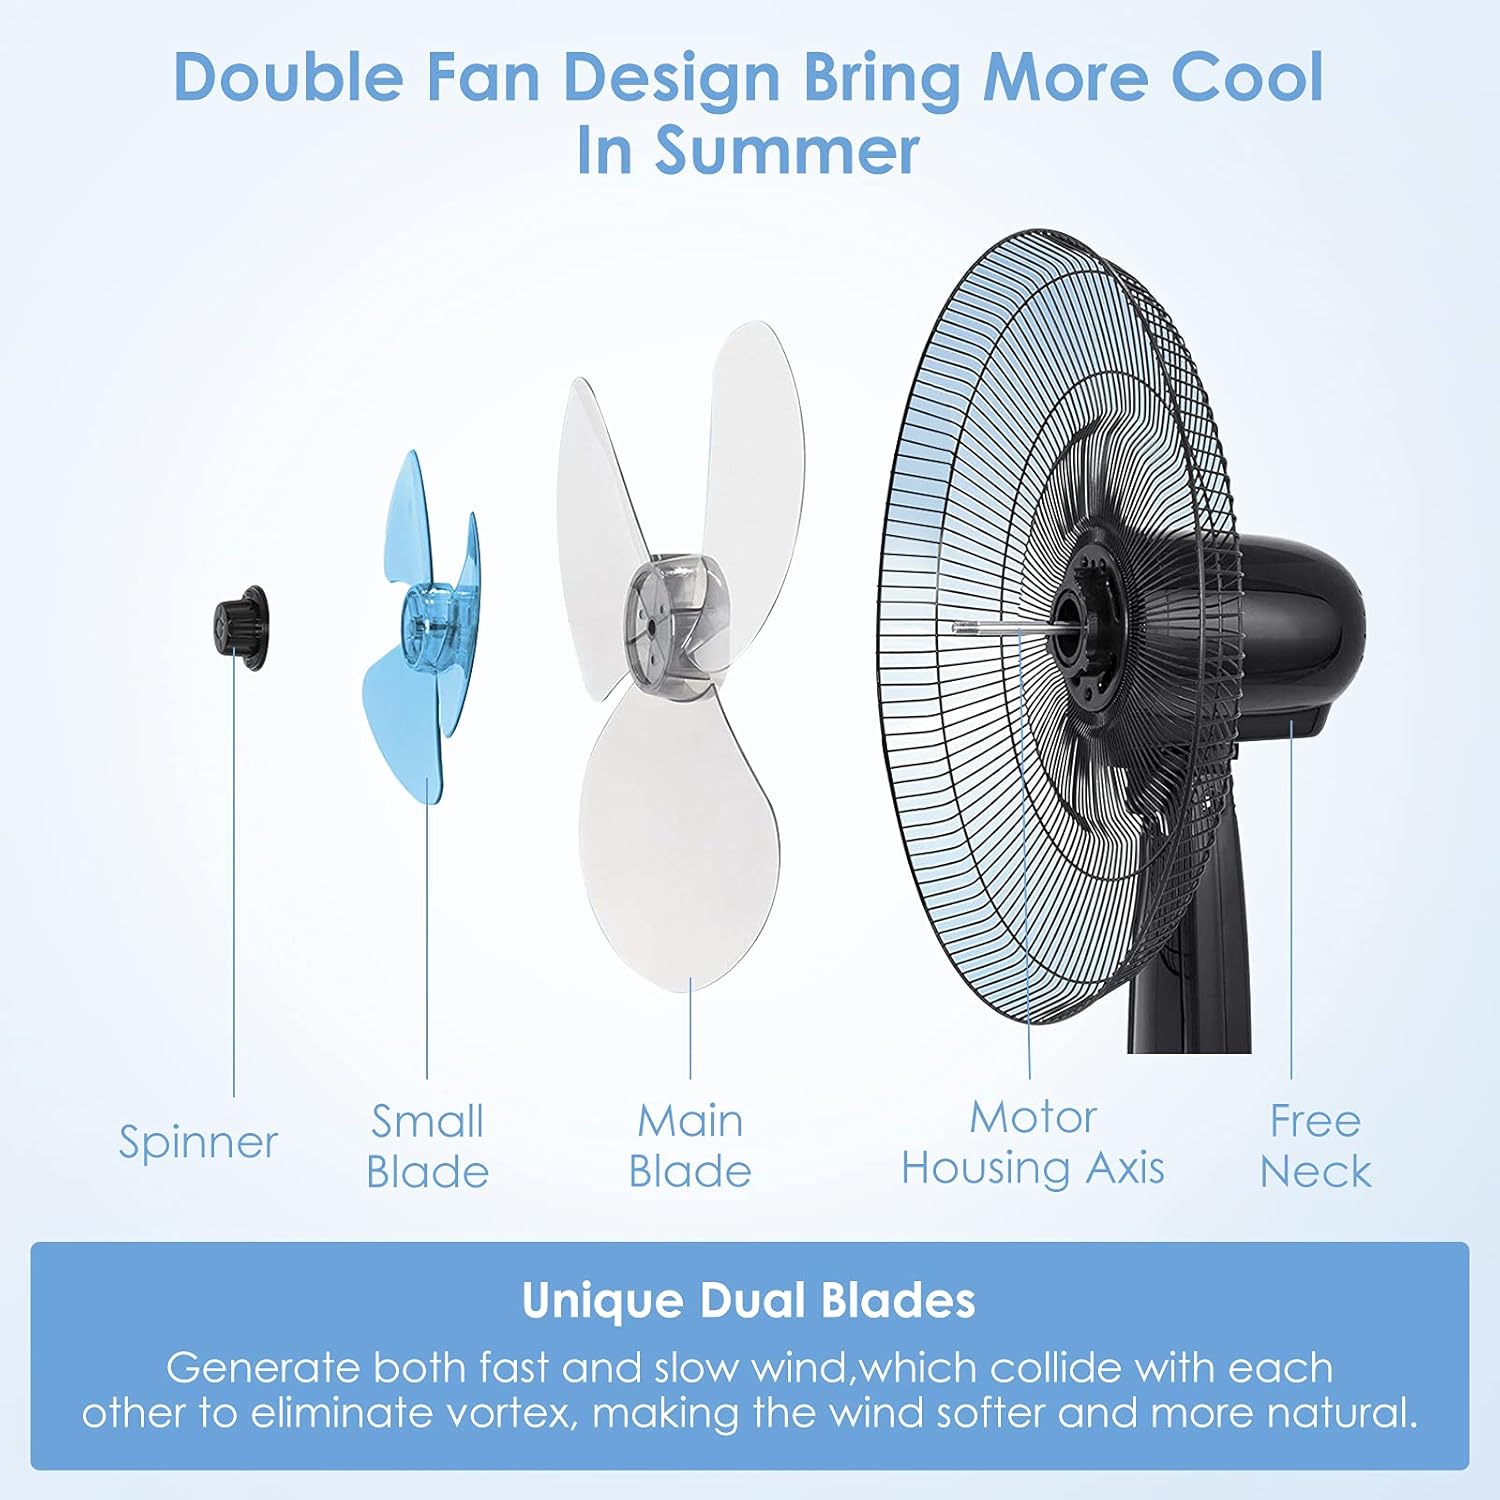
Image 3: Detailed view of the unique dual blade design for enhanced airflow.
5. Operating Instructions
Your COSTWAY Pedestal Fan offers multiple settings for personalized comfort. All functions can be controlled via the integrated control panel or the included remote control.
5.1 Control Panel and Remote Control
The fan features an intuitive control panel with an LCD display and buttons for various functions. The remote control provides convenient operation from a distance.

Image 4: The fan's control panel and remote control for easy operation.
5.2 Power On/Off and Speed Settings
- Power: Press the "On/Speed/Off" button on the control panel or the power button on the remote to turn the fan on or off.
- Speed: While the fan is on, repeatedly press the "On/Speed/Off" button or the "Speed" button on the remote to cycle through 3 speed settings: Low, Middle, and High. The LCD display will indicate the current speed.

Image 5: Visual representation of the 3 speed and mode settings.
5.3 Wind Modes
Press the "Mode" button on the control panel or remote to select from three distinct wind modes:
- Normal Mode: Provides a consistent airflow at the selected speed.
- Natural Mode: Simulates natural breezes by varying the fan speed intermittently.
- Sleep Mode: Operates at a lower, quieter speed with gentle variations, ideal for nighttime use.
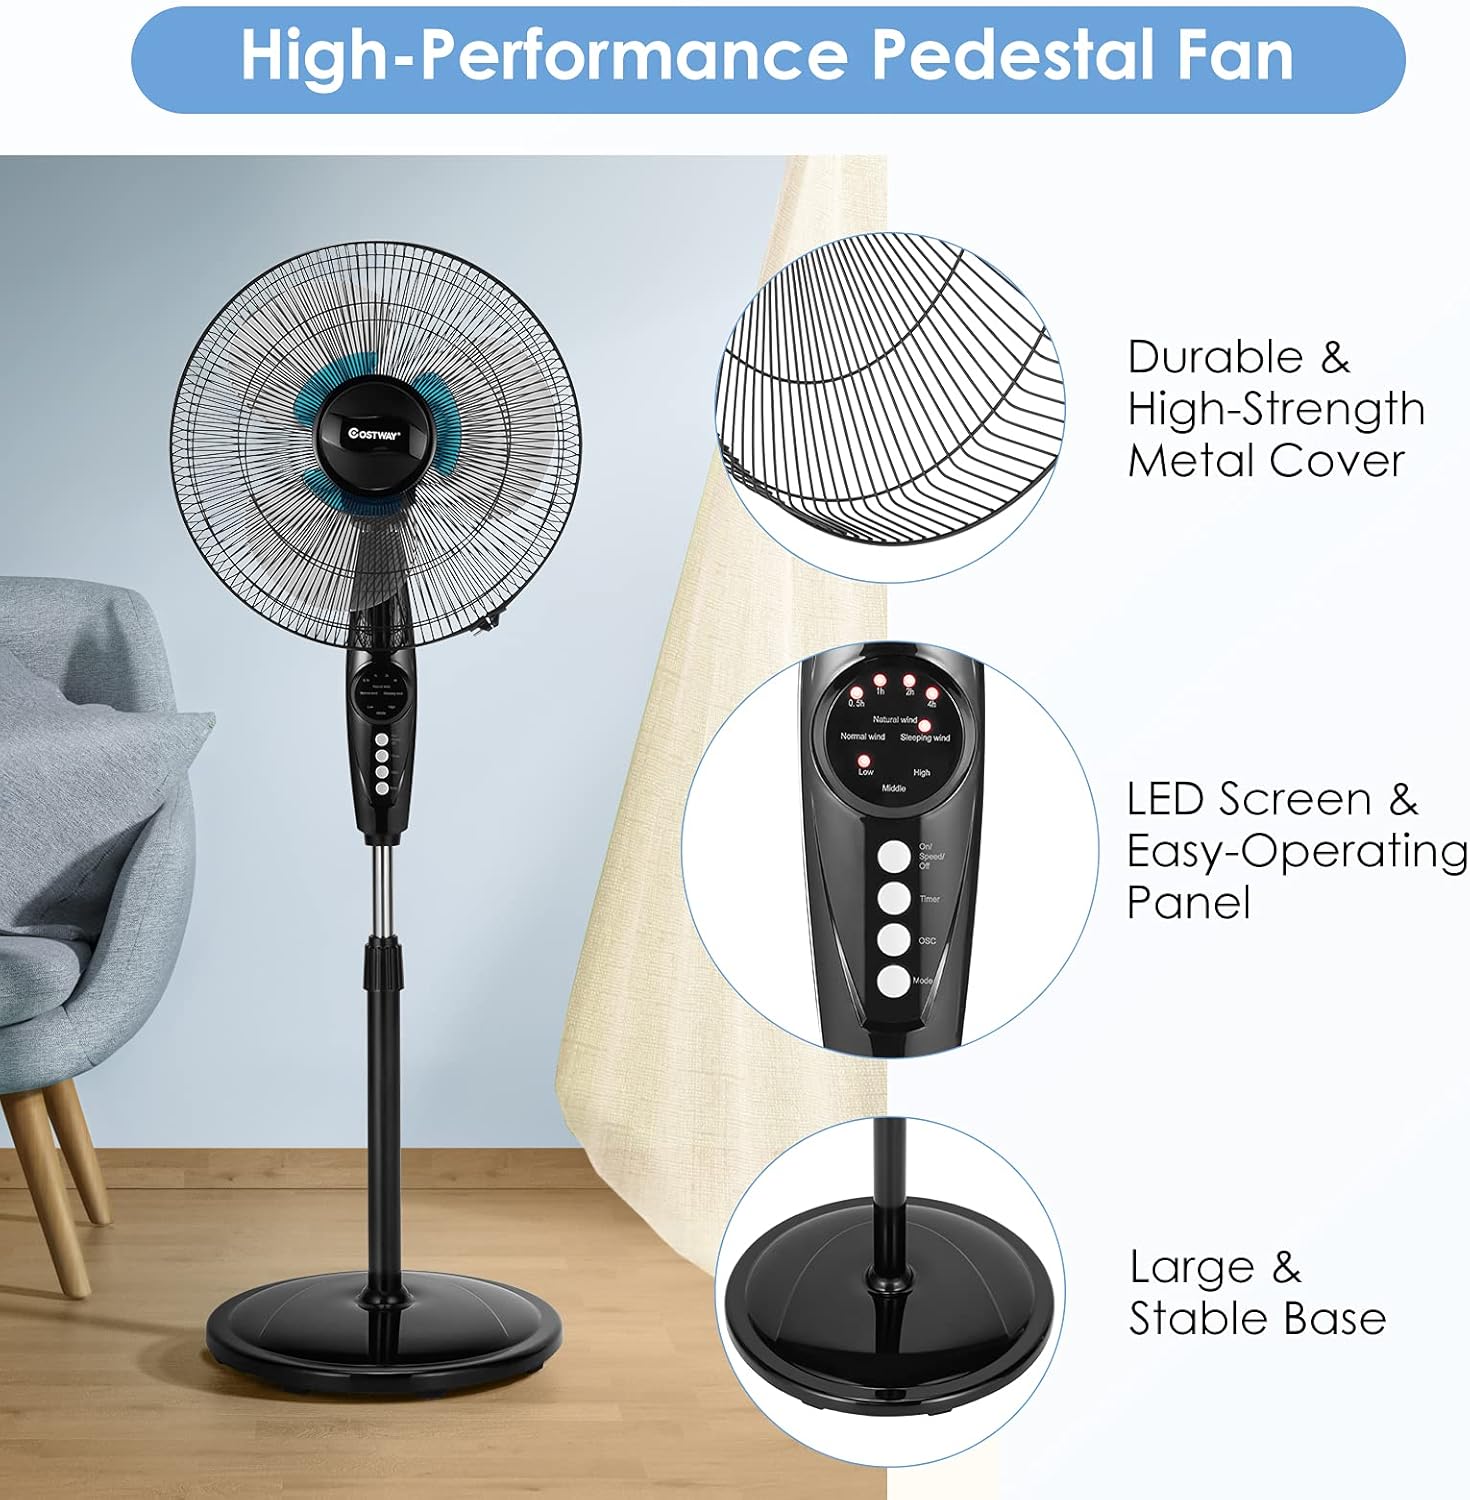
Image 6: The fan's quiet operation and soft wind in Sleep Mode.
5.4 Oscillation Function
To activate or deactivate the oscillation, press the "OSC" button on the control panel or remote. The fan head will automatically rotate horizontally to distribute air across a wider area (90-degree oscillation).

Image 7: Fan's oscillation, tilt, and height adjustment capabilities.
5.5 Timer Function
The fan includes a timer function that allows you to set the fan to automatically turn off after a specified period (0.5 to 7.5 hours). Press the "Timer" button repeatedly to adjust the desired time in 0.5-hour increments. The selected time will be shown on the LCD display.
5.6 Adjustable Height and Tilt
- Height Adjustment: Loosen the height adjustment knob on the pedestal pole, adjust the pole to your desired height (between 44.8 inches and 53 inches), and then securely tighten the knob.
- Tilt Adjustment: The fan head can be manually tilted up or down to direct airflow. Gently adjust the fan head to the desired angle.
6. Maintenance
Regular cleaning and maintenance will ensure optimal performance and longevity of your fan.
- Cleaning the Fan:
- Always unplug the fan from the power outlet before cleaning.
- Use a soft, damp cloth to wipe the exterior surfaces of the fan. Do not use abrasive cleaners or solvents.
- To clean the fan blades, carefully remove the front grille. Wipe the blades with a soft, damp cloth. Ensure blades are completely dry before reassembling.
- Reattach the front grille securely after cleaning.
- Storage: When not in use for extended periods, store the fan in a cool, dry place, preferably in its original packaging.
7. Troubleshooting
If you encounter issues with your fan, refer to the following common problems and solutions:
| Problem | Possible Cause | Solution |
|---|---|---|
| Fan does not turn on. | Not plugged in; power outlet not working; fan switch off. | Ensure the power cord is securely plugged into a working outlet. Press the power button. |
| Remote control is not working. | Batteries are dead or incorrectly inserted; remote not aimed at receiver; obstruction. | Replace remote control batteries (AAA batteries, not included). Ensure direct line of sight to the fan's control panel. |
| Fan is wobbly or unstable. | Base not securely attached; fan placed on an uneven surface. | Ensure the pedestal pole is tightly secured to the weighted base. Place the fan on a flat, stable surface. |
| Reduced airflow or unusual noise. | Dust buildup on blades or grilles; obstruction. | Unplug the fan and clean the blades and grilles as described in the Maintenance section. Remove any obstructions. |
| Oscillation not working. | Oscillation function not activated. | Press the "OSC" button on the control panel or remote to activate oscillation. |
8. Specifications
- Brand: COSTWAY
- Model Name: Costway54237CywhCS
- Item Model Number: 54237-CYWH-CS
- Color: Black
- Electric Fan Design: Floor Fan
- Power Source: Corded Electric
- Product Dimensions: 16"D x 17"W x 53"H
- Adjustable Height: 44.8 inches to 53 inches
- Special Feature: Oscillating, Digital Control, Timer, Remote Control
- Recommended Uses: Bedroom, Home, Office
- Wattage: 60 watts
- Number of Blades: 6 (Dual Blade Design)
- Blade Length: 18 Inches
- Voltage: 120 Volts
- Switch Type: Manual, Remote
- Item Weight: 12 Pounds
- Included Components: Remote
- Indoor/Outdoor Usage: Indoor
- Number of Power Levels: 3 (Low, Middle, High)
- Control Method: Remote
- Specification Met: ETL
9. Warranty and Support
For warranty information or technical support, please refer to the product packaging or contact COSTWAY customer service directly. Keep your purchase receipt for warranty claims.


