1. Introduction
This manual provides detailed instructions for setting up and operating your NETVIP 300Mbps WiFi Extender. This device is designed to extend the coverage of your existing wireless network, eliminating Wi-Fi dead zones and improving signal strength in areas with weak reception. It supports both Repeater and Access Point (AP) modes, offering flexible solutions for your networking needs.
2. Product Overview
Familiarize yourself with the components of your NETVIP WiFi Extender:
- LED Indicators: Display the device's status, including power, Wi-Fi signal, and WPS activity.
- WPS Button: For quick and secure connection to your router using Wi-Fi Protected Setup.
- LAN Port: Used for connecting wired devices or for setting up the device in Access Point mode.
- Power Plug: For connecting the device to an electrical outlet.
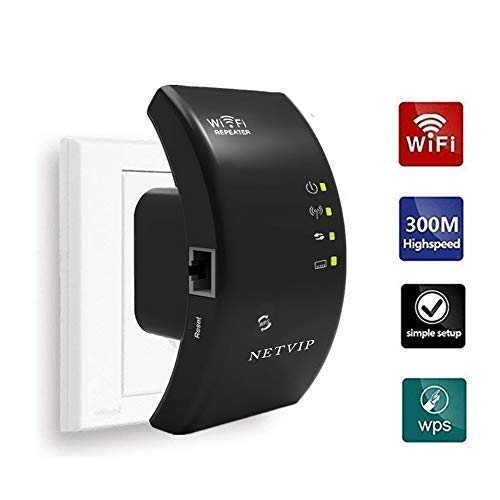
Image 2.1: Front view of the NETVIP 300Mbps WiFi Extender, showing its compact design and key indicators.
3. Setup Instructions
The NETVIP WiFi Extender can be configured in two main modes: Repeater Mode and Access Point (AP) Mode.
3.1. Repeater Mode (Extending Existing Wi-Fi)
Repeater mode extends the coverage of your existing wireless network.
- Power On: Plug the extender into an electrical outlet near your main router. Wait for the Power LED to light up.
- Connect to Extender: On your computer or mobile device, connect to the Wi-Fi network named "Wireless-N" (or similar, check the label on your device). No password is required initially.
- Access Setup Page: Open a web browser and enter the default IP address (e.g., 192.168.10.1) or domain name (e.g., repeater.net) provided in the quick start guide.
- Log In: Enter the default username and password (usually "admin" for both, check device label).
- Select Repeater Mode: On the setup page, choose "Repeater Mode".
- Scan for Networks: The extender will scan for available Wi-Fi networks. Select your home Wi-Fi network from the list.
- Enter Password: Enter the Wi-Fi password for your home network. You can also set a new SSID (network name) for the extended network or keep it the same.
- Apply Settings: Click "Apply" or "Save". The extender will restart.
- Relocate Extender: Once restarted, unplug the extender and move it to a location halfway between your router and the Wi-Fi dead zone. Ensure the signal strength LED indicates a good connection to your main router.
- Connect Devices: Connect your devices to the new extended Wi-Fi network.
WPS Setup (Alternative for Repeater Mode)
- Power On: Plug the extender into an electrical outlet near your main router.
- Press WPS on Router: Press the WPS button on your main router.
- Press WPS on Extender: Within two minutes, press the WPS button on the NETVIP WiFi Extender.
- Wait for Connection: The WPS LED on both devices should blink and then become solid, indicating a successful connection.
- Relocate Extender: Move the extender to an optimal location.
3.2. Access Point (AP) Mode (Creating a New Wi-Fi Network)
AP mode converts a wired internet connection into a wireless network.
- Power On: Plug the extender into an electrical outlet.
- Connect via Ethernet: Connect an Ethernet cable from your main router's LAN port to the LAN port on the NETVIP WiFi Extender.
- Connect to Extender: On your computer or mobile device, connect to the Wi-Fi network named "Wireless-N" (or similar).
- Access Setup Page: Open a web browser and enter the default IP address or domain name.
- Log In: Enter the default username and password.
- Select AP Mode: On the setup page, choose "AP Mode".
- Configure Wi-Fi Settings: Set a new SSID (network name) and a strong Wi-Fi password for your new wireless network.
- Apply Settings: Click "Apply" or "Save". The extender will restart.
- Connect Devices: Connect your devices to the newly created Wi-Fi network.
4. Operating Instructions
Once configured, the NETVIP WiFi Extender operates automatically. Ensure it is plugged into a power outlet and the LED indicators show normal operation.
- Optimal Placement: For best performance in Repeater Mode, place the extender where it receives a strong signal from your main router (indicated by the signal LED) and can still provide coverage to the desired area. Avoid placing it near large metal objects, microwaves, or other sources of interference.
- LED Status:
- Power LED: Solid indicates power on.
- Wi-Fi LED: Solid indicates Wi-Fi is active. Blinking indicates data transfer.
- WPS LED: Solid indicates a successful WPS connection. Blinking indicates WPS pairing in progress.
- Wired Connection: In either mode, the LAN port can be used to connect a single wired device (e.g., a desktop computer, gaming console, or smart TV) to the network, providing a stable wired connection.
5. Maintenance
Regular maintenance helps ensure optimal performance and longevity of your device.
- Cleaning: Gently wipe the device with a soft, dry cloth. Do not use liquid cleaners or aerosols.
- Firmware Updates: Periodically check the NETVIP official website for any available firmware updates. Updating firmware can improve performance, add new features, or fix bugs. Follow the instructions provided with the firmware update carefully.
- Resetting the Device: If you encounter persistent issues or wish to reconfigure the device from scratch, you can perform a factory reset. Locate the reset button (usually a small pinhole) on the device, press and hold it for 5-10 seconds with a paperclip until the LEDs flash. This will restore the device to its factory default settings.
6. Troubleshooting
If you experience issues with your NETVIP WiFi Extender, refer to the following common problems and solutions:
- Cannot access the setup page (192.168.10.1 or repeater.net):
- Ensure your device is connected to the extender's default Wi-Fi network (e.g., "Wireless-N").
- Try a different web browser.
- Clear your browser's cache and cookies.
- Restart the extender and your computer/mobile device.
- Perform a factory reset on the extender.
- No internet access after setup:
- In Repeater Mode, ensure the extender is receiving a strong signal from your main router. Relocate it closer if necessary.
- Verify that the Wi-Fi password entered during setup for your main router is correct.
- In AP Mode, ensure the Ethernet cable is securely connected between the extender and your main router, and that your main router has internet access.
- Restart both your main router and the extender.
- Slow internet speed:
- Optimal placement is crucial. The extender should be positioned where it can receive a good signal from the router and transmit effectively to your devices.
- Avoid interference from other electronic devices (microwaves, cordless phones).
- Ensure your main router is providing adequate speed.
- Check for firmware updates for the extender.
- Connection drops frequently:
- Check for signal interference or obstacles.
- Ensure the extender is not overheating.
- Try changing the Wi-Fi channel on your main router to avoid congestion.
- Perform a factory reset and reconfigure the extender.
7. Specifications
| Brand | NETVIP |
| Wireless Communication Standard | 802.11b, 802.11g, 802.11n |
| Data Transfer Rate | Up to 300Mbps |
| Operating Modes | Repeater, Access Point (AP) |
| Compatible Devices | Router, Alexa Devices |
| Special Feature | WPS Function, LAN Port |
| Product Dimensions | 4.33 x 2.36 x 2.76 inches |
| Item Weight | 5.6 ounces |
8. Warranty and Support
NETVIP products are designed for reliability and performance. For specific warranty information, please refer to the warranty card included with your product or visit the official NETVIP website.
If you require technical assistance or have questions not covered in this manual, please contact NETVIP customer support through their official website or the contact information provided with your purchase. Please have your product model and purchase details ready when contacting support.


