
ZOSI 1AR-16FKA40-US
ZOSI 16-Channel 1080P DVR Security Camera System (Model: 1AR-16FKA40-US) Instruction Manual
1. Introduction
This manual provides detailed instructions for the installation, operation, and maintenance of your ZOSI 16-Channel 1080P DVR Security Camera System. This system is designed to provide reliable surveillance for your home or business, featuring advanced recording capabilities and remote access. Please read this manual thoroughly before using the product to ensure proper setup and functionality.
2. Product Overview
2.1 DVR Compatibility and Ports
The ZOSI DVR supports up to 16 analog cameras, including TVI, CVI, AHD, and CVBS types, with resolutions up to 1080P. It is not compatible with SDI, PoE, or IP cameras. The rear panel of the DVR features various ports for connecting cameras, a monitor, network, and power.

Image: Rear panel of the ZOSI DVR illustrating the 16 video input ports, audio input/output, HDMI and VGA video outputs, Ethernet port, USB port, and DC 12V power input. The image also visually confirms compatibility with AHD, CVI, CVBS, and TVI cameras, while explicitly stating incompatibility with SDI, PoE, and IP cameras.
2.2 DVR Dimensions and Connectors
The DVR unit has a compact design, measuring approximately 11.81 inches in width, 8.98 inches in depth, and 1.87 inches in height. The front panel includes status indicators and a USB port. The rear panel provides all necessary connections for your security system.

Image: A diagram detailing the physical dimensions of the ZOSI DVR unit and an annotated view of its rear panel. Key connectors shown include 16 BNC video input ports, RCA audio input and output, HDMI and VGA ports for monitor connection, an Ethernet port for network connectivity, a USB port for mouse and backup devices, and the DC 12V power input.
3. Setup Instructions
3.1 Initial System Connection
Before powering on, connect all necessary components to the DVR. This includes security cameras, a monitor (via HDMI or VGA), a USB mouse, and an Ethernet cable for network access.
- Connect Cameras: Attach your TVI/CVI/AHD/CVBS cameras to the 'VIDEO IN' BNC ports on the DVR's rear panel.
- Connect Monitor: Use an HDMI or VGA cable to connect a monitor to the corresponding port on the DVR.
- Connect Mouse: Plug the USB mouse into one of the USB ports on the DVR.
- Network Connection (Optional for Remote Access): Connect an Ethernet cable from the DVR's LAN port to your router.
- Power On: Connect the DC 12V power adapter to the DVR and then plug it into a power outlet. The system will boot up.
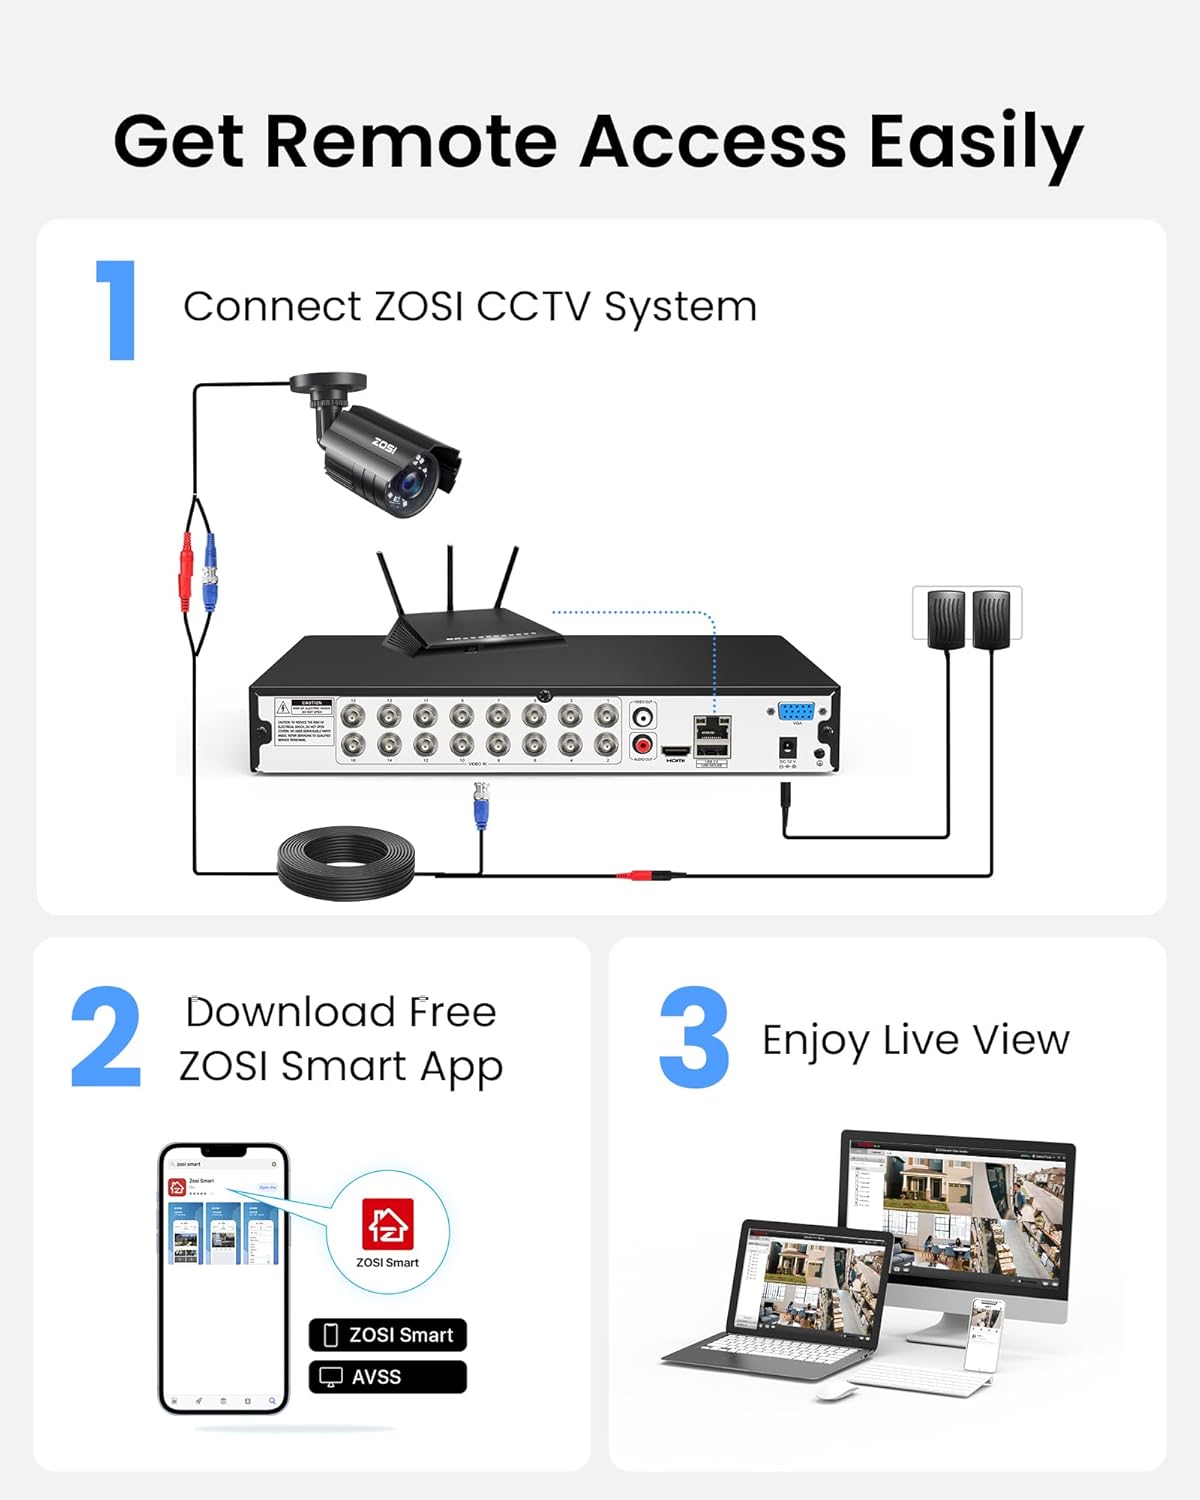
Image: A visual guide demonstrating the physical connections for the ZOSI CCTV system. It shows cameras connected to the DVR, the DVR connected to a monitor, mouse, and router. Below this, it illustrates the process of downloading the ZOSI Smart App and viewing live footage on a smartphone and laptop, indicating remote access capabilities.
3.2 Initial Configuration Wizard
Upon first boot, the DVR will guide you through an initial setup wizard. Follow the on-screen prompts to:
- Set up a strong password for the administrator account.
- Configure date and time settings.
- Adjust network settings (if not using DHCP).
- Format the pre-installed 4TB HDD (if prompted and desired).
3.3 Remote Access Setup
To access your security system remotely via smartphone or computer:
- Download ZOSI Smart App: Search for "ZOSI Smart" in your mobile app store (iOS/Android) and install it.
- Register Account: Create a new user account within the app.
- Add Device: Follow the in-app instructions to add your DVR by scanning the QR code on the DVR or manually entering its ID. Ensure your DVR is connected to the internet.
- Live View: Once added, you can view live camera feeds and manage your system remotely.
4. Operating Instructions
4.1 Recording Management
The DVR supports 24/7 continuous recording and can be configured for motion-triggered recording. The system comes with a built-in 4TB HDD and supports expansion up to 8TB via SATA.

Image: A display showing four simultaneous camera views, illustrating the system's 24/7 recording functionality. The image highlights the inclusion of a built-in 4TB Hard Disk Drive (HDD) and the option to expand storage up to 8TB using a SATA drive, with no monthly fees for recording.
- Continuous Recording: By default, the system records continuously. You can adjust recording schedules in the DVR settings.
- Motion Detection Recording: Enable motion detection for specific channels to record only when movement is detected, saving storage space.
- Storage Capacity: The 4TB HDD provides ample storage. When the HDD is full, the system will automatically overwrite the oldest footage.
4.2 Smart Detection Features
The DVR offers smart human and vehicle detection, reducing false alarms and providing more accurate alerts.

Image: A scene showing a house with a car in the driveway and a person walking by, demonstrating the DVR's smart human and vehicle detection capabilities. The image highlights instant email alerts and app push notifications that are triggered upon detection.
- Human/Vehicle Detection: Configure specific channels to detect only human or vehicle shapes, minimizing alerts from pets or swaying branches.
- Instant Alerts: Receive instant email notifications or app push alerts on your mobile device when motion is detected.
4.3 Customizable Detection Zones
You can customize the detection area and sensitivity for each camera to focus on critical zones and avoid unnecessary alerts.

Image: A mobile app interface displaying options for customizing a camera's detection zone. The image shows a house with specific areas highlighted in blue, indicating a customized detection area. Options include 'Customize Area', 'Adjust Sensitivity', and 'Mask Privacy', allowing users to fine-tune motion detection settings.
- Customize Area: Draw specific zones on the camera's view where motion detection should be active.
- Adjust Sensitivity: Fine-tune the sensitivity level to prevent false alarms from minor movements.
- Mask Privacy: Create privacy masks to block out areas you do not wish to record or monitor.
4.4 Smart Recording and Playback
The system allows for easy location and playback of recorded events, especially those triggered by motion detection.

Image: A visual representation of the smart recording and playback interface. It displays a timeline with markers indicating recorded events and three distinct snapshots of a person and a child interacting near a garage door at specific timestamps (e.g., 14:20, 14:56, 16:16 on 2025-10-13). This illustrates the ability to easily locate and review motion-triggered recordings.
- Timeline Playback: Use the DVR's interface or the ZOSI Smart App to navigate through the recording timeline and quickly find specific events.
- Event Search: Search for recordings based on event type (e.g., motion detection) and time.
5. Maintenance
- Regular Cleaning: Keep the DVR unit and cameras free from dust and debris. Use a soft, dry cloth for cleaning.
- Hard Drive Health: Periodically check the status of the hard drive in the DVR's settings to ensure optimal performance.
- Firmware Updates: Check the ZOSI official website for any available firmware updates for your DVR model. Updating firmware can improve performance and add new features.
- Power Cycle: If the DVR experiences issues, try power cycling the unit (unplug, wait 30 seconds, then plug back in).
6. Troubleshooting
6.1 No Video Output on Monitor
- Ensure the monitor is powered on and set to the correct input source (HDMI/VGA).
- Check the HDMI/VGA cable connection between the DVR and the monitor. Try a different cable or port if available.
- Verify the DVR is powered on and its power indicator lights are active.
6.2 Cannot Access DVR Remotely via App
- Confirm the DVR is connected to your router via an Ethernet cable and the network indicator light on the DVR is active.
- Check your internet connection.
- Ensure the ZOSI Smart App is updated to the latest version.
- Verify the DVR is correctly added to your account in the app. Try re-adding the device if necessary.
6.3 No Recording or Missing Footage
- Check the hard drive status in the DVR's settings to ensure it is detected and functioning correctly.
- Verify that recording schedules are properly configured for the desired channels.
- Ensure motion detection settings are correctly configured if you are relying on motion-triggered recording.
- Check if the hard drive is full. The system overwrites the oldest footage when full.
6.4 General System Instability
- Perform a power cycle of the DVR.
- Ensure the DVR is placed in a well-ventilated area to prevent overheating.
- Check for and install any available firmware updates.
7. Specifications
| Brand | ZOSI |
| Model Number | 1AR-16FKA40-US |
| ASIN | B07H2B17LC |
| GTIN / UPC | 615068916684 |
| Number of Channels | 16 |
| Video Input Compatibility | TVI, CVI, AHD, CVBS (up to 1080P) |
| Memory Storage Capacity | 4 TB (built-in), expandable up to 8 TB via SATA |
| Total USB Ports | 1 |
| Video Output | HDMI, VGA |
| Network Interface | Ethernet (RJ45) |
8. Warranty and Support
For specific warranty information regarding your ZOSI DVR system, please refer to the warranty card included with your product or visit the official ZOSI website. ZOSI provides customer support for technical assistance and troubleshooting.
ZOSI Support: For further assistance, please visit the ZOSI Brand Store or their official support channels.
Related documents1AR-16FKA40-US


Ask a question about this manual
Ask about setup, troubleshooting, compatibility, parts, safety, or missing instructions. Manuals+ will review the question and use this page’s manual context to help answer it.