
1. Introduction
This manual provides comprehensive instructions for the assembly, painting, and care of your Italeri M4A1 Sherman 1:35 Tank Model Building Kit. The M4A1 Sherman was a pivotal American medium tank of World War II, known for its role in the Allied campaigns, including the Normandy invasion. This kit allows you to construct a detailed replica of this iconic vehicle. Please read all instructions carefully before beginning assembly.
2. Safety Information
Warning: This kit contains small parts and is not suitable for children under 14 years of age due to choking hazards. Adult supervision is recommended. Always use modeling tools with care. When using paints, glues, and thinners, ensure adequate ventilation and follow the manufacturer's safety guidelines. Avoid contact with eyes and skin. Keep all materials out of reach of small children and pets.
3. Kit Contents
Your Italeri M4A1 Sherman model kit typically includes:
- Plastic sprues with molded parts
- Decal sheet for markings
- Clear parts (if applicable, for periscopes/windows)
- Instruction booklet
Note: The exact number of individual parts will vary. Please check all contents against the parts list in your kit's instruction booklet before starting assembly.
4. Tools and Materials Required
To successfully assemble your model, you will need the following (not included in the kit):
- Plastic model cement (e.g., polystyrene cement)
- Hobby knife or sprue cutters
- Small files or sandpaper (fine grit)
- Tweezers
- Paint brushes (various sizes) or airbrush
- Model paints (acrylic or enamel, suitable for plastic)
- Decal setting solution and softener
- Masking tape (for painting)
5. Assembly Instructions (Setup)
Follow the numbered steps in the included instruction booklet. It is recommended to:
- Study the Instructions: Familiarize yourself with all steps before cutting any parts.
- Part Preparation: Carefully remove parts from the sprues using sprue cutters or a hobby knife. Clean any mold lines or excess plastic (flash) with a hobby knife or fine sandpaper.
- Test Fit: Always test fit parts together before applying cement. This helps identify potential fit issues and ensures proper alignment.
- Cement Application: Apply a small amount of plastic cement to one of the mating surfaces. Hold the parts firmly together until the cement sets. Avoid using too much cement, as it can damage the plastic.
- Sub-Assemblies: Build the model in logical sub-assemblies (e.g., lower hull, upper hull, turret, tracks, wheels) as indicated in the instructions. This often simplifies painting.
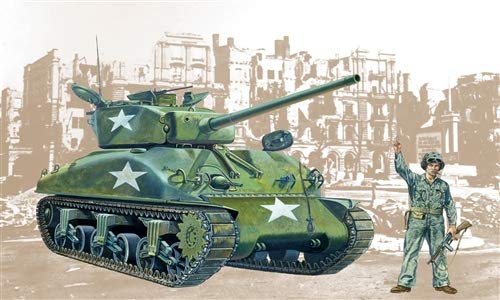
Figure 1: A fully assembled Italeri M4A1 Sherman tank model, painted in olive drab, with a white star insignia on the front hull and turret. The tank features a long barrel, detailed tracks, and a machine gun mounted on the turret. Two crew figures are visible, one in the commander's hatch and another standing near the rear of the tank. The model is set in a diorama resembling a desert or arid environment with sparse vegetation.
6. Painting and Finishing (Operating)
Once assembly is complete, or at appropriate sub-assembly stages, you can proceed with painting and decaling.
- Surface Preparation: Ensure the model surface is clean, dry, and free of dust or grease. A light primer coat can improve paint adhesion.
- Painting: Apply thin, even coats of model paint. Multiple thin coats are better than one thick coat. Refer to historical references or the kit's painting guide for accurate color schemes (e.g., Olive Drab for US tanks). Allow each coat to dry thoroughly.
- Detail Painting: Paint smaller details such as tools, machine guns, and crew figures.
- Decal Application: Apply decals to a glossy surface for best results. Cut out each decal, dip it in water for a few seconds, and slide it onto the model. Position it carefully. Use decal setting solution to help the decal conform to surface details and eliminate 'silvering' (trapped air under the decal).
- Weathering (Optional): For a realistic appearance, you can apply weathering effects such as washes, dry-brushing, and pigments to simulate dirt, rust, and wear.
- Final Coat: Apply a clear matte or satin coat to protect the paint and decals and unify the finish.
7. Maintenance
Proper care will preserve your model for years to come.
- Cleaning: Dust your model regularly with a soft brush or a can of compressed air. Avoid using harsh chemicals or abrasive materials.
- Storage: Store your model in a cool, dry place away from direct sunlight, which can cause paint fading and plastic warping. Display cases can protect against dust and accidental damage.
- Handling: Handle the model by its sturdy parts, avoiding delicate details.
8. Troubleshooting
Here are solutions to common issues encountered during model building:
- Parts Not Fitting: Ensure all flash is removed. Test fit again. If necessary, gently sand or trim the mating surfaces.
- Gaps Between Parts: Use plastic filler putty to fill gaps. Once dry, sand smooth and repaint the area.
- Paint Issues: If paint is too thick, thin it with appropriate thinner. If paint is uneven, apply more thin coats. Ensure surfaces are clean before painting.
- Decal Silvering: Apply decal setting solution and softener. Puncture small bubbles with a sharp needle and reapply solution. Ensure the surface under the decal is glossy.
- Broken Parts: Small parts can often be re-attached with plastic cement or super glue. For structural breaks, consider reinforcing with a small piece of plastic rod or wire.
9. Specifications
| Feature | Detail |
|---|---|
| Brand | Italeri |
| Model Number | ITA0225 |
| Scale | 1:35 |
| Theme | Military, World War II |
| Skill Level | 3 (Intermediate) |
| Finished Model Length | 16.5 cm |
| Recommended Age | Adult |
| Material | Plastic (Polystyrene) |
| UPC | 08001283802253 |
10. Support
For further assistance, missing parts, or specific questions regarding your Italeri M4A1 Sherman model kit, please refer to the contact information provided in your kit's instruction booklet or visit the official Italeri website: