Important Safety Information
WARNING: Always follow all local and federal laws regarding firearm storage. Keep firearms unloaded and locked when not in use. This safe is designed to deter theft and unauthorized access, but it cannot guarantee complete security against determined criminal activity. Keep keys and access codes secure and out of reach of children and unauthorized individuals.
Please read this manual thoroughly before operating your VAULTEK SE20 safe. Understanding the features and proper operation will ensure optimal performance and security.
Product Overview
The VAULTEK Essential Series SE20 is a quick-access handgun safe designed for rapid deployment and secure storage. Its slim vertical design allows for versatile placement, while robust construction and advanced access methods provide reliable protection for your firearm.

Figure 1: VAULTEK Essential Series SE20 Quick Access Handgun Safe.
Key Features
- Slim Vertical Design: Accommodates firearms up to 8.875 inches in length with optics, plus one spare magazine. Ideal for discreet placement under desks, nightstands, bookshelves, or in vehicles.
- Robust Construction: Manufactured from 16-gauge carbon steel with a durable finish for corrosion resistance and long-lasting protection. Features anti-theft measures including a single anti-impact latch and anti-pry construction.
- Quick Access System: Utilizes a three-point precision rail system with ball bearing guides for rapid, smooth deployment of the safe door, presenting the firearm in a ready position.
- Multiple Entry Methods: Access via an auto-illuminating keypad with a built-in proximity sensor or through the included manual keys.
- Rechargeable Lithium-ion Battery: Provides power for up to 4 months on a single charge, with a full charge achieved in 2.5 hours using the micro-USB charging kit.
- Responsive LED Lighting: Interior LEDs illuminate the safe's contents, and the keypad is backlit for visibility in low-light conditions.
- Refined Interior: High-density foam padding secures and protects a single firearm and one spare magazine.
- Proprietary Mounting Plate: Allows for various mounting configurations, including standard VESA 75mm and 100mm hole patterns, and enables quick removal of the safe from the plate by an authorized user.
Package Contents
Verify that all items listed below are included in your package:
- VAULTEK Essential Series SE20 Safe
- Manual Keys (2)
- Rechargeable Lithium-ion Battery (1)
- Micro-USB Charging Kit (Cable and Wall Adapter)
- Proprietary Mounting Plate
- Mounting Hardware

Figure 2: Included components with the VAULTEK SE20 safe.
Initial Setup
1. Charging the Battery
- Locate the micro-USB port on the safe.
- Connect the provided micro-USB cable to the safe and the wall adapter.
- Plug the wall adapter into a standard electrical outlet.
- Allow approximately 2.5 hours for a full charge. The LED indicator will change when charging is complete.
2. Setting Your Access Code
Your safe comes with a default access code. It is highly recommended to change this immediately.
- Open the safe using the default code or manual key.
- Locate the programming button inside the safe (refer to the diagram in the quick start guide for exact location).
- Press and hold the programming button until the keypad lights begin to flash.
- Enter your desired new access code (4-8 digits).
- Press the programming button again to confirm. The keypad lights will stop flashing, indicating the new code is set.
- Test your new code with the safe door open to ensure it works correctly before closing the safe.
Operation
Opening the Safe with Keypad
- Approach the safe; the keypad will auto-illuminate due to the proximity sensor.
- Enter your programmed access code.
- The safe door will automatically deploy open, presenting the firearm.

Figure 3: Keypad and manual key entry points.
Opening the Safe with Manual Key
The manual keys serve as a backup access method in case of battery depletion or forgotten code.
- Locate the keyhole, typically concealed on the front or side of the safe (refer to Figure 3).
- Insert one of the provided manual keys and turn it to unlock the safe.
- The door will open.
Closing the Safe
Gently push the door back into the closed position until it latches securely. Ensure no obstructions prevent the door from closing completely.

Figure 4: Rapid firearm deployment upon successful access.
Mounting Instructions
The VAULTEK SE20 includes a proprietary mounting plate for secure installation.
- Select Location: Choose a secure and stable surface for mounting, such as a desk, nightstand, or wall stud. Ensure the surface can support the weight of the safe and its contents.
- Attach Mounting Plate: Use the provided mounting hardware to securely attach the mounting plate to your chosen surface. The plate supports standard VESA 75mm and 100mm hole patterns.
- Attach Safe to Plate: Align the safe with the mounting plate and slide it into place until it clicks securely.
- Secure Safe (Optional): For added security, the safe can be locked to the mounting plate using a specific mechanism (refer to the quick start guide for details on this locking feature).

Figure 5: VAULTEK SE20 safe with its mounting plate.

Figure 6: Example of the VAULTEK SE20 safe mounted under a nightstand.
Maintenance
Battery Care
- Recharge the lithium-ion battery when the low battery indicator activates (refer to troubleshooting for indicator details).
- While the safe can be left plugged in, occasional unplugging and allowing the battery to cycle down is recommended for optimal battery health.
- If storing the safe for an extended period, ensure the battery is fully charged before storage and recharge periodically.
General Cleaning
- Wipe the exterior of the safe with a soft, damp cloth. Avoid abrasive cleaners or solvents.
- Keep the keypad free of dust and debris to ensure proper function.
- Do not lubricate the internal mechanisms unless specifically instructed by VAULTEK support.
Troubleshooting
| Problem | Possible Cause | Solution |
|---|---|---|
| Safe does not open with code. | Incorrect code entered; Low battery; Keypad malfunction. | Verify code and re-enter carefully. Charge the battery. Use manual key. Contact support if issue persists. |
| Keypad lights do not illuminate. | Proximity sensor obstructed; Battery depleted. | Ensure nothing is blocking the sensor. Charge the battery. |
| Door does not open smoothly. | Obstruction inside safe; Mechanism dirty. | Check for items blocking the door or rail system. Clean interior. |
| Battery drains quickly. | Frequent use; Old battery; Constant charging. | This is normal with heavy use. Ensure full charges. Consider battery replacement if very old. |
Technical Specifications
| Feature | Specification |
|---|---|
| Model Number | CVT-SE20-BK |
| Product Dimensions (D x W x H) | 9.1" x 2.6" x 11.25" |
| Item Weight | 7.5 pounds |
| Lock Type | Electronic Keypad, Manual Key |
| Material | Alloy Steel, Carbon Steel |
| Color | Black |
| Mounting Type | Floor Mount (with included plate) |
| Battery Type | Lithium Ion (included) |
| Max Firearm Length | 8.875 inches (with optics) |
| Water Resistance Level | Not Water Resistant |

Figure 7: VAULTEK SE20 Product Dimensions.
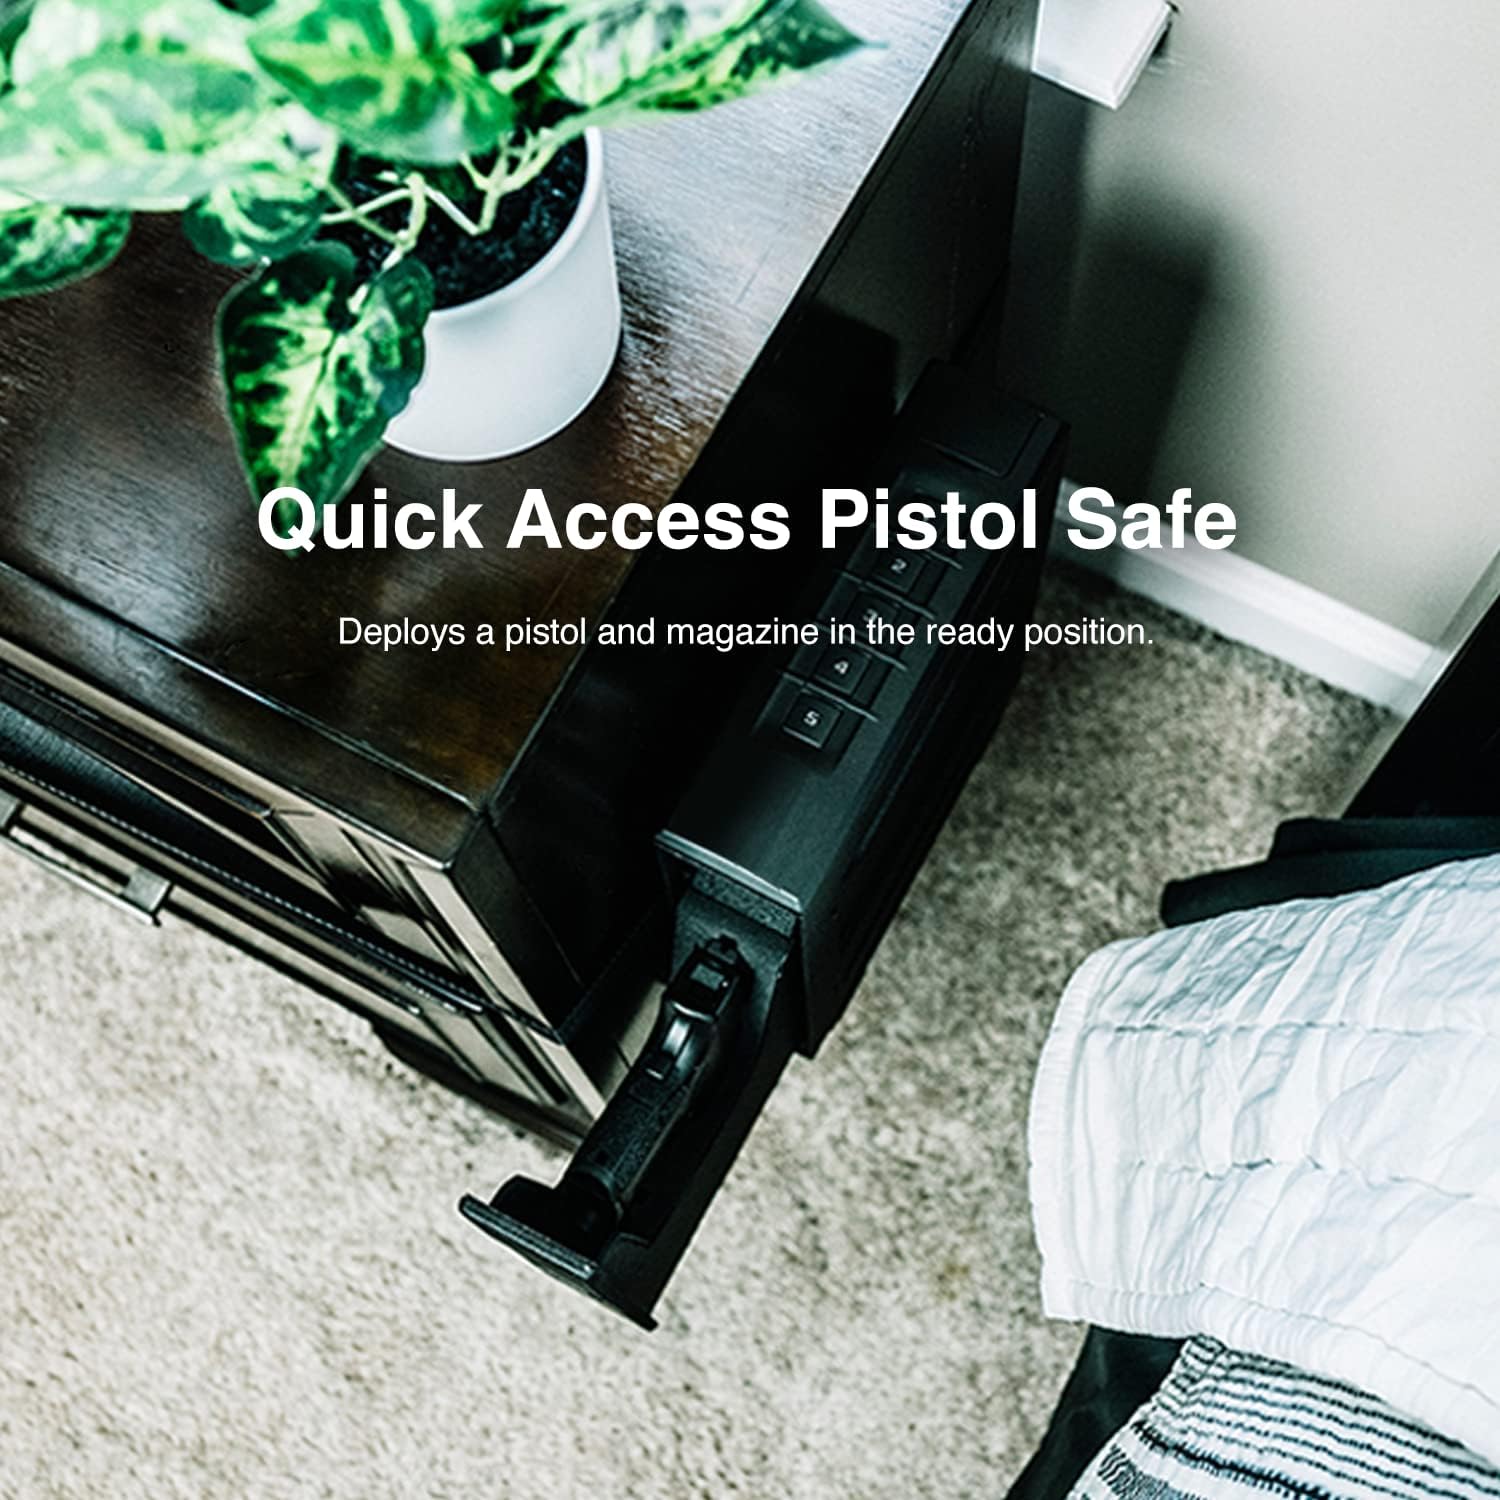
Figure 8: Handgun fitment within the VAULTEK SE20 safe.
Warranty and Support
For detailed warranty information and customer support, please visit the official VAULTEK website or contact their customer service department. Keep your purchase receipt as proof of purchase for any warranty claims.
VAULTEK Official Website: www.vaulteksafe.com


