
EVERSECU XVR1104
EVERSECU 4CH 5MP Lite 5-in-1 Hybrid DVR User Manual
Model: XVR1104
1. Introduction
This manual provides comprehensive instructions for the installation, operation, and maintenance of your EVERSECU 4-Channel 5MP Lite 5-in-1 HD Analog Hybrid DVR. This DVR is designed to provide a robust surveillance solution, supporting various camera types including CVBS, CVI, TVI, AHD, and ONVIF-compatible IP cameras.
Please read this manual thoroughly before operating the device to ensure proper setup and functionality.
2. Product Overview
2.1. Key Features
- 5-in-1 Compatibility: Supports 5MP CVBS/CVI/TVI/AHD/IP cameras.
- Full 1080N Recording: Records video across all 4 channels.
- Multiple Video Outputs: Equipped with HDMI and VGA ports.
- Easy Setup: True plug-and-play with BNC video power cable connections.
- USB Backup: Conveniently back up and transfer footage via USB.
- Remote Viewing: Supports iOS/Android/PC remote viewing via the "Xmeye" app.
- Motion Detection: Configurable motion tracking with email alerts.
- ONVIF Support: Compatible with ONVIF IP cameras.
2.2. Package Contents
Please verify that all items are present in your package:
- EVERSECU 4CH 5MP Lite 5-in-1 Hybrid DVR Unit (Model: XVR1104)
- Power Adapter
- USB Mouse
- User Manual (this document)
- Screws for HDD Installation (HDD not included)
2.3. DVR Front and Rear Panels
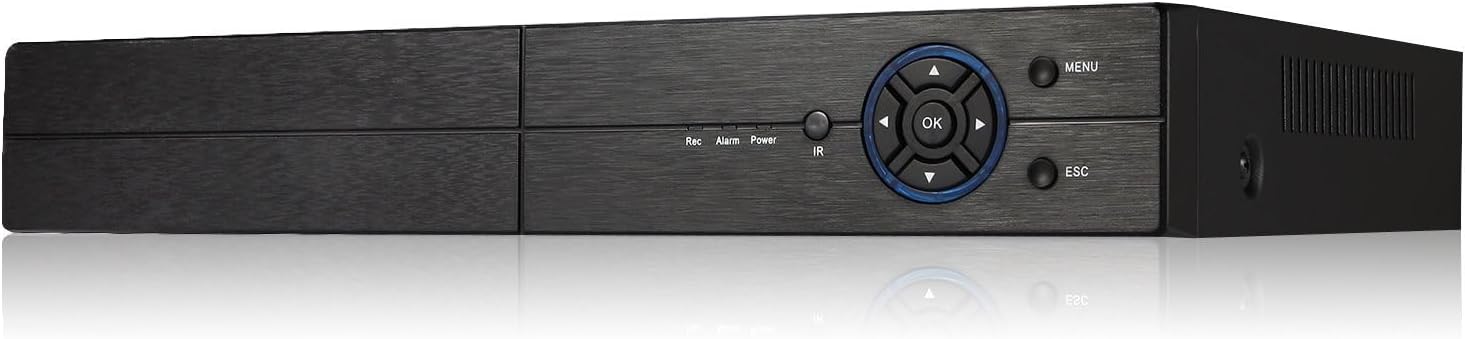
Figure 2.3.1: Front view of the EVERSECU 4-channel DVR, showing the control panel with navigation buttons, power, alarm, and IR indicators.

Figure 2.3.2: Rear panel connections of the EVERSECU 4-channel DVR, illustrating video inputs, HDMI/VGA outputs, audio input/output, network port, USB interfaces, and power input.
2.4. Third-Party Camera Compatibility
The DVR is designed to work seamlessly with various third-party cameras that support the ONVIF protocol. This allows for flexible integration into existing surveillance systems or expansion with a wider range of camera options.

Figure 2.4.1: Illustration of the DVR's compatibility with various ONVIF-compliant third-party cameras, demonstrating its versatility in a surveillance network.
3. Setup and Installation
3.1. Hard Drive Installation (Optional, HDD Not Included)
If you wish to record video, an internal 3.5-inch SATA hard drive must be installed. Follow these steps:
- Twist down the screws of the DVR: Locate and remove the screws on the DVR casing to open it.
- Access the hard disk bay: Carefully open the DVR cover to expose the internal components and the hard drive bay.
- Connect SATA cables: Connect the SATA data and power cables to the hard drive.
- Install the screws: Secure the hard drive within the bay using the provided screws.
- Close the DVR: Carefully replace the DVR cover and secure it with the screws.

Figure 3.1.1: Visual guide for installing the hard drive, showing the process of opening the DVR, connecting cables, and securing the drive.
3.2. Connecting Cameras and Peripherals
- Analog/AHD/TVI/CVI Cameras: Connect these cameras directly to the BNC video input ports on the rear panel using BNC video power cables.
- IP Cameras (ONVIF Compatible): Connect IP cameras to a network switch. Then, connect the network switch to the DVR's network port. Ensure both the DVR and IP cameras are on the same network segment.
- Monitor: Connect a monitor to the HDMI or VGA output port.
- Mouse: Connect the USB mouse to one of the USB ports for local control.
- Power: Connect the power adapter to the DVR and then to a power outlet.
4. Operating Instructions
4.1. Initial Setup and Configuration
Upon first power-on, the DVR will guide you through an initial setup wizard. Follow the on-screen prompts to set up basic parameters such as date/time, network settings, and password.
4.2. Local Operation
- Live View: Once cameras are connected, their feeds will appear on the connected monitor.
- Menu Navigation: Use the USB mouse to navigate the DVR's on-screen menu. The front panel buttons can also be used for basic navigation.
- Recording: If an HDD is installed, the DVR will automatically begin recording based on default settings (e.g., continuous recording). Recording schedules can be customized in the system settings.
- Playback: Access recorded footage through the playback menu. You can search by date, time, and event.
4.3. Remote Viewing via Mobile App (Xmeye)
To view your surveillance system remotely, download the "Xmeye" app on your iOS or Android device.
- Download App: Scan the QR code provided in the DVR's network settings or search for "Xmeye" in your device's app store.
- Register Account: Create an account within the Xmeye app.
- Add Device: In the app, select "Add Device" and scan the DVR's QR code (found in the DVR's network settings) or manually enter the device ID.
- Connect to Router: Ensure the DVR is connected to your internet router for remote access.

Figure 4.3.1: Example of Xmeye app notifications on a mobile phone, demonstrating instant email alerts and app pushes for motion detection events.
4.4. Motion Detection and Alerts
The DVR features motion detection capabilities that can trigger alerts and recordings.
- Configuration: Navigate to the "Alarm" or "Event" settings in the DVR menu to configure motion detection zones, sensitivity, and actions (e.g., record, send email, push notification).
- Email Alerts: Set up your email server details in the network settings to receive instant email alerts when motion is detected.
5. Maintenance
- Regular Cleaning: Keep the DVR unit clean and free from dust to ensure proper ventilation. Use a soft, dry cloth for cleaning.
- Firmware Updates: Periodically check the EVERSECU official website for firmware updates. Updating firmware can improve performance and add new features.
- Hard Drive Health: If an HDD is installed, monitor its health through the DVR's system information. Back up important footage regularly.
- Password Management: Change your DVR and app passwords periodically to maintain security.
6. Troubleshooting
| Problem | Possible Cause | Solution |
|---|---|---|
| No video display on monitor. | Loose cable connection, incorrect video output settings, monitor issue. | Check HDMI/VGA cable connections. Ensure monitor is powered on and set to correct input. Try a different monitor or cable. |
| Cameras not showing up. | Camera power issue, BNC cable issue, incorrect camera type selected, IP camera network issue. | Verify camera power supply. Check BNC cable integrity. Ensure camera type matches DVR settings. For IP cameras, confirm they are on the same network segment as the DVR. |
| Cannot access DVR remotely via Xmeye app. | DVR not connected to internet, incorrect network settings, firewall blocking, app issues. | Ensure DVR is connected to router. Check network settings (DHCP enabled or static IP configured correctly). Verify router firewall settings. Reinstall Xmeye app. |
| No recording. | No HDD installed, HDD full, HDD not initialized, recording schedule not set. | Install an HDD. Check HDD status in DVR settings; format if necessary. Verify recording schedule. |
7. Specifications
| Feature | Detail |
|---|---|
| Model Number | XVR1104 |
| Video Input | 4 Channels (5-in-1: CVBS/CVI/TVI/AHD/IP) |
| Video Resolution | Up to 5MP (IP Camera), 5MP (AHD/TVI/CVI), 960H (Analog) |
| Recording Resolution | 1080N |
| Video Output | HDMI, VGA |
| Audio Input/Output | Yes (1-channel input, 1-channel output) |
| Network Interface | RJ45 Ethernet Port |
| USB Interface | 2 x USB 2.0 ports |
| HDD Support | 1 x 3.5 inch SATA HDD (up to 4TB, not included) |
| Dimensions (L x W x H) | 10.23 x 8.74 x 1.77 inches |
| Weight | 2.42 pounds |
| Power Supply | DC 12V (adapter included) |
8. Warranty and Support
EVERSECU products come with a standard manufacturer's warranty. For specific warranty terms and conditions, please refer to the warranty card included with your product or visit the official EVERSECU website.
For technical support, troubleshooting assistance, or any inquiries regarding your DVR, please contact EVERSECU customer service. Contact information can typically be found on the product packaging or the official brand website.
Online resources such as FAQs and updated manuals may also be available on the EVERSECU support page.
Ask a question about this manual
Ask about setup, troubleshooting, compatibility, parts, safety, or missing instructions. Manuals+ will review the question and use this page’s manual context to help answer it.