
Sensaphone Sentinel Pro AT&T with Clear Door Enclosure
Sensaphone Sentinel Pro AT&T with Clear Door Enclosure User Manual
Model: Sentinel Pro AT&T with Clear Door Enclosure
1. Introduction
The Sensaphone Sentinel Pro Monitoring System with Cellular Modem is designed to provide comprehensive monitoring for locations lacking traditional landline or internet connections. This system efficiently monitors, delivers alarms, and datalogs input/output points from various third-party Modbus sensors, transducers, and programmable logic controllers. It supports both Modbus RTU/485 and Modbus TCP protocols.
Capable of integrating up to 12 digital or analog sensors, the Sentinel Pro allows users to define high and low limits for monitored parameters. Should these limits be exceeded, the system instantly dispatches alerts via phone, text, or email over AT&T’s cellular network. It also generates daily event reports and maintains audit logs for comprehensive record-keeping. All data is stored securely in the cloud, ensuring data integrity and providing unlimited storage capacity, enabling management of multiple devices from a single account. The system features a weather-proof NEMA 4X rated enclosure with a clear door, and includes a cellular modem for AT&T’s 4G network. A manufacturer-purchased cellular plan is required for operation.
2. Key Features
- Twelve Sensor Inputs: Monitor environmental conditions and/or alarm contacts from other equipment.
- Cloud-Based User Interface: Facilitates programming, data storage, and alarm delivery.
- Battery Backup: Ensures uninterrupted performance during power outages.
- Relay Output: Capable of automatic or manual control of external devices.
- 4G Cellular Modem: Enables operation in locations without an Ethernet connection.
- Modbus Support: Poll up to 64 Modbus registers from sensors, equipment or controllers.
- Third-Party Sensor Compatibility: Connects to any third-party sensors that output a 4-20mA or dry contact signal.
- Web/Mobile App Configuration: Program high and low limits on sensor data via a user-friendly website or mobile application.
- Supervised Internet Connection: Ensures the Sentinel Pro is continuously online and monitoring.
- Unlimited Datalogging: Comprehensive data logging capability on all sensor inputs.
3. Setup and Installation
3.1 Unpacking and Inspection
Carefully unpack the Sentinel Pro system and all included accessories. Verify that all components are present and undamaged. The package should include the Sentinel Pro unit, cellular antenna, power adapter, and any ordered sensors.

Figure 3.1: Sensaphone Sentinel Pro unit with cellular antenna and power adapter.
3.2 Mounting the Enclosure
The NEMA 4X rated enclosure is designed for indoor or outdoor use. Choose a suitable location that allows for easy access, good cellular signal reception, and proximity to sensors and power. Securely mount the enclosure using appropriate hardware (not included) through the mounting tabs.

Figure 3.2: Front view of the Sentinel Pro enclosure, showing the clear door.
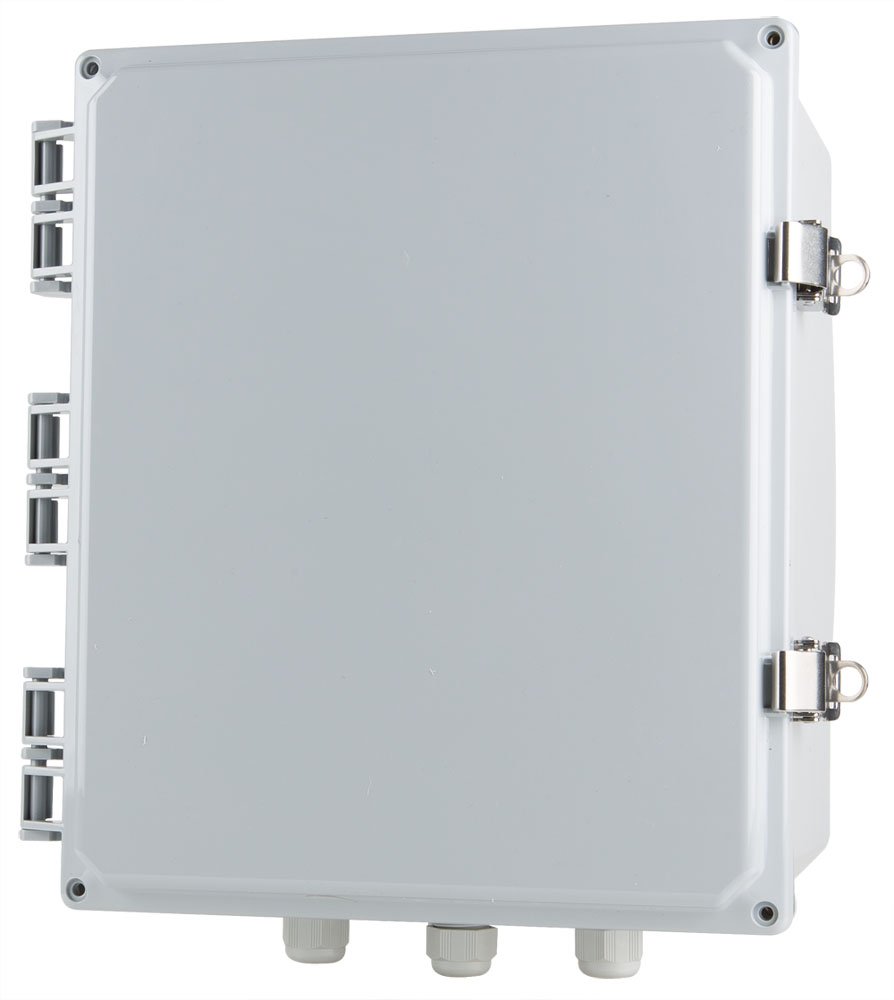
Figure 3.3: Side view of the Sentinel Pro enclosure, highlighting the latches.
3.3 Connecting Sensors and Power
Open the enclosure door to access the internal components. Connect your digital, analog, or Modbus sensors to the designated terminals. Ensure proper wiring according to the sensor's documentation. The system supports up to 12 external sensors and can poll up to 64 Modbus registers.
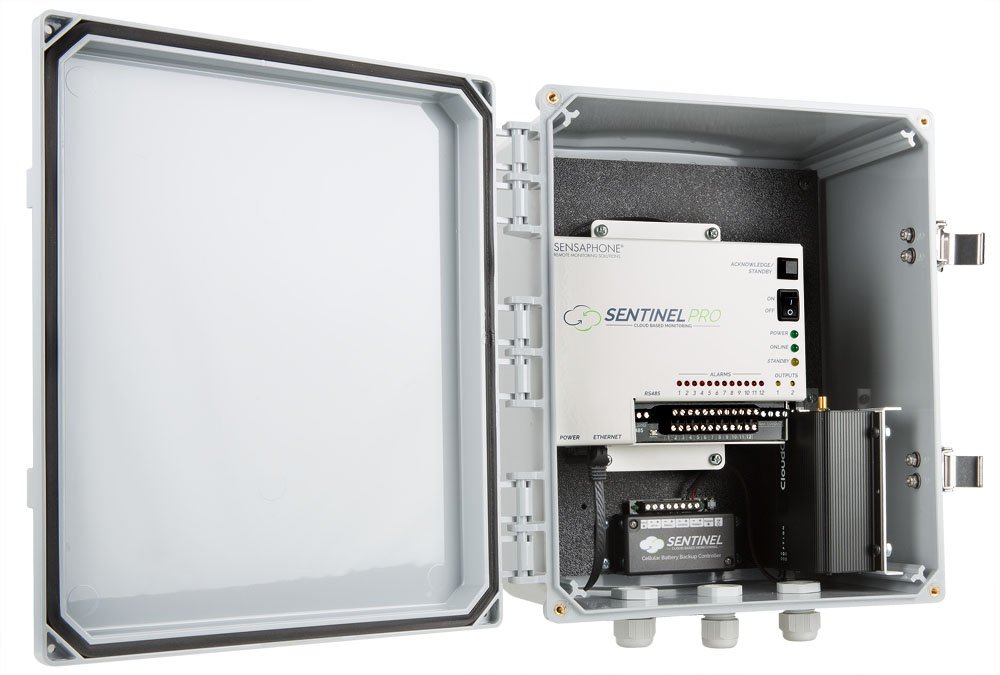
Figure 3.4: Interior view of the Sentinel Pro with the clear door open, revealing the main board and cellular modem.
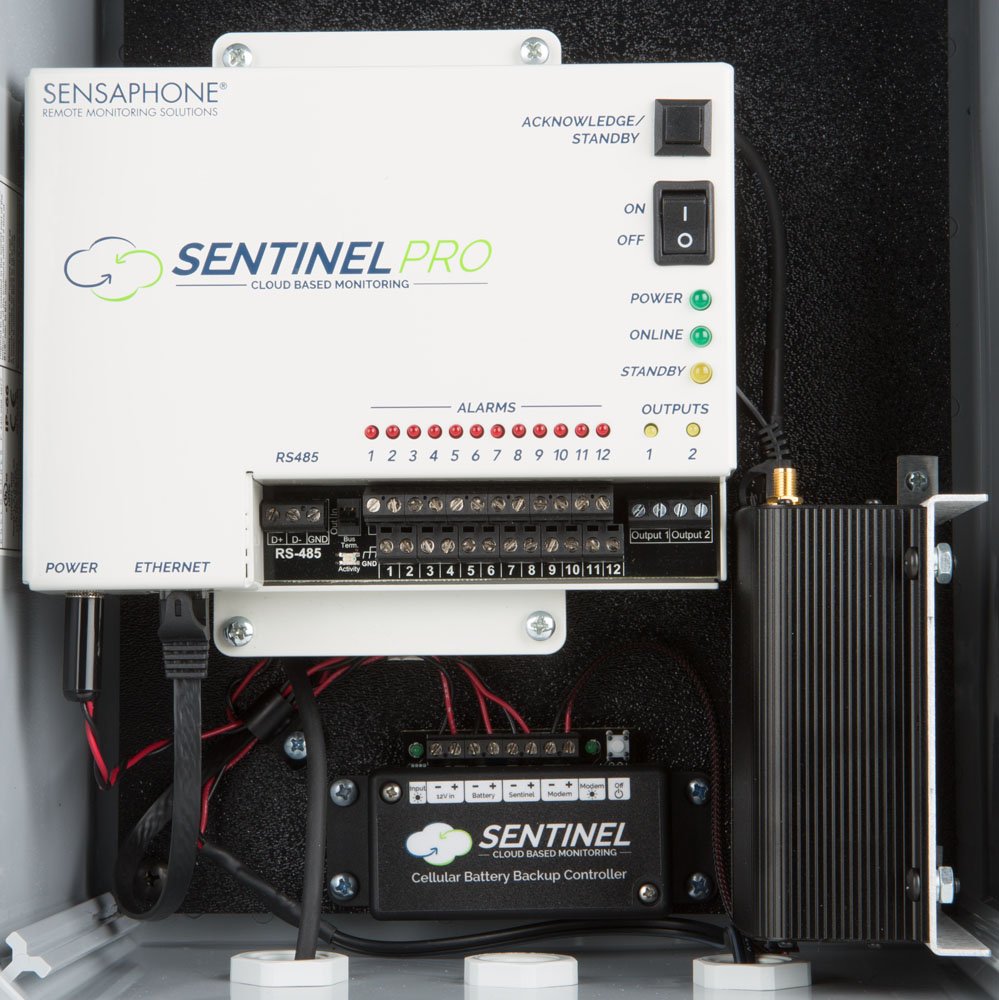
Figure 3.5: Detailed view of the Sentinel Pro's main board, showing sensor input terminals (1-12), RS485, Power, and Ethernet ports.
Connect the cellular antenna to the modem. Route all cables through the provided cable glands at the bottom of the enclosure to maintain the NEMA 4X rating. Finally, connect the power adapter to the unit and then to a suitable power outlet.

Figure 3.6: Bottom view of the Sentinel Pro enclosure, illustrating the cable glands for secure wiring.
3.4 Initial Configuration (Cloud-Based)
The Sentinel Pro is configured via a cloud-based web interface. Access the Sensaphone cloud portal using a web-enabled device. Follow the on-screen instructions to register your device, activate your cellular plan, and configure sensor parameters, alarm limits, and notification preferences (phone, text, email).
No software installation is required. The cloud interface allows for easy management and monitoring from anywhere.
4. Operation
4.1 Powering On and Status Indicators
Once connected to power, the Sentinel Pro will initiate its startup sequence. Observe the LED indicators on the main board:
- Power LED: Indicates the unit is receiving power.
- Online LED: Indicates successful connection to the Sensaphone cloud service via the cellular network.
- Alarms LEDs (1-12): Correspond to the status of each sensor input.
- Outputs LEDs (1-2): Indicate the status of the relay outputs.

Figure 4.1: Internal view of the Sentinel Pro, highlighting the LED status indicators for power, online status, alarms, and outputs.
4.2 Monitoring Data and Receiving Alerts
All sensor data is continuously logged and accessible through the cloud-based interface. You can view real-time readings, historical trends, and audit logs. When a monitored parameter exceeds its configured limits, the system will automatically trigger alerts based on your notification settings (phone calls, text messages, emails).
The system also sends daily event reports, providing a summary of activity.
4.3 Acknowledging Alarms
Alarms can be acknowledged directly from the cloud interface or via phone/text if configured. Acknowledging an alarm stops further notifications for that specific event.
5. Maintenance
- Regular Checks: Periodically check the system's online status via the cloud interface to ensure continuous operation.
- Battery Backup: The internal battery backup provides power during outages. Ensure the battery is properly connected and functioning. Refer to the cloud interface for battery status.
- Enclosure Integrity: For outdoor installations, regularly inspect the NEMA 4X enclosure for any signs of damage, cracks, or compromised seals that could affect its weather resistance. Ensure latches are securely closed.
- Cleaning: Clean the exterior of the enclosure with a damp cloth as needed. Do not use abrasive cleaners.
- Sensor Calibration: If using analog sensors that require calibration, follow the sensor manufacturer's guidelines.

Figure 5.1: Rear view of the Sentinel Pro enclosure, showing the robust latches for secure closure.
6. Troubleshooting
| Problem | Possible Cause | Solution |
|---|---|---|
| No Power LED | Power adapter unplugged or faulty; no power at outlet. | Check power connections. Test outlet with another device. Replace power adapter if necessary. |
| Online LED is off or blinking | No cellular signal; cellular plan inactive; modem issue. | Relocate unit for better signal. Verify cellular plan status with Sensaphone. Contact support if issue persists. |
| No alerts received | Incorrect notification settings; sensor not triggering; cellular network issue. | Verify notification settings in the cloud portal. Check sensor wiring and calibration. Confirm Online LED is solid. |
| Sensor reading incorrect | Sensor faulty; incorrect wiring; sensor out of calibration. | Check sensor wiring. Test sensor with another device if possible. Recalibrate or replace sensor. |
7. Technical Specifications
| Feature | Detail |
|---|---|
| Model | Sentinel Pro AT&T with Clear Door Enclosure |
| Manufacturer | Sensaphone |
| Product Dimensions | 14 x 12 x 7.4 inches |
| Weight | 15 Pounds |
| Enclosure Rating | NEMA 4X (Weather-proof) |
| Connectivity | 4G Cellular (AT&T network), Modbus RTU/485, Modbus TCP |
| Sensor Inputs | Up to 12 digital or analog sensors |
| Modbus Registers | Poll up to 64 Modbus registers |
| Alert Methods | Phone, Text, Email |
| Data Storage | Cloud-based, unlimited datalogging |
8. Warranty and Support
8.1 Warranty Information
For detailed warranty information regarding your Sensaphone Sentinel Pro system, please refer to the warranty card included with your product or visit the official Sensaphone website. Warranty terms typically cover manufacturing defects for a specified period from the date of purchase.
8.2 Technical Support
If you encounter any issues or have questions not covered in this manual, please contact Sensaphone Technical Support. Before contacting support, please have your product model and serial number ready.
Sensaphone Contact Information:
Please visit the official Sensaphone website for the most current contact details, including phone numbers, email addresses, and support hours.
Related documentsSentinel Pro AT&T with Clear Door Enclosure

Ask a question about this manual
Ask about setup, troubleshooting, compatibility, parts, safety, or missing instructions. Manuals+ will review the question and use this page’s manual context to help answer it.