1. Introduction
This instruction manual provides detailed guidance for using the Make It Real 1308 Gold & Glitter Accent Jewelry Kit. This DIY kit allows young designers, aged 8 and up, to create sparkling necklaces and other jewelry pieces by combining plaster, glitter, gold accents, and various components. Follow these instructions carefully to ensure a safe and enjoyable crafting experience.

Image 1.1: Example of a finished necklace being worn.
2. Safety Information
WARNING: CHOKING HAZARD – Small parts. Not for children under 3 years. Adult supervision is required at all times during the use of this product.
- Always use this kit under the direct supervision of an adult.
- Keep all small components away from young children and pets to prevent choking hazards.
- Avoid inhaling plaster powder. Work in a well-ventilated area.
- Do not ingest any materials from the kit.
- In case of contact with eyes or skin, rinse thoroughly with water. If irritation persists, seek medical attention.
- Dispose of waste materials responsibly according to local regulations.

Image 2.1: Product packaging displaying safety warnings and contents.
3. Package Contents and Setup
3.1. Kit Components
Before beginning, ensure all the following components are present in your kit:
- Plaster powder (100g)
- Plastic mold
- 20 gold jewelry pieces (charms/connectors)
- Gold chain with clasp (65 cm)
- 2 colors of glitter
- Metallic adhesive tape
- Brush
- Craft glue
- Instruction sheet

Image 3.1: All components included in the kit.
3.2. Workspace Preparation
Prepare a clean, flat, and well-lit workspace. Cover the surface with newspaper or a protective mat to prevent spills and make cleanup easier. Gather a small bowl and a stirring stick for mixing plaster (not included).
4. Operating Instructions
4.1. Creating Plaster Charms
- Mix Plaster: In a separate bowl, mix a small amount of plaster powder with water according to the instructions on the plaster packaging (or a 2:1 plaster to water ratio). Stir until smooth and lump-free.
- Fill Molds: Carefully pour the plaster mixture into the plastic mold cavities. Tap the mold gently on the table to release any air bubbles.
- Insert Hooks: Before the plaster sets, insert one of the gold jewelry pieces (hooks/loops) into the top of each charm, ensuring it is securely embedded.
- Dry: Allow the plaster charms to dry completely. This may take several hours, depending on humidity. Once dry, carefully remove the charms from the mold.
4.2. Decorating Charms with Glitter and Tape
- Apply Glue: Using the craft glue and brush, apply a thin layer of glue to the areas of the plaster charm where you want to add glitter.
- Add Glitter: Sprinkle one of the glitter colors over the glued areas. Gently tap off any excess glitter. Allow the glue to dry.
- Apply Metallic Tape: Cut small strips of metallic adhesive tape and apply them to the charms to create patterns or accents. Press firmly to ensure adhesion.
- Repeat: Repeat steps 1-3 with different glitter colors or tape designs as desired.
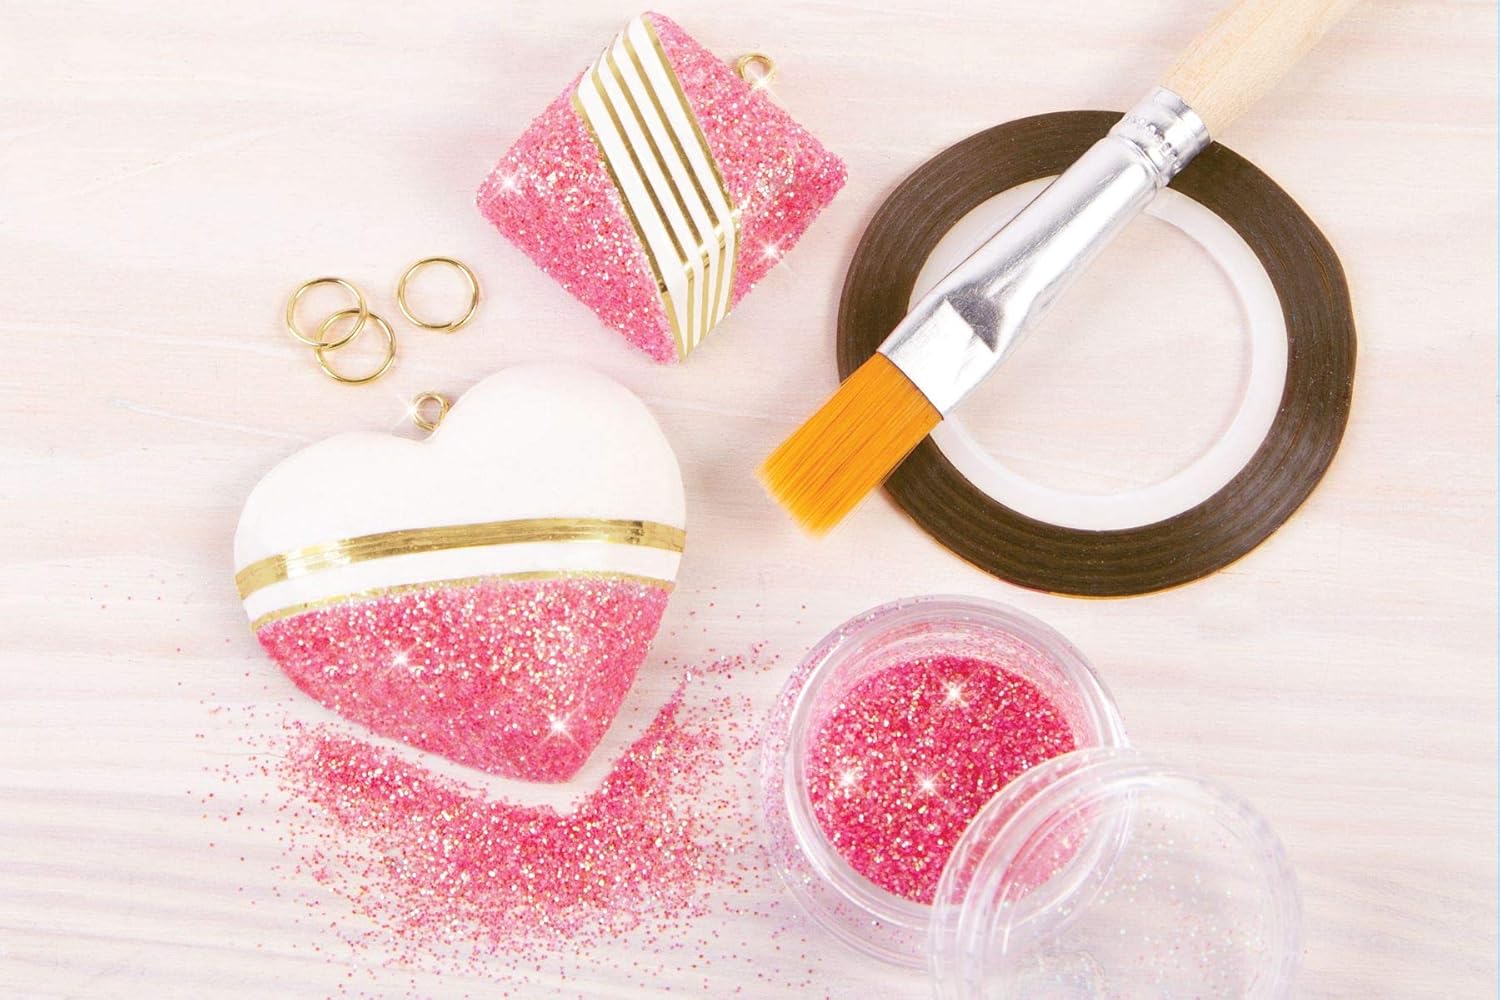
Image 4.1: Charms decorated with glitter and metallic tape.
4.3. Assembling Jewelry
- Attach Charms to Chain: Open the clasp of the gold chain. Thread the chain through the embedded hook on your decorated plaster charm. Close the clasp securely.
- Create Multiple Pieces: Use the remaining charms and gold jewelry pieces to create additional necklaces, bracelets, or other accessories.

Image 4.2: Examples of completed jewelry pieces.
5. Maintenance
- Cleaning Tools: After use, immediately clean the brush and any mixing tools with water to prevent plaster or glue from hardening on them.
- Storage: Store unused plaster powder, glitter, and other components in their original containers or airtight bags in a cool, dry place to maintain their quality.
- Finished Jewelry: Keep finished jewelry away from excessive moisture to preserve the integrity of the plaster and glitter.
6. Troubleshooting
- Plaster Not Setting: Ensure the correct water-to-plaster ratio is used. High humidity can also affect drying time; allow more time in such conditions.
- Glitter Not Sticking: Apply a sufficient, even layer of craft glue before sprinkling glitter. Ensure the glue is still wet when applying glitter.
- Charms Breaking: Handle dried plaster charms carefully as they can be fragile. Ensure the plaster is fully set before removing from molds.
- Metallic Tape Not Adhering: Ensure the charm surface is clean and dry before applying tape. Press firmly along the entire length of the tape.
7. Specifications
- Model Number: 1308
- Brand: Make It Real
- Product Dimensions (L x W x H): 37 x 24 x 26.5 cm (14.57 x 9.45 x 10.43 inches)
- Item Weight: 45 Grams (0.1 lbs)
- Material: Plastic (molds), Plaster, Metal (chains/charms)
- Age Range: 8 years and up
- Color: Multicolored (components)
- UPC: 695929013080
8. Warranty Information
This product is covered by the standard manufacturer's warranty. For specific details regarding warranty coverage, duration, and claims process, please refer to the information provided on the product packaging or contact the manufacturer directly. Please retain your proof of purchase for any warranty claims.
9. Support
For further assistance, questions, or to report any issues with your Make It Real 1308 Gold & Glitter Accent Jewelry Kit, please visit the official Make It Real website or contact their customer support. You can find more information and contact details at: www.makeitrealplay.com


