1. Introduction
This manual provides detailed instructions for the safe and efficient operation of your Energizer 3000W Modified Sine Wave Power Inverter, Model ENK3000. This device converts 12V DC battery power into 120V AC household power, enabling you to operate various appliances and tools from your vehicle or other 12V power sources. Please read this manual thoroughly before use and retain it for future reference.
2. Safety Information
Adherence to these safety guidelines is crucial to prevent personal injury and damage to the inverter or connected devices.
- Ventilation: Ensure adequate ventilation around the inverter. Do not block ventilation openings.
- Environment: Operate the inverter in a dry, cool, and well-ventilated area, away from direct sunlight, heat sources, and flammable materials.
- Moisture: Do not expose the inverter to rain, water, or excessive moisture.
- Grounding: The inverter must be properly grounded. Refer to the installation section for grounding instructions.
- Battery Connection: Connect the inverter directly to a 12V DC battery. Ensure correct polarity (+ to + and - to -). Incorrect connection can cause damage.
- Load Capacity: Do not exceed the inverter's rated wattage (3000W continuous, 6000W peak). Overloading can cause the inverter to shut down or be damaged.
- Medical Devices: This inverter is not suitable for use with life-support systems or other critical medical equipment.
- Children: Keep the inverter out of reach of children.
- Servicing: Do not attempt to open or service the inverter yourself. Refer all servicing to qualified personnel.
3. Package Contents
Verify that all items are present in the package:
- Energizer 3000W Modified Sine Wave Power Inverter (Model ENK3000)
- Installation Hardwire Kit
- 3FT 0 AWG Battery Cables (Red and Black)
- User Manual (this document)
4. Product Features and Components

Figure 4.1: Overall view of the Energizer 3000W Power Inverter, showcasing its robust design and primary connections.
4.1 Front Panel Features

Figure 4.2: Detailed view of the inverter's front and rear panels, highlighting key components.
- LCD Digital Display: Shows battery output, output wattage, input voltage, and warning indicators.
- Main Shutdown Switch: Power button for turning the inverter on and off.
- 2 USB Ports (2.4 Amp Each): For charging USB-powered devices.
- Display Selector Switch: Used to cycle through display modes on the LCD.
- 2 Standard North American Outlets: 120V AC outlets for connecting appliances.
- Hardwire AC Output Connection: Terminal block for permanent AC wiring.
4.2 Rear Panel Features
- Negative Power Input Terminal (Black): Connects to the negative terminal of the 12V battery.
- Positive Power Input Terminal (Red): Connects to the positive terminal of the 12V battery.
- Ground Terminal: For connecting the inverter to an earth ground.
- High Speed Cooling Fan: Automatically activates to dissipate heat during operation.
- Remote Control Receptacle: For connecting an optional remote control unit (if applicable).
4.3 LCD Display Indicators
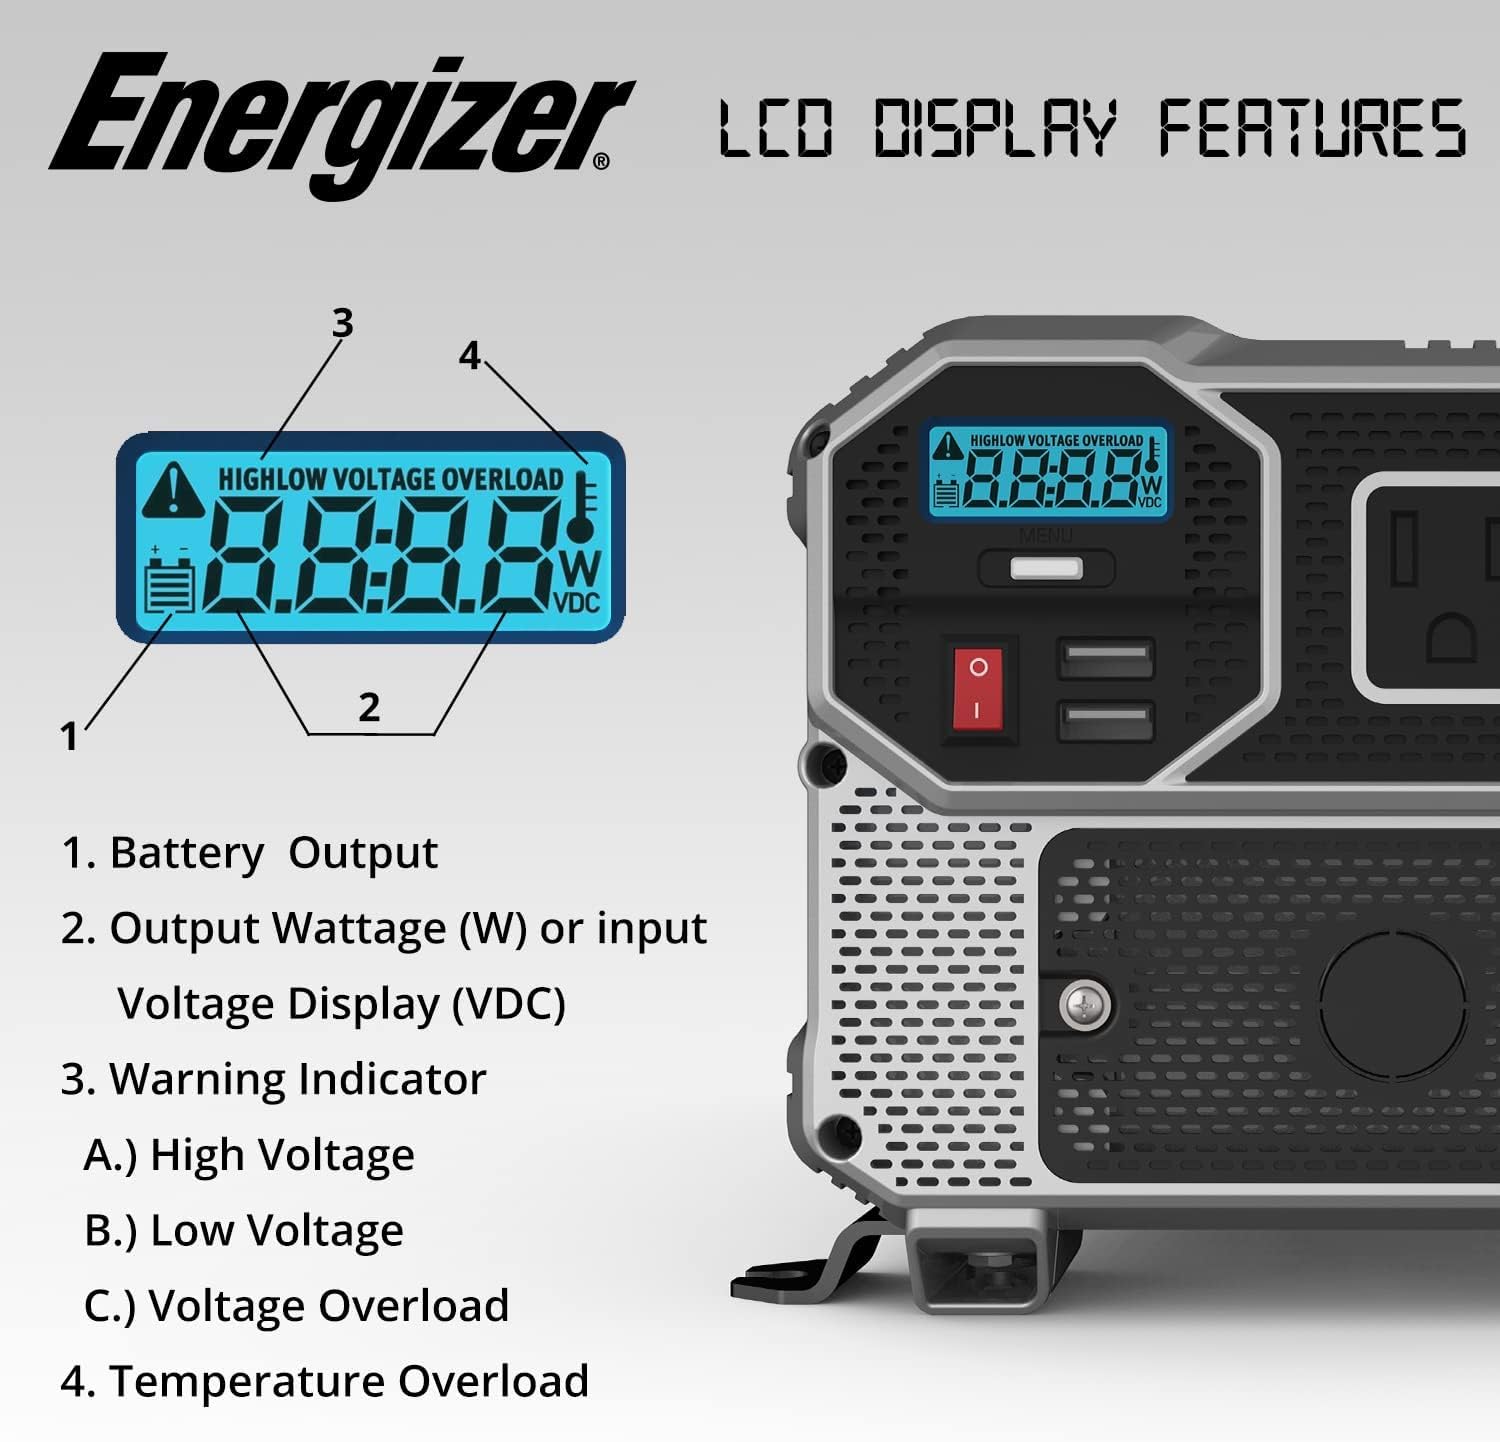
Figure 4.3: Close-up of the LCD display, detailing its various indicators.
- Battery Output: Displays the current battery voltage.
- Output Wattage (W) or Input Voltage Display (VDC): Shows the power consumption of connected devices in watts or the input DC voltage.
- Warning Indicator: Illuminates to signal specific conditions:
- High Voltage: Input voltage exceeds safe limits.
- Low Voltage: Input voltage is below safe operating limits.
- Voltage Overload: Connected load exceeds the inverter's capacity.
- Temperature Overload: Indicates the inverter is overheating.
5. Setup and Installation
Proper installation is critical for safe and efficient operation.
5.1 Choosing a Location
- Mount the inverter on a flat, stable surface.
- Ensure the location is dry, cool, and well-ventilated.
- Avoid areas with direct sunlight, heat, or moisture.
- Maintain at least 6 inches of clear space around the inverter for proper airflow.
5.2 Grounding the Inverter
The inverter must be properly grounded. Connect a heavy-gauge wire (not included) from the inverter's ground terminal to a suitable earth ground point, such as the chassis of a vehicle or a dedicated ground rod.
5.3 Connecting to a 12V Battery
Use the provided 3FT 0 AWG battery cables for connection. Ensure the inverter is turned off before making connections.
- Connect the red cable to the inverter's positive (+) terminal and then to the battery's positive (+) terminal.
- Connect the black cable to the inverter's negative (-) terminal and then to the battery's negative (-) terminal.
- Ensure all connections are tight and secure. Loose connections can cause overheating and damage.
5.4 Hardwire AC Output Connection
The included hardwire kit allows for permanent AC wiring. This connection is suitable for fixed installations where direct wiring to a distribution panel or specific appliances is desired.
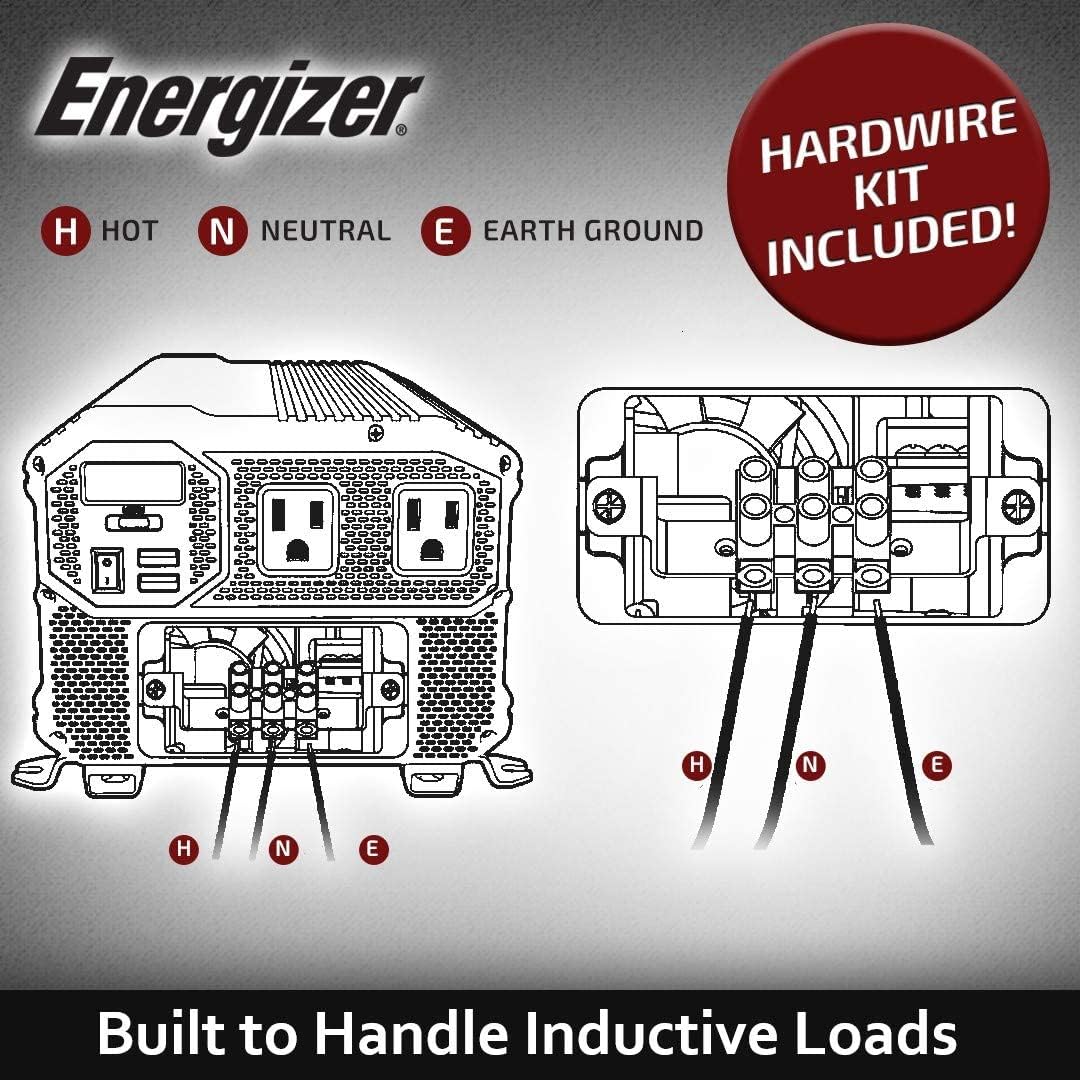
Figure 5.1: Diagram illustrating the hardwire AC output connection points (H: Hot, N: Neutral, E: Earth Ground).
Consult a qualified electrician for hardwire installations to ensure compliance with local electrical codes and safety standards.
6. Operating Instructions
6.1 Powering On the Inverter
- Ensure all DC and AC connections are secure.
- Press and hold the Main Shutdown Switch (power button) on the front panel for a few seconds until the LCD display illuminates.
- The LCD will show the battery voltage and output wattage (if a load is connected).
6.2 Connecting AC Devices
- Plug your AC appliances into the standard North American outlets on the front panel.
- Ensure the total wattage of all connected devices does not exceed 3000W.
- For devices with high startup (surge) power requirements, ensure the inverter's peak power rating (6000W) is sufficient.
6.3 Using USB Ports
The two 2.4 Amp USB ports can be used to charge compatible USB-powered devices directly.
6.4 Powering Off the Inverter
- Disconnect all AC appliances and USB devices.
- Press and hold the Main Shutdown Switch until the LCD display turns off.
7. Maintenance
- Cleaning: Periodically clean the exterior of the inverter with a dry, soft cloth. Do not use liquid cleaners or solvents.
- Ventilation: Ensure the cooling fan and ventilation openings are free from dust and debris. Use compressed air to clear blockages if necessary.
- Connections: Regularly check battery and AC connections for tightness and corrosion. Clean any corrosion with a wire brush and baking soda solution.
- Battery Care: Maintain your 12V battery according to its manufacturer's instructions to ensure optimal performance and lifespan for the inverter.
8. Troubleshooting
| Problem | Possible Cause | Solution |
|---|---|---|
| No power output / Inverter does not turn on |
|
|
| Overload warning / Inverter shuts down |
|
|
| Low voltage warning |
|
|
| Over-temperature warning |
|
|
9. Specifications
| Model Name | ENK3000 |
| Continuous Wattage | 3000 Watts |
| Peak Wattage | 6000 Watts |
| Input Voltage | 12V DC |
| Output Voltage | 120V AC |
| Output Waveform | Modified Sine Wave |
| USB Output | 2 x 2.4 Amp USB Ports |
| Product Dimensions | 13.31 x 7.68 x 5.63 inches |
| Item Weight | 11.68 pounds |
| Power Source | Battery Powered |
| Recommended Use | Vehicle |
| Manufacturer | Energizer Batteries |
10. Warranty and Support
This Energizer 3000W Power Inverter comes with a 2-Year Warranty from the date of purchase. This warranty covers defects in materials and workmanship under normal use.
For warranty claims, technical support, or service inquiries, please contact Energizer customer support. Keep your proof of purchase for warranty validation.
Contact Information: Refer to the Energizer official website or product packaging for the most current customer support contact details.


