
1. Introduction and Overview
The Hanchen HP-20 Digital Torque Meter is a versatile and intelligent measuring instrument designed for precise torque testing. It is primarily used for calibrating tightening force and performing torsional destructive testing on various components, including bottle caps. Its design emphasizes ease of operation, high accuracy, portability, and comprehensive functionality, making it suitable for applications in electrical engineering, light industry, machinery processing, and research institutions.

Figure 1.1: Front view of the Hanchen HP-20 Digital Torque Meter, showing the display and control buttons.
2. Safety Information
Please read and understand all safety instructions before operating the Hanchen HP-20 Digital Torque Meter. Failure to follow these instructions may result in injury or damage to the device.
- Always operate the device on a stable, level surface to prevent accidental drops or inaccurate readings.
- Do not exceed the maximum specified torque capacity of the instrument. Overloading can cause permanent damage.
- Ensure the correct power supply voltage (110V for this model) is used. Incorrect voltage can damage the internal electronics.
- Keep the device dry and away from liquids. Avoid operating in environments with high humidity or extreme temperatures.
- Refer to the charging instructions for safe battery handling and charging procedures.
- Do not attempt to disassemble or repair the device yourself. Contact qualified service personnel for any maintenance or repair needs.
3. Product Features
The Hanchen HP-20 Digital Torque Meter incorporates several advanced features for precise and efficient torque measurement:
- High-Precision Torque Sensor: Equipped with an advanced torque sensor that provides accurate measurements and displays torque direction.
- Limit Settings and Alarms: Allows setting upper and lower torque limits. Visual indicators (red/green lights) and an audible buzzer provide immediate feedback when limits are reached or exceeded.
- PC Interface and Data Analysis: Features a USB interface for PC communication. This enables synchronous testing, real-time display of force graphs, and detailed test process monitoring on a computer. Data can be saved, printed, and used for various analytical purposes.
- Peak Holding Function: Includes a peak holding function that automatically captures and displays the maximum torque value achieved during a test. This function can be configured for automatic removal after a set time, offering flexibility in measurement.
- High Performance Display: Offers high precision, high resolution, and a fast sampling rate, with a clear full-screen display for easy reading of measurements.

Figure 3.1: Detailed view of the Hanchen HP-20 control panel and display.
4. Setup
Follow these steps to set up your Hanchen HP-20 Digital Torque Meter:
- Unpacking: Carefully remove the torque meter and all accessories from the packaging. Inspect the device for any signs of damage during transit.
- Placement: Place the torque meter on a stable, flat, and vibration-free surface. Ensure adequate space around the device for operation and ventilation.
- Power Connection: Connect the provided 110V power adapter to the device's power input port and then to a standard 110V AC power outlet.
- Initial Charging: If the device is battery-operated, allow it to charge fully before first use. The initial charge time is approximately 20 hours. Refer to the charging indicator on the device.
- Mounting (if applicable): If using external fixtures or a test stand, securely mount the torque meter according to the specific application requirements.
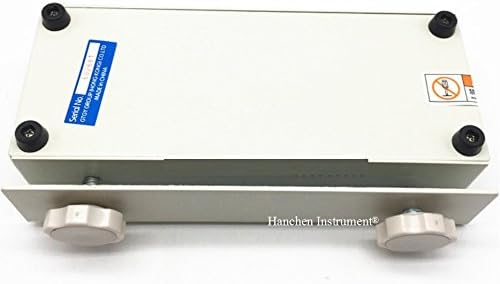
Figure 4.1: Bottom view of the Hanchen HP-20 Digital Torque Meter, showing mounting points and serial number label.
5. Operating Instructions
This section outlines the basic steps for operating the Hanchen HP-20 Digital Torque Meter.
- Power On/Off: Press the POWER button to turn the device on. Press and hold the POWER button to turn it off.
- Mode Selection: Press the MODE button to cycle through the measurement modes: TRACK (real-time display), PEAK (displays maximum value), and FIRST PEAK (captures the first peak value).
- Unit Selection: Press the UNIT button to select the desired unit of measurement: Nm, lbf.in, or kgf.cm.
- Setting Limits: Use the SET button and arrow keys to configure upper and lower torque limits. The device will provide visual and audible alerts when these limits are met.
- Performing a Measurement: Apply torque to the object being tested. The display will show the real-time torque value in TRACK mode, or the peak value in PEAK/FIRST PEAK modes.
- Clearing Readings: Press the CLR button to clear the current reading or reset peak values.
- PC Connection (Optional): Connect the device to a computer via the USB interface. Install the necessary software (not included in this manual) to enable synchronous testing, data logging, and analysis.
6. Maintenance
Proper maintenance ensures the longevity and accuracy of your Hanchen HP-20 Digital Torque Meter.
- Cleaning: Wipe the device with a soft, dry cloth. Do not use abrasive cleaners or solvents, as these can damage the display or casing.
- Battery Care: Recharge the battery when the low battery indicator appears. Avoid completely draining the battery frequently. The battery has a lifespan of approximately 300 charges.
- Storage: Store the torque meter in a clean, dry environment, away from direct sunlight, extreme temperatures, and corrosive substances.
- Calibration: For continued accuracy, periodic calibration by qualified personnel is recommended. The frequency of calibration depends on usage and application requirements.
7. Troubleshooting
This section addresses common issues you might encounter with the Hanchen HP-20 Digital Torque Meter.
- Device does not power on:
- Check if the power adapter is securely connected to both the device and the power outlet.
- Ensure the power outlet is functional.
- If using battery power, ensure the battery is sufficiently charged.
- Inaccurate readings:
- Verify that the device is placed on a stable, level surface.
- Ensure the correct unit of measurement is selected.
- Check if the device requires calibration.
- Ensure the applied torque is within the device's specified range.
- Display is blank or frozen:
- Try turning the device off and then on again.
- Ensure the battery is charged or the power adapter is connected.
- PC connection issues:
- Ensure the USB cable is properly connected to both the device and the computer.
- Verify that the correct driver software is installed on your computer.
- Check the settings in the PC software.
8. Specifications
The following table details the technical specifications of the Hanchen HP-20 Digital Torque Meter:
| Parameter | Specification |
|---|---|
| Model | HP-20 |
| Peak Range (Nm) | 0.030 – 2.000 |
| Peak Range (lbf.in) | 0.3 – 18.00 |
| Peak Range (kgf.cm) | 0.3 – 20.00 |
| Accuracy | ±0.5% (FS) |
| Measurement Modes | Track, Peak, First Peak |
| Dimensions (L x W x H) | 230mm x 5mm x 120mm |
| Weight | 4 kg |
| Battery Pack | Five 1.2V NiMH 1000mA |
| Charge Time | Approximately 20 hours |
| Continuous Operation (Full Charge) | 8 hours |
| Battery Lifespan | Approximately 300 charges |
| Power Input | AC 110V 60Hz |
| Power Output | DC 15V 500mA |
| Material | Polycarbonate |

Figure 8.1: Technical specifications table for the HP-10, HP-20, HP-50, and HP-100 models.
9. Warranty and Support
Hanchen Instrument aims to provide quality products and service. For technical support, service, or warranty inquiries, please contact Hanchen customer service. Please have your model number (HP-20) and purchase information ready when contacting support.