Introduction
This manual provides comprehensive instructions for the installation, operation, and maintenance of your Techage Analog CCTV Camera HD 1080P Complete Security Bullet Camera Kit. Please read this manual carefully before using the product to ensure proper setup and functionality.

Figure 1: Techage Analog CCTV Camera HD 1080P Complete Security Bullet Camera Kit, showing the DVR and four bullet cameras.
Setup and Installation
Follow these steps to set up your Techage security system.
1. System Components
Your kit includes a Digital Video Recorder (DVR) and multiple 1080P bullet cameras. Each camera is designed for robust outdoor and indoor use with IP66 weatherproofing.

Figure 2: A single Techage 1080P bullet camera, featuring a 3.6mm lens and infrared LEDs for night vision.
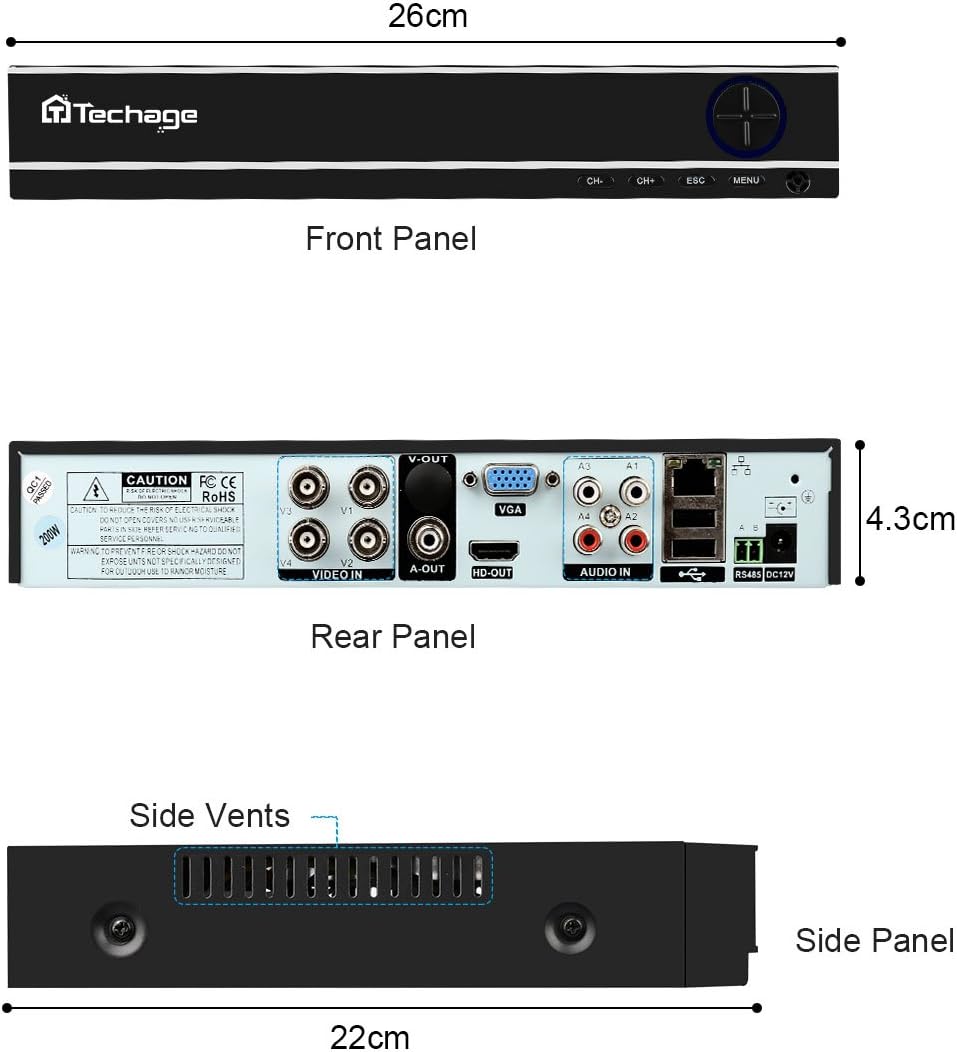
Figure 3: Front, Rear, and Side Panels of the Techage DVR, showing input/output ports and dimensions.
2. Hardware Connection
Connect all components as illustrated in the diagram below. Ensure all connections are secure before powering on the system.
- Connect each camera to the DVR using the provided power and video cables.
- Connect the DVR to a monitor or TV using an HDMI or VGA cable.
- Connect the DVR to your network router using an Ethernet cable for remote viewing capabilities.
- Connect the power supply to the DVR and cameras.

Figure 4: Installation and Connection Diagram. This diagram illustrates how to connect the cameras to the DVR, and the DVR to a monitor/HDTV and network for live viewing.
3. Mobile Settings for Remote Viewing
To view your cameras remotely on your mobile device, follow these steps:
- Install the Xmeye App: Scan the QR code or visit the links below to download the Xmeye mobile application for your device.
- Local Login: Open the Xmeye app and select "Local Login".
- Add Device: Tap the "+" icon to add a new device.
- Enter Serial Number: Input the 16-digit serial number of your DVR. This can usually be found on the DVR itself or in the system information menu.
- Choose Device: Select the device from the list to begin viewing your cameras.

Figure 5: Mobile Settings for Remote Viewing. This image illustrates the 5 steps to configure the Xmeye app for live camera viewing on a smartphone.
Operating Instructions
Live View and Recording
Once connected, you can view live footage from your cameras on a connected monitor, or remotely via the Xmeye app on your computer, tablet, or smartphone. The DVR continuously records footage, which can be reviewed later.
Day and Night Monitoring
The cameras are equipped with infrared (IR) LEDs for true day and night monitoring. During the day, the cameras provide full-color video. As light levels decrease, the cameras automatically switch to black and white night vision mode to ensure continuous surveillance.

Figure 6: Day and Night Vision Comparison. This image shows the difference in camera footage during daytime (color) and nighttime (black and white infrared).
Motion Detection and Email Notifications
Configure motion detection settings on your DVR to trigger recordings and send instant email notifications to your registered email address when activity is detected. This feature enhances security by alerting you to potential incidents in real-time.

Figure 7: Email Notifications for Motion Detection. This image depicts how the system can send email alerts to your mobile device upon detecting suspicious activity.
Maintenance
- Camera Lenses: Periodically clean camera lenses with a soft, lint-free cloth to ensure clear image quality. Avoid abrasive cleaners.
- Cable Connections: Regularly check all cable connections (power, video, network) to ensure they are secure and free from damage.
- DVR Ventilation: Ensure the DVR's side vents are clear of obstructions to prevent overheating.
- Software Updates: Check the manufacturer's website for any available firmware updates for your DVR to ensure optimal performance and security.
Troubleshooting
| Problem | Possible Cause | Solution |
|---|---|---|
| No video display on monitor/TV. | Loose video cable, incorrect input selected on monitor, DVR not powered on. | Check all video cable connections. Ensure monitor is set to the correct HDMI/VGA input. Verify DVR power supply. |
| No remote viewing via mobile app. | DVR not connected to network, incorrect network settings, app not configured correctly. | Ensure DVR is connected to the internet. Verify network settings on DVR. Re-check mobile app configuration steps (Figure 5). |
| Poor image quality. | Dirty camera lens, low light conditions (if not in night mode), cable interference. | Clean camera lens. Ensure sufficient lighting or verify night vision is active. Check cable integrity. |
| Motion detection not working. | Motion detection settings not enabled, sensitivity too low, recording schedule not set. | Access DVR settings to enable motion detection, adjust sensitivity, and set recording schedules. |
Specifications
| Feature | Detail |
|---|---|
| Brand | Techage |
| Connectivity Technology | Wired |
| Video Capture Resolution | 1080p |
| Special Feature | Night Vision |
| Number of Channels | 4 |
| Power Source | Corded Electric |
| Compatible Devices | Cameras |
| Signal Format | Analog |
| Low light technology | Night Vision |
| Manufacturer | Tinosec |
| Package Dimensions | 11.7 x 10 x 9.7 inches |
| Item Weight | 9.83 pounds |
| ASIN | B07BB7FYKX |
| Date First Available | November 6, 2018 |
Warranty and Support
Specific warranty information for this product is not provided in the available data. Please refer to the product packaging or the manufacturer's official website for detailed warranty terms and conditions.
For technical support or further assistance, please contact Techage customer service through their official channels. Keep your purchase receipt and product serial number handy when contacting support.


