
1. Introduction
The myTouchSmart 33861 LE One In-Wall Digital Timer is designed to automate the control of indoor and outdoor lighting, fans, and other devices. This timer offers various programming options, including custom ON/OFF times, a countdown mode, and daily/weekly settings. It features SunSmart technology, which automatically adjusts to local sunset and sunrise times, and a backlit LED screen for clear visibility. The timer is equipped with a push-door switch for manual operation and access to programming buttons.

Image: The myTouchSmart 33861 LE One In-Wall Digital Timer shown with its packaging, highlighting key features like 7-day daily/weekly settings, custom countdown mode, and SunSmart technology. The timer itself is visible with its backlit screen and push-door switch.
2. Safety Information
- Electrical Installation: Installation should be performed by a qualified electrician or a knowledgeable individual familiar with electrical wiring. Always turn off power at the circuit breaker before installation.
- Neutral Wire Required: A neutral wire is required for the proper operation and installation of this timer. Ensure your electrical box has a neutral wire available.
- Electrical Ratings: This timer is rated for 120 VAC, 60Hz, 15A Resistive, 10A Tungsten, 5A Electronic Ballast, and 1/2HP Motor. Do not exceed these ratings.
- Indoor Use: This device is intended for indoor use only.
3. Package Contents
Verify that all components are present before beginning installation:
- myTouchSmart 33861 LE One In-Wall Digital Timer
- White interchangeable ON/OFF switch cover
- Light almond interchangeable ON/OFF switch cover
- User Manual (this document)
Note: Wall plate is not included.
4. Installation
Important: Turn off power at the circuit breaker before proceeding with installation. A neutral wire is required.
- Prepare Wiring: Carefully remove the existing wall switch. Identify the Line (hot), Load, Neutral, and Ground wires. It is recommended to label each wire.
- Connect Wires: Connect the wires from the wall box to the corresponding screw terminals on the myTouchSmart timer. Ensure connections are secure and tight (8.85 - 12.39 lbf-in or 1.0 - 1.4 Nm).
- Line: Connect the incoming power wire (hot) to the 'Line' terminal.
- Load: Connect the wire going to the light/device to the 'Load' terminal.
- Neutral: Connect the neutral wire to the 'Neutral' terminal. This connection is mandatory.
- Ground: Connect the ground wire to the 'Ground' terminal.
- Mount Timer: Carefully push the wired timer into the wall box. Secure it with the provided screws.
- Install Faceplate: Attach your desired wall plate (not included) over the timer.
- Restore Power: Turn the power back on at the circuit breaker.

Image: Detailed wiring diagram showing connections for Load, Traveler (not used for single-pole), Neutral, Line, and Ground terminals on the back of the myTouchSmart timer. Caution regarding high voltage and wire gauge is also visible.
Clarification on Line vs. Load: The 'Line' wire provides power from the electrical panel. The 'Load' wire carries power from the switch to the connected device (e.g., light, fan). Ensure these are connected correctly as per the diagram.
5. Initial Setup
After installation and restoring power, the timer's backlit LED screen will activate. Follow these steps for initial setup:
- Set Current Time and Date: Use the UP (▲) and DOWN (▼) arrow buttons to adjust the current time and date displayed on the screen. Press the CLOCK button to cycle through setting hours, minutes, and day of the week.
- Select Region for SunSmart Technology: Press the SET button to enter the region selection mode. Use the UP (▲) and DOWN (▼) arrows to select your geographical region. This allows the SunSmart technology to automatically adjust sunset/sunrise times.
- Daylight Saving Time (DST): The timer includes an adjustment for daylight saving. Refer to the full manual for specific instructions on enabling or disabling DST.

Image: Visual guide illustrating the three simple setup steps: 1. Scroll to set current time & date, 2. Select region for SunSmart technology, 3. Choose from preset options or set custom times. The timer's screen and buttons are clearly visible.
6. Operating Instructions
The myTouchSmart timer offers various programming options and manual controls. Open the push-door switch to access the programming buttons.

Image: Close-up of the myTouchSmart 33861 timer's control panel, showing the backlit LED screen, ON/OFF override buttons, two programmable ON/OFF buttons, and additional program/countdown buttons.
6.1 Manual ON/OFF Override
The large ON/OFF button (or the push-door switch itself) allows for immediate manual control of the connected device, overriding any active program without deleting it.
6.2 Custom ON/OFF Programs
The timer allows for up to 8 custom ON/OFF times. Use the MY ON TIME and MY OFF TIME buttons to set specific schedules.
- Press MY ON TIME (or MY OFF TIME) once to view the current setting. Press again to enter programming mode.
- Use the UP (▲) and DOWN (▼) arrows to adjust the time.
- Press MY ON TIME (or MY OFF TIME) again to save the setting.
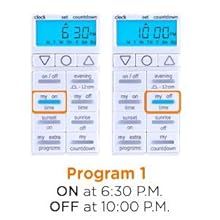
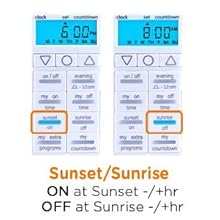
Image: Two examples of custom program settings. The first shows an ON time of 6:30 P.M. and OFF time of 10:00 P.M. The second shows an ON time of 8:30 A.M. and OFF time of 3:00 P.M.
6.3 Preset Options
The timer includes convenient preset options:
- Evening: Activates the device at a preset evening time (e.g., ON at 5:30 P.M., OFF at 12:00 A.M.). Press the EVENING button to activate or adjust.
- Sunset ON / Sunrise OFF: Utilizes SunSmart technology to automatically turn the device ON at sunset and OFF at sunrise, adjusting daily based on your selected region. Press the SUNSET ON or SUNRISE OFF buttons to activate.
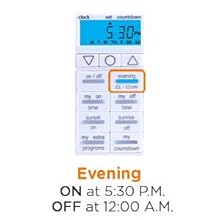
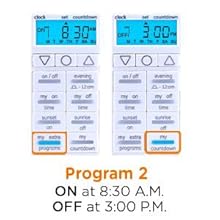
Image: Two examples of preset options. One shows the 'Evening' preset with ON at 5:30 P.M. and OFF at 12:00 A.M. The other shows the 'Sunset/Sunrise' preset, where ON occurs at sunset and OFF at sunrise.
6.4 Countdown Mode
The COUNTDOWN button allows you to set a specific duration for the device to remain ON before automatically turning OFF. This is useful for temporary lighting needs.
- Press COUNTDOWN to activate.
- Use the UP (▲) and DOWN (▼) arrows to set the desired countdown duration.
- The device will turn OFF once the countdown expires.
7. Maintenance
- Cleaning: Wipe the timer's surface with a soft, dry cloth. Do not use abrasive cleaners or solvents.
- Backup Battery: The timer includes a backup battery to maintain your programmed settings in the event of a power outage. No user maintenance is required for this battery.

Image: Icon depicting a cloud with a lightning bolt, symbolizing the timer's ability to retain settings during power outages thanks to its backup battery.
8. Troubleshooting
- Timer Not Functioning After Installation:
- Ensure power is restored at the circuit breaker.
- Verify all wiring connections (Line, Load, Neutral, Ground) are correct and secure. A common issue is incorrect identification of Line and Load wires. Refer to the installation section and diagram.
- Confirm a neutral wire is connected; it is required for this timer.
- Programs Not Activating:
- Check that the current time and day are set correctly.
- Ensure the desired program (e.g., MY ON/OFF TIME, Evening, Sunset/Sunrise) is activated and not overridden by manual ON/OFF.
- For SunSmart features, confirm your region is correctly selected.
- Screen is Blank:
- Check power at the circuit breaker.
- Verify wiring connections.
- Difficulty Programming:
- Refer to the detailed programming steps in Section 6.
- Ensure you are pressing the correct buttons to enter and save programming modes.
9. Specifications
| Specification | Value |
|---|---|
| Model Number | 33861 |
| Operation Mode | ON-OFF-ON |
| Current Rating | 15 Amps |
| Operating Voltage | 125 Volts (AC) |
| Contact Type | Normally Closed |
| Connector Type | Screw |
| Terminal | Screw |
| Item Dimensions (L x W x H) | 6.6 x 8.64 x 11.18 inches |
| Circuit Type | 1-way |
| Actuator Type | Push Button |
| Contact Material | Nickel |
| International Protection Rating | IP01 |
| Upper Temperature Rating | 40 Degrees Celsius |
| Control Method | Touch |
| Item Weight | 6.4 ounces |
| Certifications | UL Listed |

Image: Diagram showing the dimensions of the myTouchSmart 33861 timer: 4.06 inches (10.31cm) in height and 1.75 inches (4.45cm) in width.
10. Warranty and Support
For detailed warranty information, additional support, or to download the latest version of this manual, please visit the official product support page:
jascoproducts.com/HEP-ET/20000-99999/26892
This product is UL Listed, ensuring it meets recognized safety standards.


