Introduction
This manual provides detailed instructions for the setup, operation, maintenance, and troubleshooting of your Pyle Bluetooth Home Theater Amplifier, model PDA7BU. Please read this manual thoroughly before using the device to ensure proper functionality and safety.

Image: Front view of the Pyle PDA7BU Bluetooth Home Theater Amplifier, showcasing its controls and display.
What's in the Box
Upon unpacking, please verify that all the following components are included:
- Amplifier Receiver (Pyle PDA7BU)
- Remote Control
- Rack Mounts (Pair of 19" rack mount adapters)
- FM Antenna

Image: Diagram showing the amplifier, remote control, FM antenna, and 19-inch rack mount adapters, along with product dimensions.
Setup Guide
1. Placement and Ventilation
Place the amplifier on a stable, flat surface. Ensure adequate ventilation around the unit to prevent overheating. If using the included rack mounts, secure the amplifier properly within a standard 19-inch audio rack.

Image: The Pyle PDA7BU amplifier shown installed in a rack mount setup, highlighting its compatibility with standard audio racks.
2. Connecting Speakers
The PDA7BU supports 5 channels: Front Right, Front Left, Center, Surround Left, and Surround Right, with a dedicated subwoofer output. Connect your speakers to the appropriate terminals on the rear panel. The speaker terminals are spring-loaded and screw-type banana plug combo for secure connections.
- Main Speakers (Right/Left): Connect your primary stereo speakers to the "MAIN SYSTEM" Right and Left terminals.
- Surround Speakers (Right/Left): Connect your surround sound speakers to the "SURROUND SPEAKERS" Right and Left terminals.
- Center Speaker: Connect your center channel speaker to the "CENTER" terminal.
- Subwoofer: Connect your powered subwoofer to the "SW OUT" RCA output.

Image: Detailed view of the amplifier's rear panel, illustrating speaker outputs, RCA inputs, and subwoofer output.

Image: Close-up showing the spring-loaded and screw-type banana plug combo speaker terminals, and multi-source RCA audio inputs with subwoofer output.
3. Connecting Audio Sources
The amplifier offers various input options:
- RCA Inputs: Connect external audio devices such as CD players, DVD players, or TVs to the RCA input jacks (CD/DVD, TV, AUX).
- 3.5mm AUX Input: Use the front-facing 3.5mm AUX input for quick connection of portable devices like smartphones or MP3 players.
- USB/SD Card Readers: Insert a USB flash drive or SD memory card into the front panel slots for direct playback of MP3 and WAV audio files.
- Microphone Inputs: Two 6.35mm (1/4-inch) microphone inputs are available on the front panel for karaoke or public address use.

Image: Comprehensive diagram labeling all input and output connections on both the front and rear panels of the amplifier.
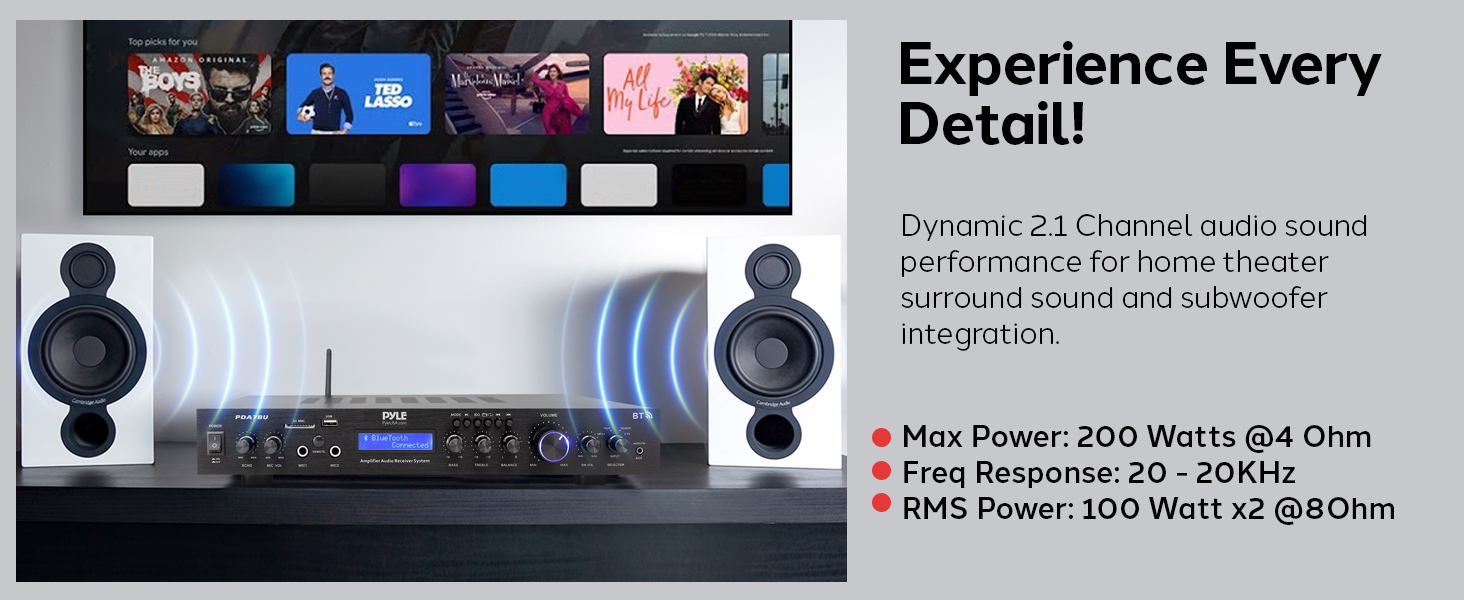
Image: Illustration of how to easily play music files by inserting a USB flash drive into the amplifier's front panel.
4. Power Connection
Once all audio connections are made, connect the power cord to the amplifier's AC input and then to a standard wall outlet. Ensure the voltage selector on the rear panel is set correctly for your region (110V/220V).
Operating Instructions
1. Power On/Off
Press the POWER switch on the front panel to turn the amplifier on or off. The LCD display will illuminate when the unit is powered on.
2. Source Selection
Use the INPUT SELECTOR knob or the corresponding buttons on the remote control to choose your desired audio source (e.g., Bluetooth, USB, SD, AUX, CD/DVD, TV, FM).
3. Volume Control
Adjust the overall volume using the large VOLUME knob on the front panel or the volume buttons on the remote control. Start with a low volume and gradually increase it to a comfortable listening level.
4. Tone and Balance Adjustment
Fine-tune the audio output using the following controls:
- BASS: Adjusts the low-frequency response.
- TREBLE: Adjusts the high-frequency response.
- BALANCE: Adjusts the relative volume between the left and right channels.

Image: Close-up view of the amplifier's front panel showing the Bass, Treble, and Balance control knobs for precise audio adjustments.
5. Bluetooth Streaming
To stream audio wirelessly from your Bluetooth-enabled device:
- Select Bluetooth as the input source using the INPUT SELECTOR. The LCD display will show "Bluetooth Connected" once paired.
- On your mobile device, enable Bluetooth and search for available devices.
- Select "Pyle PDA7BU" from the list to pair.
- Once paired, you can play audio from your device, and it will stream through the amplifier. The amplifier supports Bluetooth version 5.3 and offers a wireless range of over 100 feet.

Image: The amplifier positioned next to a smartphone, illustrating the seamless Bluetooth streaming capability with a 100ft+ wireless range.

Image: Visual representation of wireless streaming, highlighting Bluetooth Version 2.1 and a 30+ Ft Wireless Range. (Note: There's a discrepancy between this image and another stating 5.3 and 100ft+. Users should refer to the latest product specifications for the most accurate Bluetooth version and range.)
6. USB/SD Card Playback
Insert a USB flash drive or SD card containing MP3 or WAV audio files into the respective slots on the front panel. The amplifier will automatically detect the media and begin playback. Use the playback controls (Play/Pause, Next/Previous Track) on the front panel or remote.
7. FM Radio Operation
Select FM as the input source. Use the tuning buttons on the front panel or remote to scan for available radio stations. Extend the included FM antenna for optimal reception.
8. Karaoke Function
Connect up to two wired microphones to the 6.35mm inputs on the front panel. Adjust the microphone volume using the MIC VOL knob and add echo effects with the ECHO knob.

Image: The amplifier set up for karaoke, showing dual microphone inputs and controls for echo and microphone volume.

Image: A visual emphasizing the dual microphone inputs for enhanced entertainment, suitable for karaoke.
Maintenance
Proper maintenance ensures the longevity and optimal performance of your amplifier.
- Cleaning: Regularly wipe the unit with a soft, dry cloth. Do not use liquid cleaners or aerosol sprays, as they may damage the finish or internal components.
- Ventilation: Ensure that the ventilation openings on the top and sides of the amplifier are not blocked. Blocked vents can lead to overheating and potential damage.
- Storage: If storing the amplifier for an extended period, disconnect it from power, clean it, and store it in a cool, dry place away from direct sunlight and extreme temperatures.
Troubleshooting
If you encounter issues with your Pyle PDA7BU amplifier, refer to the following common problems and solutions:
| Problem | Possible Cause | Solution |
|---|---|---|
| No power | Power cord not connected; Power switch off; Blown fuse; Power outlet issue. | Ensure power cord is securely plugged in. Turn the power switch ON. Check the fuse (if accessible and replaceable by user). Test the power outlet with another device. |
| No sound output | Incorrect input source selected; Volume too low; Speaker connections loose; Muted. | Select the correct input source. Increase the volume. Check all speaker wire connections. Ensure the unit is not muted. |
| Bluetooth connection issues | Device too far; Bluetooth not enabled on device; Amplifier not in pairing mode; Interference. | Move device closer to the amplifier. Ensure Bluetooth is enabled on your device. Select Bluetooth input on the amplifier. Avoid placing the amplifier near other wireless devices. |
| USB/SD playback not working | Unsupported file format; Corrupted files; Drive/card not inserted correctly. | Ensure files are MP3 or WAV format. Try a different USB drive/SD card. Reinsert the drive/card firmly. |
| Poor FM reception | Antenna not connected or extended; Weak signal. | Connect and fully extend the FM antenna. Try repositioning the antenna for better signal. |
Specifications
| Feature | Detail |
|---|---|
| Power Output | 200 Watts (Max) into 5 Channels (Front R/L, Center, Surround R/L) |
| RMS Power | 100 Watts x 2 @ 8 Ohm |
| Max Power | 200 Watts @ 4 Ohm |
| Frequency Response | 20 - 20KHz |
| Surround Sound Channel Configuration | 2.1 Channel (Audio Processing) |
| Connectivity Technology | Bluetooth, USB, SD Card, 3.5mm AUX, RCA |
| Bluetooth Version | 5.3 (as per image, though another image states 2.1) |
| Wireless Range | 100+ ft (as per image, though another image states 30+ ft) |
| Digital Media File Support | MP3, WAV |
| Microphone Inputs | 2 x 6.35mm (1/4-inch) |
| Product Dimensions (L x W x H) | 19.02 x 9.85 x 2.17 inches |
| Item Weight | 7.4 pounds |
| Manufacturer | Sound Around |
| Model Number | PDA7BU |
Note on Channel Configuration: While the amplifier provides 5 speaker outputs, its audio processing is listed as 2.1 Channel. This typically means it processes stereo audio and directs bass frequencies to a connected subwoofer, distributing the stereo signal across the main and surround channels.
Warranty Information
Pyle products typically come with a limited manufacturer's warranty. For specific details regarding the warranty period, coverage, and terms and conditions for your PDA7BU amplifier, please refer to the warranty card included with your product or visit the official Pyle website.
Customer Support
For technical assistance, troubleshooting beyond this manual, or inquiries about your product, please contact Pyle customer support:
- Website: Visit the official Pyle USA website for FAQs, support resources, and contact information. (www.pyleusa.com)
- Phone: Refer to the contact section on the Pyle website for phone support numbers.


