
AT&T CD4930
AT&T CD4930 Corded Phone User Manual
Model: CD4930
1. Product Overview
The AT&T CD4930 is a corded telephone system designed for reliable communication with integrated digital answering system and Caller ID features. It offers user-friendly functionality with an extra-large tilt display and large buttons for enhanced visibility and ease of use.
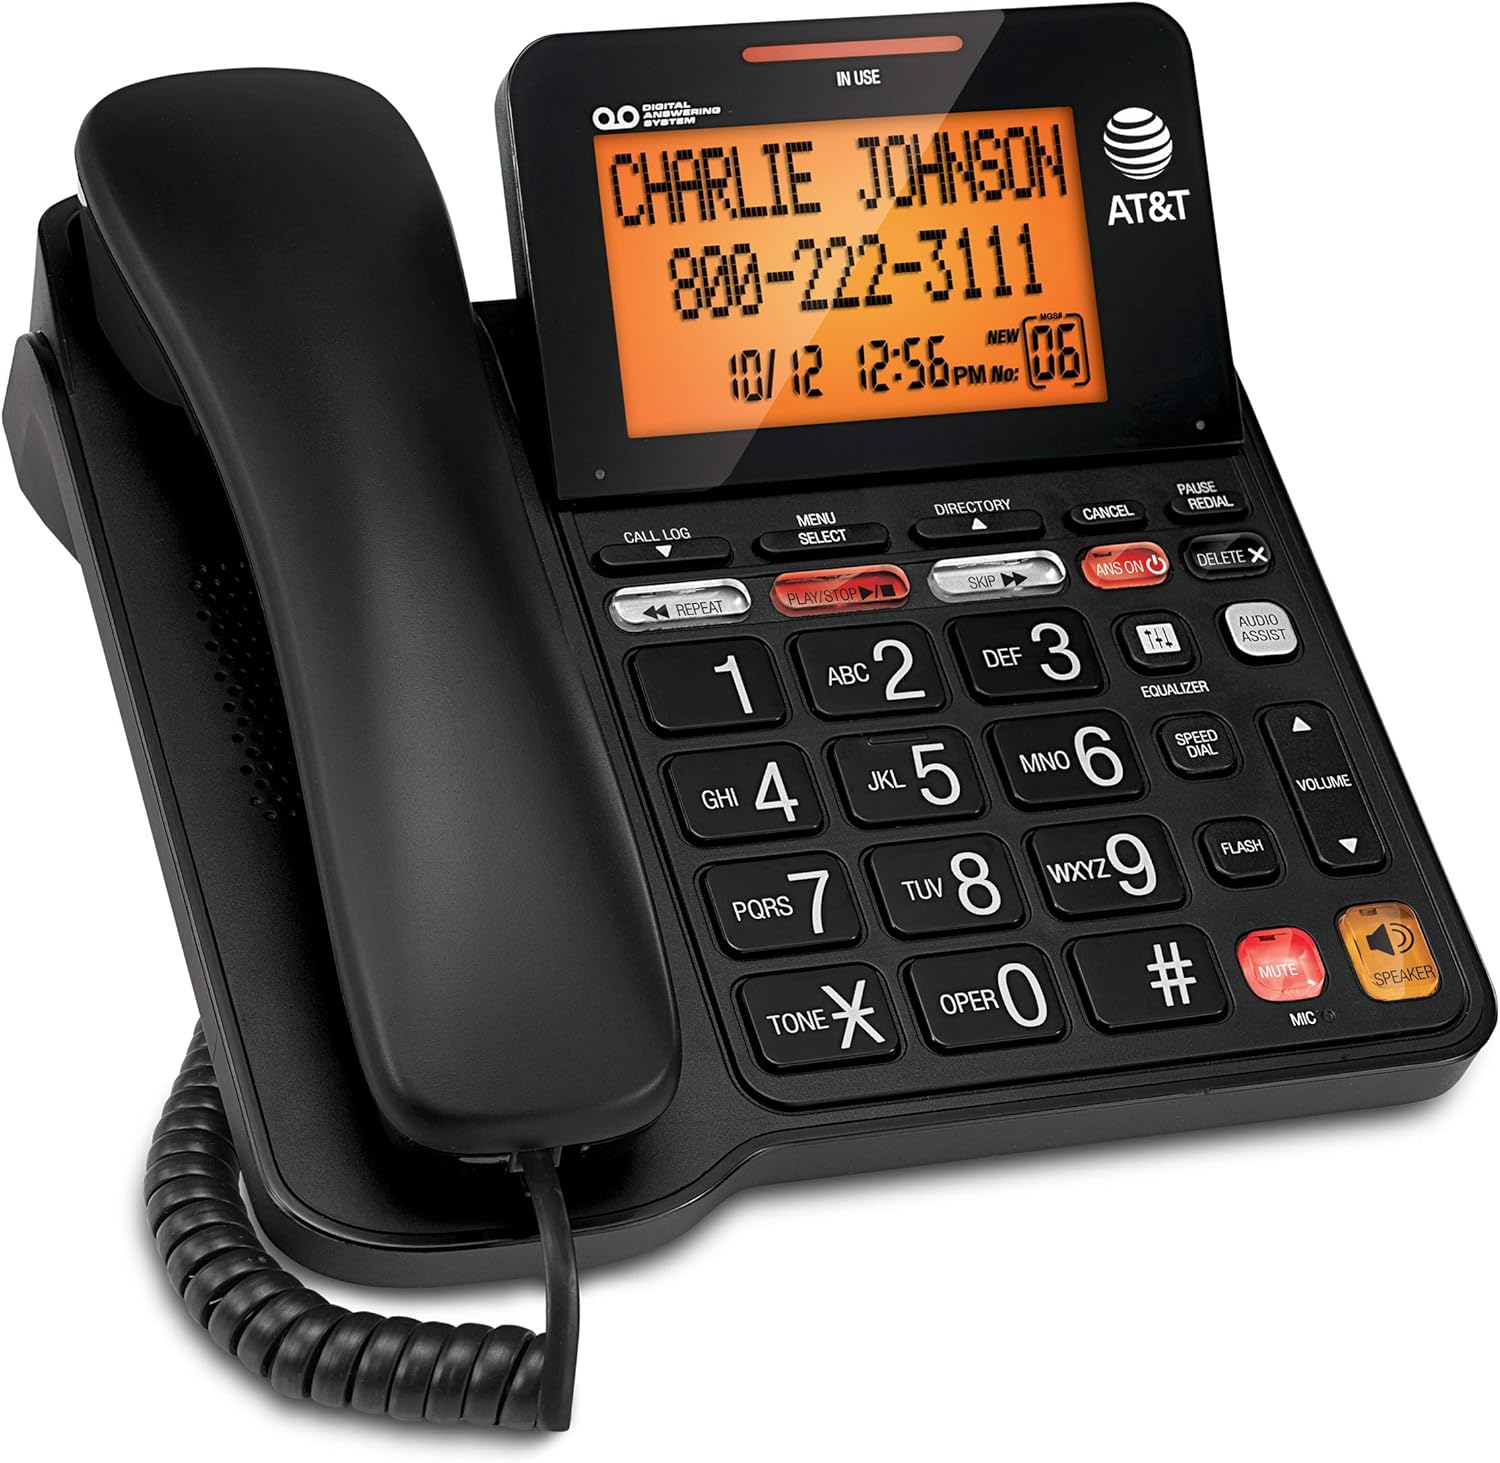
Figure 1: AT&T CD4930 Corded Phone with Digital Answering System and Caller ID.
Key Features:
- Digital Answering System: Records up to 25 minutes of messages, announcements, and memos. Features instant playback, selective save/delete, and message skipping/repeating.
- Speakerphone: Allows hands-free conversation, enabling multiple participants to join calls.
- Backlit Display: Provides clear visibility of caller information, time, and date.
- Caller ID: Displays name, number, time, and date of incoming calls, including call waiting.
- Extra-Large Tilt LCD: Adjustable display for optimal viewing of Caller ID and call history.
- Audio Assist: Temporarily increases overall volume and enhances sound frequencies for clearer speech.
- Equalizer: Customizable audio profiles (bass, treble, natural tones) to suit individual needs.
2. Setup
2.1 Package Contents
Ensure all components are present in the package:
- AT&T CD4930 Corded Phone Base Unit
- Handset
- Coiled Handset Cord
- Telephone Line Cord
- AC Power Adapter
2.2 Connection
- Connect the Handset: Plug one end of the coiled handset cord into the handset and the other end into the jack labeled HANDSET on the side of the phone base.
- Connect the Telephone Line: Plug one end of the telephone line cord into the jack labeled LINE on the back of the phone base. Plug the other end into a telephone wall jack.
- Connect Power: Plug the small end of the AC power adapter into the DC IN 6V jack on the back of the phone base. Plug the large end into a standard electrical outlet.
Upon successful connection, the display will illuminate, and the phone will perform a self-check. Allow a few moments for the phone to initialize.
2.3 Initial Setup (Date and Time)
Setting the correct date and time is crucial for accurate Caller ID and answering system timestamps.
- Press MENU/SELECT.
- Use the ▼ or ▲ buttons to scroll to SET DATE/TIME, then press MENU/SELECT.
- Enter the current month, day, and year using the dial pad. Press MENU/SELECT after each entry.
- Enter the current hour and minute. Use the ▼ or ▲ buttons to select AM or PM, then press MENU/SELECT to confirm.
- Press CANCEL to exit the menu.
3. Operating Instructions
3.1 Making and Receiving Calls
- To Make a Call: Lift the handset or press SPEAKER. Dial the phone number.
- To Answer a Call: When the phone rings, lift the handset or press SPEAKER.
- To End a Call: Place the handset back on the cradle or press SPEAKER if using speakerphone.
3.2 Speakerphone
The speakerphone allows for hands-free communication.
- To Activate: During a call, press the SPEAKER button.
- To Deactivate: Lift the handset to switch back to handset mode, or press SPEAKER again to end the call.
3.3 Volume Control
Adjust the listening volume during a call.
- During a call, press VOLUME ▲ to increase volume or VOLUME ▼ to decrease volume.
3.4 Mute Function
Temporarily disable your microphone during a call.
- During a call, press MUTE. The microphone will be muted.
- Press MUTE again to resume the conversation.
3.5 Redial and Pause
- Redial: Lift the handset or press SPEAKER, then press REDIAL to dial the last number called.
- Pause: When entering a phone number, press PAUSE to insert a 4-second pause. Useful for dialing numbers that require access codes or extensions.
4. Digital Answering System
The integrated digital answering system can record up to 25 minutes of messages.
4.1 Turning the Answering System On/Off
- Press ANS ON/OFF to toggle the answering system on or off. When on, the ANS ON indicator light will illuminate.
4.2 Playing Messages
- Press PLAY/STOP to play new messages. If no new messages, it will play old messages.
- During playback:
- Press REPEAT to repeat the current message. Press twice to play the previous message.
- Press SKIP to skip to the next message.
- Press DELETE to delete the current message.
- Press PLAY/STOP to stop playback.
4.3 Recording an Outgoing Announcement
- Press MENU/SELECT.
- Scroll to ANNOUNCEMENT and press MENU/SELECT.
- Select RECORD ANN. and press MENU/SELECT.
- Speak clearly into the microphone on the phone base.
- Press PLAY/STOP to end recording. The announcement will play back.
5. Caller ID Features
The Caller ID feature displays information about incoming calls.
5.1 Viewing Call Log
- Press CALL LOG.
- Use ▼ or ▲ to scroll through the call entries.
- Press CANCEL to exit.
5.2 Dialing from Call Log
- While viewing a call log entry, lift the handset or press SPEAKER to dial the displayed number.
5.3 Deleting Call Log Entries
- While viewing a call log entry, press DELETE X to delete the current entry.
- To delete all entries, press MENU/SELECT, scroll to DELETE ALL CALLS, and press MENU/SELECT. Confirm when prompted.
6. Maintenance
6.1 Cleaning the Phone
To keep your phone clean, wipe it with a soft, slightly damp cloth. Do not use cleaning sprays or harsh chemicals, as these may damage the finish or electrical components.
6.2 General Care
- Avoid exposing the phone to extreme temperatures, direct sunlight, or moisture.
- Do not drop the phone or subject it to severe impact.
- Keep the phone away from sources of electrical noise, such as motors or fluorescent lighting.
7. Troubleshooting
If you experience issues with your AT&T CD4930 phone, refer to the following common problems and solutions:
| Problem | Solution |
|---|---|
| No dial tone. |
|
| Cannot hear caller or caller cannot hear me. |
|
| Caller ID is not displaying. |
|
| Answering system is not recording messages. |
|
For further assistance, please refer to the full user manual available on the AT&T support website or contact AT&T customer service.
8. Specifications
| Feature | Detail |
|---|---|
| Model Number | CD4930 |
| Brand | AT&T |
| Telephone Type | Landline |
| Answering System Type | Digital |
| Recording Capacity | Up to 25 minutes |
| Power Source | Corded Electric |
| Dialer Type | Dual Keypad |
| Material | Plastic |
| Item Weight | 2.42 pounds |
| Package Dimensions | 10.2 x 8.98 x 3.62 inches |
| Manufacturer | VTech |
| Country of Origin | Malaysia |
9. Warranty and Support
9.1 Warranty Information
For detailed warranty information regarding your AT&T CD4930 Corded Phone, please refer to the warranty card included in your product packaging or visit the official AT&T website. Warranty terms and conditions may vary.
9.2 Customer Support
If you require technical assistance, have questions about your product, or need to report an issue, please contact AT&T Customer Support:
- Online Support: Visit the official AT&T support website for FAQs, troubleshooting guides, and downloadable manuals.
- Telephone Support: Refer to your product documentation or the AT&T website for the most current customer service contact numbers.
Please have your product model number (CD4930) and serial number ready when contacting support.
Related documentsCD4930


Ask a question about this manual
Ask about setup, troubleshooting, compatibility, parts, safety, or missing instructions. Manuals+ will review the question and use this page’s manual context to help answer it.