
Hamilton Beach P90D23AL-WR
Hamilton Beach 0.9 cu.ft. 900W Microwave Oven User Manual
Model: P90D23AL-WR
1. Introduction
Thank you for choosing the Hamilton Beach 0.9 cu.ft. 900W Microwave Oven. This appliance is designed for convenient and efficient heating and cooking of various food items. Its sharp stainless steel design complements modern kitchens, offering a variety of menu choices and user-friendly controls. This manual provides essential information for safe and effective operation, maintenance, and troubleshooting of your new microwave oven.
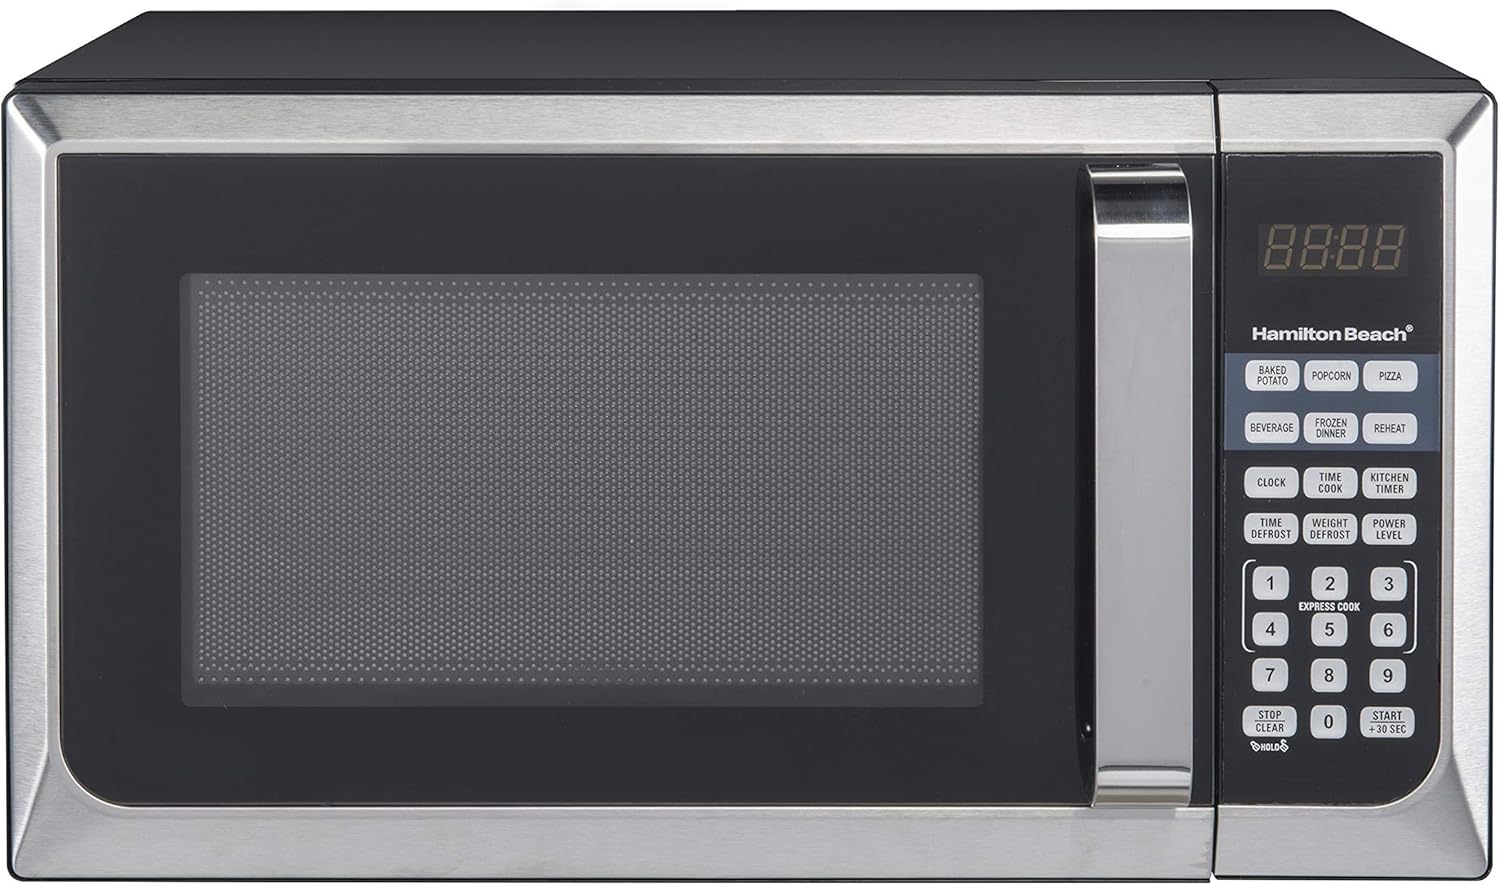
Figure 1: Hamilton Beach 0.9 cu.ft. 900W Microwave Oven, Stainless Steel. This image shows the front view of the microwave oven with its control panel and door.
2. Important Safety Information
WARNING: To reduce the risk of fire, electric shock, injury to persons, or exposure to excessive microwave energy, observe the following basic precautions:
- Read all instructions before using the appliance.
- Do not operate the oven if it is damaged. Ensure the door closes properly and there is no damage to the door, hinges, latches, or sealing surfaces.
- Do not attempt to adjust or repair the oven yourself. Only qualified service personnel should perform servicing.
- Do not heat liquids or other foods in sealed containers as they are liable to explode.
- Do not overcook food. Attend the appliance when cooking with paper, plastic, or other combustible materials inside the oven.
- Clean the oven regularly and remove any food deposits. Failure to maintain the oven in a clean condition could lead to deterioration of the surface that could adversely affect the life of the appliance and possibly result in a hazardous situation.
- Do not use corrosive chemicals or vapors in this appliance.
- This appliance is intended for household use only.
3. Setup
Unpacking:
Carefully remove the microwave oven and all packing materials from the carton. Check for any damage. Ensure all standard accessories, including the turntable, user manual, and warranty card, are present.
Placement:
Place the microwave oven on a flat, stable surface that can support its weight (approximately 29.6 pounds). Ensure there is adequate ventilation around the unit. Maintain a minimum of 4 inches (10 cm) of space on the top, back, and sides for proper airflow.
Power Connection:
Plug the microwave oven into a grounded 120V AC, 60Hz electrical outlet. Do not use an extension cord or adapter.
Initial Setup (Setting the Clock):
Upon plugging in, the LED display will show "88:88". To set the clock:
- Press the CLOCK button once.
- Use the number pad to enter the current time (e.g., 12:30).
- Press the CLOCK button again to confirm.
4. Operating Instructions
Control Panel Overview:
The control panel features an LED display and a touch-pad with various buttons for different functions:
- Number Pad (0-9): Used to enter cooking times, weights, and clock settings.
- EXPRESS COOK (1-6): One-touch cooking for 1 to 6 minutes.
- START/+30 SEC: Starts cooking or adds 30 seconds to cooking time.
- STOP/CLEAR: Stops cooking or clears settings.
- TIME COOK: Manual time cooking.
- POWER LEVEL: Adjusts microwave power level (10 levels available).
- TIME DEFROST: Defrosts food based on time.
- WEIGHT DEFROST: Defrosts food based on weight.
- KITCHEN TIMER: Functions as a kitchen timer.
- CLOCK: Sets the current time.
- Pre-set Menus: BAKED POTATO, POPCORN, PIZZA, BEVERAGE, FROZEN DINNER, REHEAT.
Basic Cooking:
Time Cook:
- Place food in the microwave-safe container.
- Press TIME COOK.
- Enter desired cooking time using the number pad (e.g., 1 for 1 minute, 10 for 10 seconds, 100 for 1 minute).
- (Optional) Press POWER LEVEL and select a power level (1-10, 10 being full power).
- Press START/+30 SEC to begin cooking.
Express Cook:
For quick cooking, simply press any number from 1 to 6 on the number pad. The microwave will start immediately and cook for that many minutes at full power.
Adding 30 Seconds:
During cooking, press START/+30 SEC to add 30 seconds to the current cooking time.
Pre-set Menu Functions:
The microwave features one-touch buttons for common food items:
- BAKED POTATO: For baking potatoes.
- POPCORN: For popping microwave popcorn.
- PIZZA: For reheating pizza slices.
- BEVERAGE: For heating beverages.
- FROZEN DINNER: For cooking frozen dinners.
- REHEAT: For general reheating of food.
Simply press the desired pre-set button. Some pre-sets may require multiple presses to select quantity (e.g., number of potatoes, ounces of popcorn). Refer to the specific pre-set instructions on the control panel or a more detailed guide if available.
Defrosting:
Time Defrost:
- Press TIME DEFROST.
- Enter the desired defrosting time using the number pad.
- Press START/+30 SEC.
Weight Defrost:
- Press WEIGHT DEFROST.
- Enter the weight of the food in ounces using the number pad.
- Press START/+30 SEC.
Child Safety Lock:
To activate the child safety lock, press and hold the STOP/CLEAR button for 3 seconds. The display will show "LOCK". To deactivate, press and hold STOP/CLEAR again for 3 seconds.
5. Maintenance and Cleaning
Regular cleaning of your microwave oven will ensure its longevity and efficient operation.
Interior Cleaning:
Wipe the interior cavity, door, and door seal with a damp cloth and mild detergent after each use. For stubborn stains, place a bowl of water with lemon slices inside and microwave for 2-3 minutes to loosen food particles, then wipe clean.
Exterior Cleaning:
Clean the exterior surfaces with a soft, damp cloth. Avoid abrasive cleaners or scouring pads that could scratch the stainless steel finish.
Turntable Cleaning:
The glass turntable can be removed and washed in warm, soapy water or in the dishwasher. Ensure it is completely dry before placing it back in the oven.
Odor Removal:
To remove odors, combine one cup of water with several tablespoons of lemon juice or vinegar in a microwave-safe bowl. Microwave on high for 5-7 minutes. Let it stand in the oven for a few minutes before removing and wiping the interior.
6. Troubleshooting
| Problem | Possible Cause | Solution |
|---|---|---|
| Oven will not start. | Power cord not plugged in; Door not closed properly; Fuse blown or circuit breaker tripped; Child safety lock activated. | Ensure power cord is securely plugged in; Close door firmly; Check household fuse/circuit breaker; Deactivate child safety lock by holding STOP/CLEAR for 3 seconds. |
| Food not heating. | Incorrect cooking time or power level set; Door not closed properly. | Increase cooking time or power level; Ensure door is fully closed. |
| Turntable not rotating. | Turntable not properly placed; Food too large or heavy. | Ensure turntable is correctly seated on its support; Rearrange food or use a smaller dish. |
| Oven light not working. | Bulb needs replacement. | Contact qualified service personnel for bulb replacement. Do not attempt to replace it yourself. |
| Unusual noise during operation. | Turntable or roller ring not properly positioned; Foreign object inside. | Check and reposition turntable and roller ring; Remove any foreign objects. If noise persists, discontinue use and contact service. |
7. Specifications
- Brand: Hamilton Beach
- Model Number: P90D23AL-WR
- Capacity: 0.9 Cubic Feet
- Wattage: 900 watts
- Power Levels: 10
- Voltage: 120 Volts
- Product Dimensions (D x W x H): 11.06" x 19.02" x 15.6"
- Item Weight: 29.6 Pounds
- Material: Stainless Steel
- Color: Stainless Steel
- Special Feature: Safety Lock
- Installation Type: Countertop
- Included Components: Standard microwave oven accessories (turntable, user manual, warranty card, etc.)
8. Warranty and Support
Your Hamilton Beach Microwave Oven comes with a manufacturer's warranty. Please refer to the included warranty card for detailed information regarding coverage, terms, and conditions. Keep your purchase receipt as proof of purchase for warranty claims.
For technical support, service, or questions regarding your product, please refer to the contact information provided on your warranty card or visit the official Hamilton Beach website. Do not attempt to repair the appliance yourself.
Related documentsP90D23AL-WR


Ask a question about this manual
Ask about setup, troubleshooting, compatibility, parts, safety, or missing instructions. Manuals+ will review the question and use this page’s manual context to help answer it.