
Introduction
This manual provides essential information for the proper installation, operation, and maintenance of your Monroe Quick-Strut 371139 Suspension Strut and Coil Spring Assembly. Designed for specific Ford Expedition and Lincoln Navigator models, this pre-assembled unit offers a complete solution for strut replacement, aiming to restore original equipment (OE) ride height and handling performance.
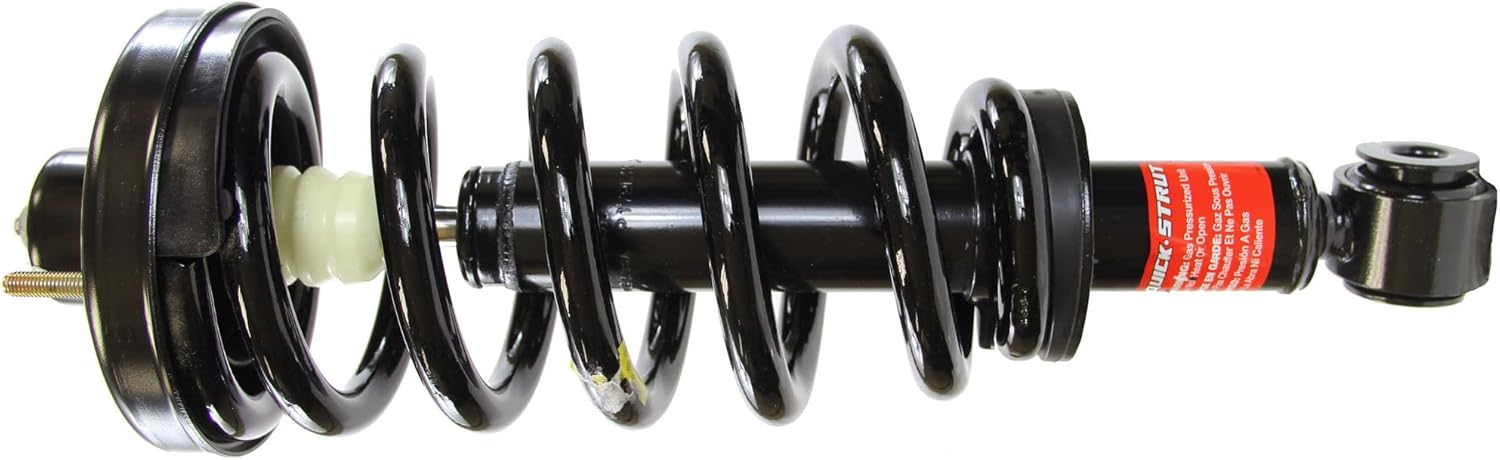
Image: The Monroe Quick-Strut 371139 Suspension Strut and Coil Spring Assembly. This fully assembled unit includes the strut, coil spring, and mount, ready for installation.
Compatibility
The Monroe Quick-Strut 371139 is compatible with the following vehicle models:
- 2010-2010 Ford Expedition
- 2011-2013 Ford Expedition
- 2014-2017 Ford Expedition
- 2018-2022 Ford Expedition
- 2020-2021 Ford Expedition
- 2010-2010 Lincoln Navigator
- 2011-2013 Lincoln Navigator
- 2014-2017 Lincoln Navigator
Important: Always verify compatibility with your specific vehicle's year, make, model, engine, and trim before installation. Refer to the manufacturer's fitment guide or consult a qualified automotive technician.
What's in the Box
Each Monroe Quick-Strut 371139 assembly includes:
- One (1) Pre-assembled Strut and Coil Spring Unit
- Mounting Hardware
- Parts Pack(s)

Image: Detailed view of the Monroe Quick-Strut assembly, highlighting components such as the robust bearing plate, jounce bumper, dust boot, OE-style coil spring, upper and lower spring isolators, and OE-quality strut technology.
Safety Information
Automotive suspension work can be hazardous. Always prioritize safety. If you are not experienced with vehicle maintenance, it is highly recommended to have this product installed by a certified professional technician.
- Wear Personal Protective Equipment (PPE): Always wear safety glasses, gloves, and appropriate work attire.
- Secure the Vehicle: Use a hydraulic lift or sturdy jack stands on a level surface. Never rely solely on a jack.
- Consult Vehicle Manual: Refer to your vehicle's service manual for specific torque specifications and procedures.
- Avoid Spring Compressors: This Quick-Strut assembly is pre-assembled and does not require a spring compressor, which can be dangerous if misused.
- Keep Work Area Clear: Ensure no obstructions or tripping hazards are present.
Setup and Installation
The Monroe Quick-Strut assembly is designed for a quicker, safer, and easier replacement process as it comes fully assembled. Follow these general steps for installation. Specific vehicle procedures may vary.
1. Preparation
- Park the vehicle on a level surface and engage the parking brake.
- Loosen the lug nuts on the wheel(s) where the strut will be replaced.
- Raise the vehicle using a hydraulic lift or floor jack and secure it with jack stands.
- Remove the wheel(s).

Image: A vehicle securely positioned on an automotive lift, ready for suspension component replacement.
2. Pre-Installation Checks
- Measure the vehicle's ride height before removing the old strut. This can help confirm proper installation and identify potential issues.
- Inspect surrounding suspension components for wear or damage, such as ball joints, tie rod ends, and control arm bushings. Replace any worn parts as necessary.

Image: A technician uses a tape measure to record the vehicle's ride height from the wheel arch to the center of the wheel, a crucial step before and after strut replacement.
3. Removal of Old Strut
- Disconnect any brake lines, ABS sensor wires, or sway bar links attached to the strut assembly.
- Remove the lower mounting bolts connecting the strut to the steering knuckle or control arm.
- Access the upper strut mount bolts, typically located under the hood or in the trunk/cargo area. Remove these bolts.
- Carefully remove the old strut assembly from the vehicle.

Image: A close-up of a severely rusted and damaged old strut, indicating the need for replacement due to corrosion and structural failure.
4. Installation of New Quick-Strut
- Position the new Monroe Quick-Strut assembly into the vehicle.
- Align the upper strut mount bolts with the mounting holes and hand-tighten them.
- Align the lower mounting holes and insert the bolts. Hand-tighten these as well.
- Reconnect any brake lines, ABS sensor wires, or sway bar links that were disconnected.
- Torque all mounting bolts to the vehicle manufacturer's specifications. Refer to your vehicle's service manual for precise values.

Image: A hand carefully guides a new strut assembly into its mounting position within the vehicle's wheel well, demonstrating a key step in the installation process.
5. Post-Installation
- Reinstall the wheel(s) and torque the lug nuts to specification.
- Lower the vehicle.
- Perform a wheel alignment. Replacing struts significantly affects alignment, and it is crucial for proper handling and tire wear.
- Test drive the vehicle to ensure proper function and ride quality.
Operating Characteristics
After proper installation, your Monroe Quick-Strut assembly is designed to restore your vehicle's original ride and handling characteristics. You should experience:
- Restored Ride Height: The application-specific coil spring is engineered to return the vehicle to its intended ride height.
- Improved Vehicle Control: Reduced body sway, vibration, and road harshness contribute to better handling.
- Enhanced Steering Precision: The premium upper strut mount helps ensure smooth, precise steering and minimizes noise and vibration.

Image: Two modern vehicles, representing the improved ride and handling achieved by installing Monroe Quick-Strut assemblies, which restore original equipment performance.
Maintenance
Monroe Quick-Strut assemblies are designed for durability and minimal maintenance. However, regular inspection of your vehicle's suspension components is recommended as part of routine vehicle service.
- Visual Inspection: Periodically check the struts for signs of fluid leaks, bent rods, or damaged boots.
- Mounting Hardware: Ensure all mounting bolts remain tight.
- Alignment: If you notice uneven tire wear or steering issues, have your wheel alignment checked.
- Cleaning: Keep the strut assembly free from excessive dirt and debris, especially around the shaft and seals.
Troubleshooting
| Symptom | Possible Cause | Solution |
|---|---|---|
| Excessive Bouncing or Sway | Worn or damaged strut, improper installation. | Inspect strut for damage. Verify proper installation and torque specifications. |
| Uneven Tire Wear | Misalignment, worn suspension components. | Perform a wheel alignment. Inspect other suspension parts. |
| Clunking or Rattling Noises | Loose mounting hardware, damaged strut mount, worn bushings. | Check all fasteners for tightness. Inspect strut mount and bushings for wear. |
| Vehicle Pulls to One Side | Misalignment, uneven tire pressure, damaged strut. | Check tire pressure. Perform a wheel alignment. Inspect strut for damage. |
If troubleshooting steps do not resolve the issue, consult a qualified automotive technician.
Specifications
| Feature | Detail |
|---|---|
| Brand | Monroe |
| Model Number | 371139 |
| Auto Part Position | Front |
| Vehicle Service Type | Ford Expedition, Lincoln Navigator |
| Material | Alloy Steel |
| Extended Length | 19.72 Inches |
| Item Weight | 23.3 pounds |
| Product Dimensions | 24.4 x 7.8 x 8.8 inches |
| UPC | 048598188984 |
Warranty and Support
For information regarding product warranty, please refer to the official Monroe website or contact Monroe customer support directly. Keep your purchase receipt for warranty claims.
Monroe Customer Support: For technical assistance, installation questions, or warranty inquiries, please visit the Monroe Store on Amazon or the official Monroe website.
