
Important Safety Information
Please read all instructions carefully before using this appliance to ensure safe operation and to prevent injury or damage. Keep this manual for future reference.
- Electrical Safety: Do not immerse the control panel or heating element in water or other liquids. Ensure the appliance is unplugged when not in use and before cleaning. Use only with a properly grounded outlet. Do not use an extension cord.
- Oil Handling: Always use cooking oil or shortening. Never use water. Do not overfill or underfill the oil tank. Hot oil can cause severe burns. Exercise extreme caution when moving the fryer containing hot oil. Allow oil to cool completely before handling or cleaning.
- Hot Surfaces: The exterior surfaces of the fryer become very hot during operation. Use oven mitts or pot holders when touching any part of the fryer during or after use. Do not touch the heating element directly.
- Breakaway Cord: The fryer is equipped with a breakaway cord designed to detach if snagged, preventing the fryer from tipping over. Ensure the cord is properly seated during operation.
- Supervision: Close supervision is necessary when any appliance is used by or near children. Do not leave the fryer unattended while in operation.
- Ventilation: Use the fryer in a well-ventilated area.

Image: The deep fryer features a viewing window on the lid to monitor cooking and a breakaway cord for enhanced safety, designed to prevent accidental tipping.
Product Overview
The Hamilton Beach Electric Deep Fryer (Model 35035A) is designed for home use, offering a professional-style frying experience. It features an immersed heating element for rapid oil heating and consistent temperature control, an extra-large capacity, and easy-to-clean components.
Components
- Control Panel: Includes temperature dial, timer, power light, and ready light.
- Heating Element: Immersed design for quick and even heating.
- Oil Tank: Removable, enamel-coated container for cooking oil.
- Frying Basket: Chrome-plated basket with a handle and hooks for draining.
- Lid: Features a viewing window and vent to reduce splatters.
- Housing: Stainless steel exterior.
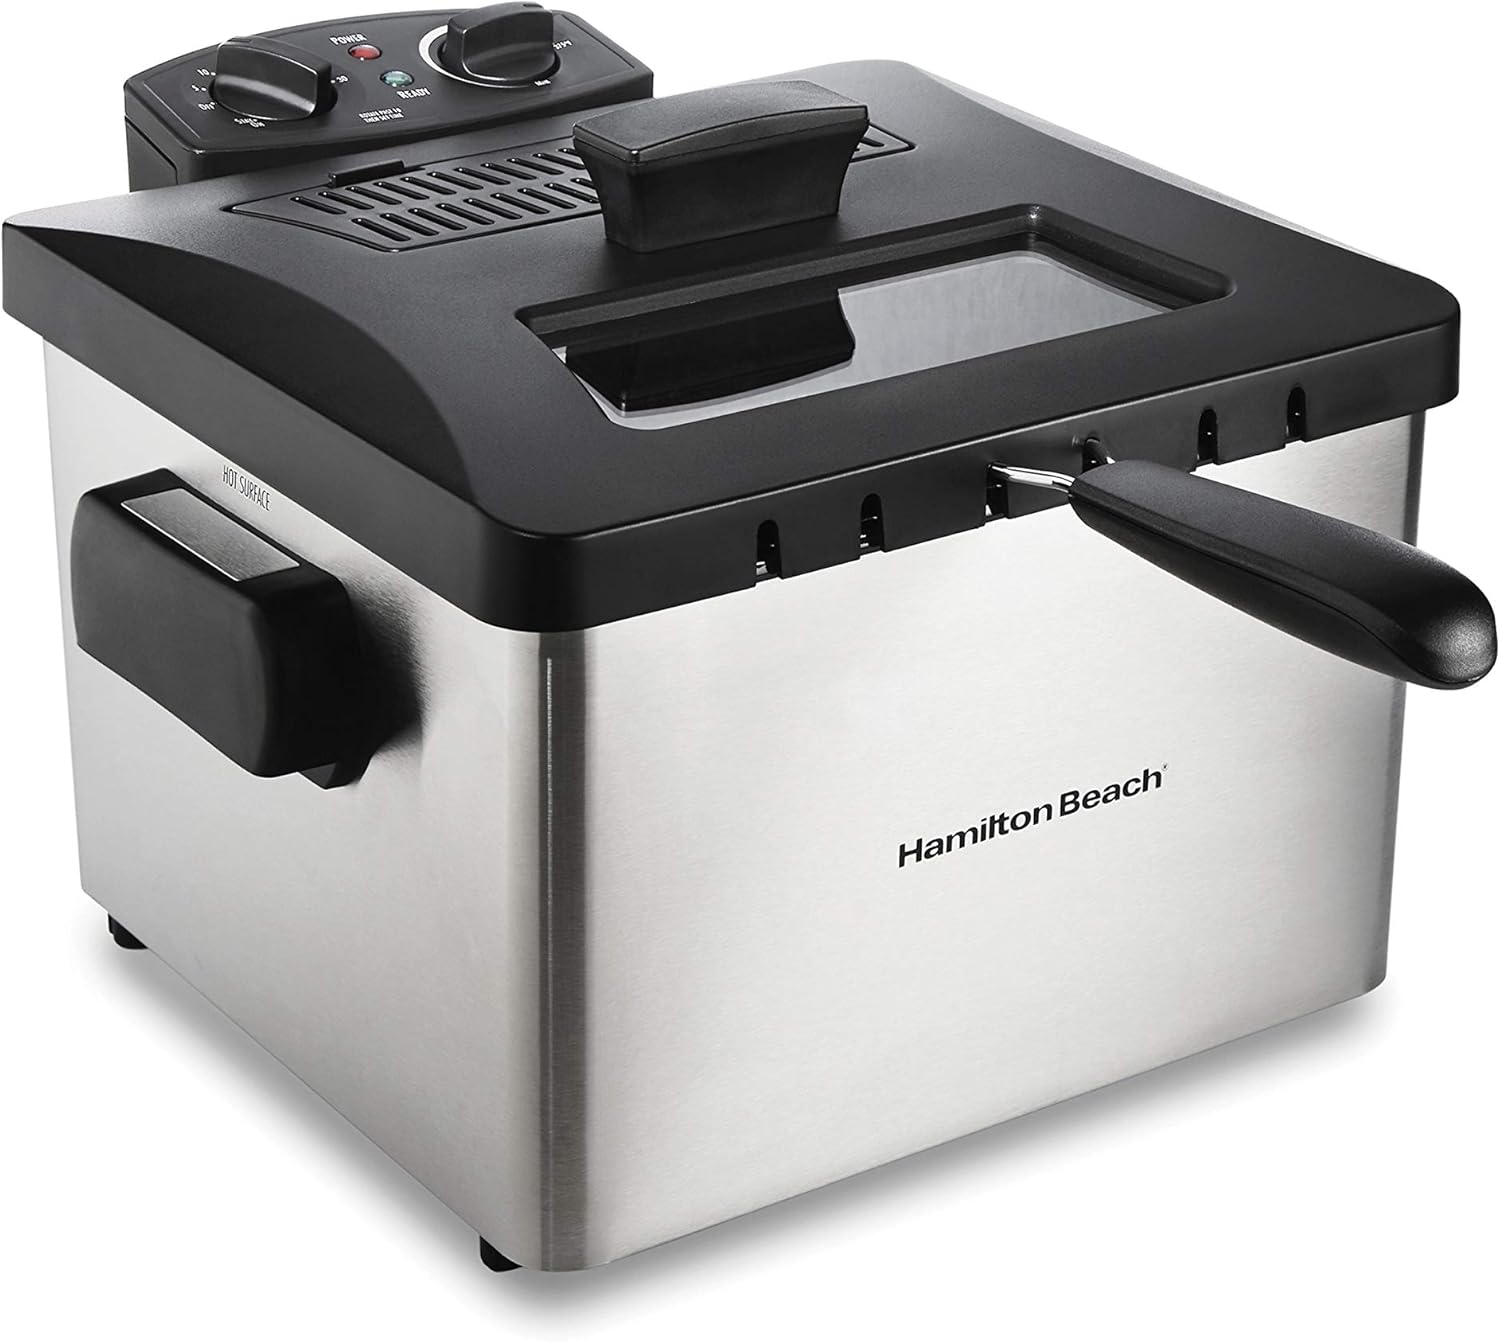
Image: The Hamilton Beach Electric Deep Fryer, showcasing its stainless steel body, black lid with a viewing window, and integrated control panel.
Setup
Follow these steps to prepare your deep fryer for first use:
- Unpack: Carefully remove all components from the packaging.
- Clean Components: Wash the oil tank, frying basket, and lid in warm, soapy water. Rinse thoroughly and dry completely. The heating element and control panel should only be wiped with a damp cloth; never immerse them in water.
- Assemble: Place the stainless steel housing on a stable, heat-resistant surface. Insert the clean oil tank into the housing. Position the heating element assembly securely onto the rim of the oil tank, ensuring it is properly seated.
- Add Oil: Pour cooking oil into the oil tank, ensuring it is between the MIN and MAX fill lines. The fryer has a 4.5-liter (19-cup) oil capacity.
- Attach Basket: Place the frying basket into the oil tank.
- Connect Power: Plug the breakaway power cord into the back of the control panel, then plug the other end into a grounded electrical outlet.

Image: The deep fryer's components laid out, demonstrating its easy assembly and disassembly for cleaning.
Operating Instructions
Frying Process
- Preheat Oil: Turn the temperature dial to your desired frying temperature (265°F to 375°F). The Power light will illuminate. The Ready light will turn on when the oil has reached the set temperature. This may take several minutes.
- Prepare Food: Ensure food is dry before frying to prevent excessive splattering. Do not overload the basket.
- Load Basket: Place food into the frying basket.
- Lower Basket: Carefully lower the basket into the hot oil. Close the lid to minimize splatters.
- Fry: Cook food for the recommended time. Use the timer dial if desired. Monitor cooking through the viewing window.
- Lift and Drain: Once food is cooked, carefully lift the basket using the handle. Hook the basket onto the side of the oil tank to allow excess oil to drain back into the tank.
- Serve: Remove food from the basket and serve immediately.
Temperature Control
The adjustable temperature dial allows precise control over oil temperature, ranging from 265°F to 375°F. The 'Ready' light indicates when the oil has reached the selected temperature, ensuring optimal frying conditions for various foods.
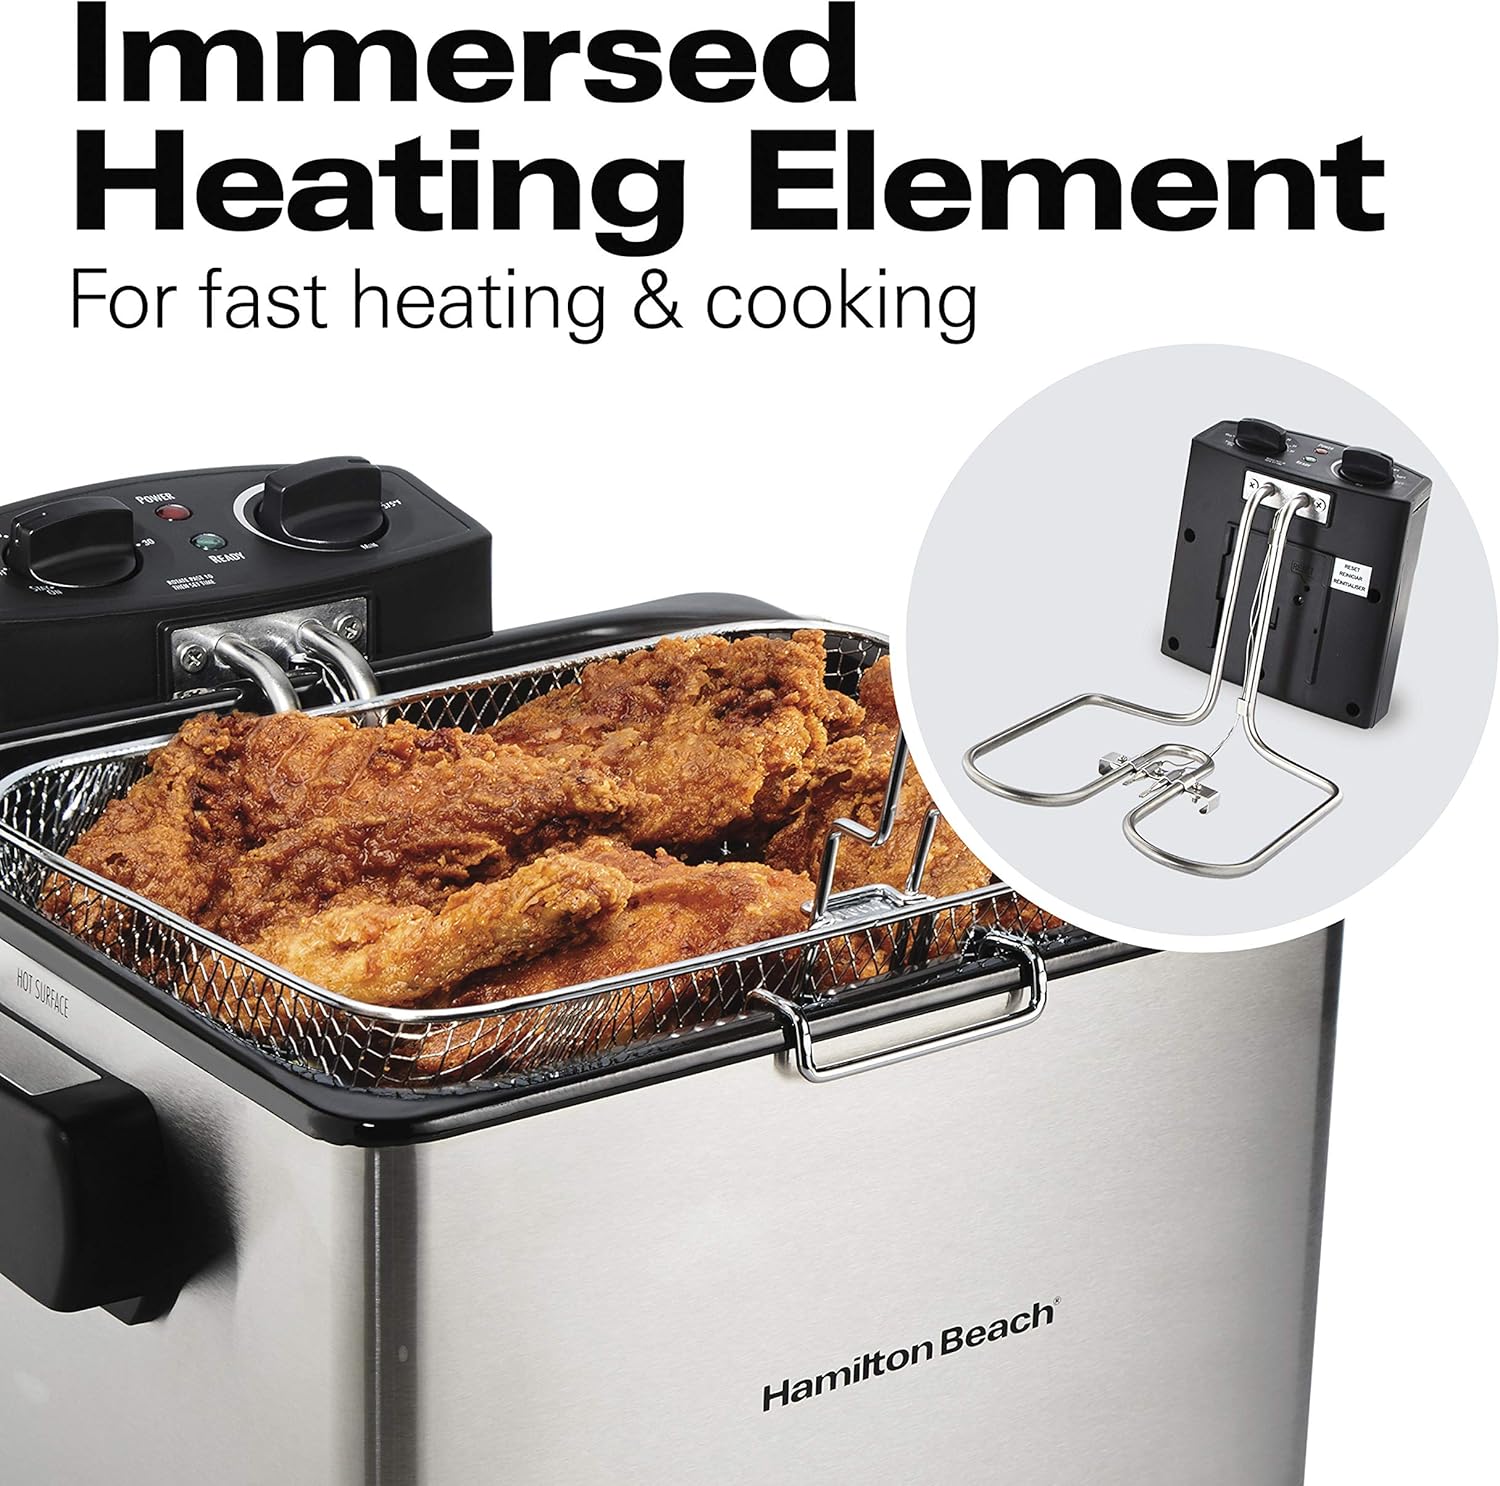
Image: The control panel showing the adjustable temperature dial (265°F to 375°F), timer dial, and indicator lights for power and readiness.

Image: The extra-large frying basket, capable of holding a significant amount of food, shown filled with french fries.

Image: The immersed heating element, designed for fast and efficient heating of the cooking oil.
Cleaning and Maintenance
Regular cleaning ensures optimal performance and extends the life of your deep fryer. Always allow the fryer and oil to cool completely before cleaning.
- Unplug and Cool: Disconnect the power cord from the outlet and the fryer. Allow the oil to cool for several hours or overnight.
- Drain Oil: Carefully remove the heating element assembly. Lift the oil tank from the housing and pour the cooled oil into a suitable container for disposal or reuse.
- Disassemble: Remove the frying basket and lid.
- Wash Parts: The oil tank, frying basket, and lid are dishwasher safe or can be washed by hand in warm, soapy water.
- Clean Heating Element and Housing: Wipe the heating element and control panel with a damp cloth. Never immerse these parts in water. Wipe the exterior stainless steel housing with a damp cloth and dry thoroughly.
- Reassemble: Ensure all parts are completely dry before reassembling the fryer. Store in a clean, dry place.
Troubleshooting
If you encounter issues with your deep fryer, refer to the following table for common problems and solutions.
| Problem | Possible Cause | Solution |
|---|---|---|
| Fryer does not turn on. | Not plugged in; breakaway cord not fully seated; circuit breaker tripped. | Ensure power cord is securely plugged into both the fryer and a grounded outlet. Check household circuit breaker. |
| Oil not heating up. | Temperature dial not set; heating element not properly seated. | Turn temperature dial to desired setting. Ensure heating element assembly is correctly positioned in the oil tank. |
| Excessive splattering. | Food is wet; oil level too high; basket overloaded. | Pat food dry before frying. Ensure oil level is between MIN and MAX lines. Do not overload the basket. Close the lid during frying. |
| Food not cooking evenly or quickly. | Oil temperature too low; basket overloaded. | Allow oil to reach the set temperature (Ready light on) before adding food. Do not overload the basket. |
Specifications
- Model Name: Hamilton Beach Electric Deep Fryer
- Brand: Hamilton Beach
- Material: Stainless Steel
- Product Dimensions: 14.1"D x 15.6"W x 10.5"H
- Item Weight: 11 Pounds
- Wattage: 1800 watts
- Oil Capacity: 4.5 Liters / 19 Cups
- UPC: 040094350353
- Item Model Number: 35035A

Image: The deep fryer with its key dimensions indicated for reference.
Warranty and Support
This Hamilton Beach appliance is covered by a limited warranty. For specific warranty details, terms, and conditions, please refer to the warranty card included with your product or visit the official Hamilton Beach website. For technical support, replacement parts, or service inquiries, please contact Hamilton Beach customer service directly.
Online Support: www.hamiltonbeach.com/support


