
Intermatic DT101
Intermatic DT101 Digital Time Switch User Manual
Model: DT101
Introduction
The Intermatic DT101 Digital Time Switch is designed to provide precise, automated control over electrical circuits. This electronic time switch offers advanced features compared to traditional mechanical timers, including up-to-the-minute programming, battery backup for power outages, and automatic Daylight Saving Time adjustments. It supports up to 28 programmable events and operates on a standard 24-hour cycle, making it ideal for daily repeating schedules.
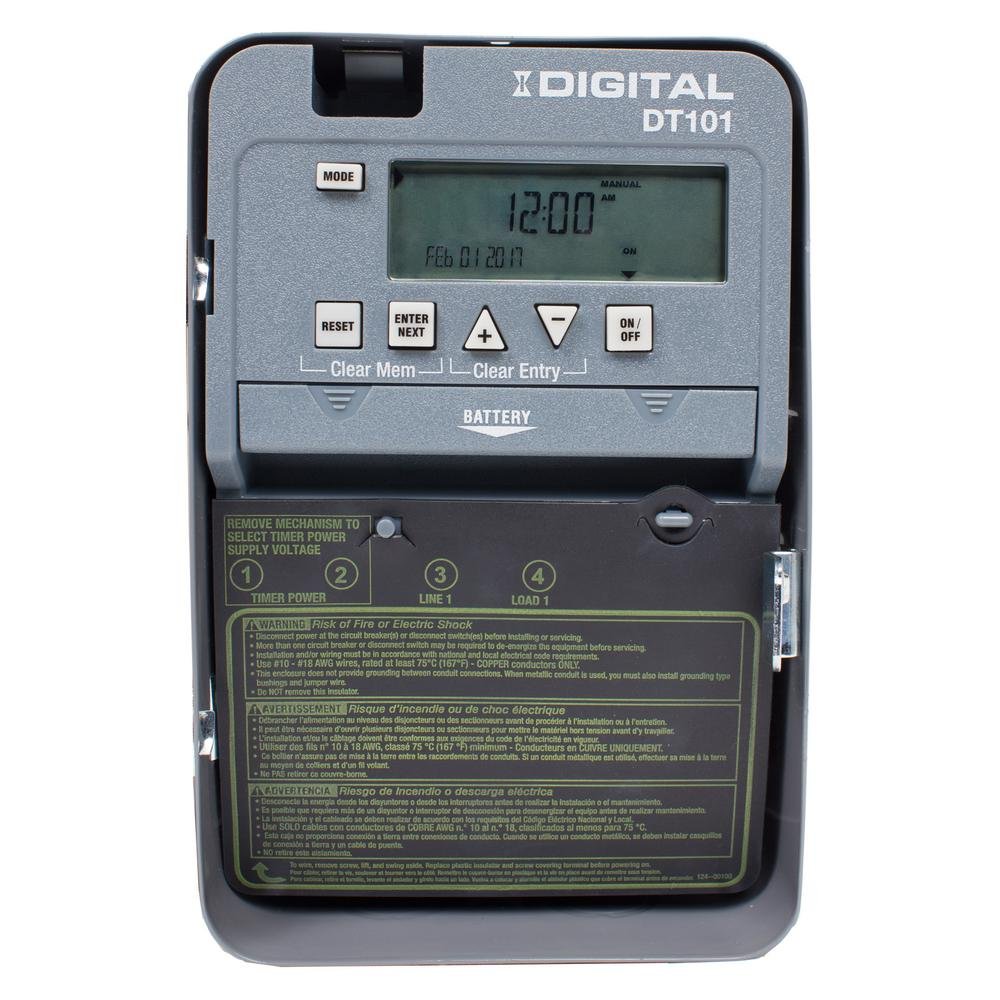
Figure 1: Front view of the Intermatic DT101 Digital Time Switch, showing the digital display, control buttons, and battery compartment.
Important Safety Information
WARNING: Risk of Fire or Electric Shock. Installation and servicing of this product must be performed by a qualified electrician in accordance with all national and local electrical codes. Always disconnect power at the circuit breaker or disconnect switch before installing or servicing the unit. This enclosure does not provide grounding between conduit connections. If metal conduit is used, you must also install grounding type bushings and jumper wires.
- Read all instructions before installing or using this device.
- Ensure the power supply matches the voltage requirements of the timer (120-277 VAC, 50/60 Hz).
- Do not exceed the maximum load ratings of the switch.
- This device is intended for indoor use only unless installed in a suitable outdoor enclosure.

Figure 2: The Intermatic DT101 unit with its cover open, revealing the internal components, wiring terminals, and printed safety warnings on the inside of the door.
Setup and Installation
Proper installation is critical for the safe and effective operation of your DT101 Digital Time Switch. Follow these steps carefully:
- Disconnect Power: Before beginning any installation, ensure that power to the circuit where the timer will be installed is completely disconnected at the main circuit breaker or fuse box. Verify with a voltage tester.
- Mounting: Mount the timer enclosure securely to a wall or suitable surface using appropriate fasteners. Ensure it is level and accessible for wiring and programming.
- Battery Installation: Install the two (2) AAA batteries (required, not included) into the battery compartment. This provides backup power for settings during power outages.
- Wiring: Connect the electrical wires to the appropriate terminals inside the timer. The DT101 supports 120-277 VAC. Refer to the wiring diagram printed inside the unit's door for correct connections (Line 1, Load 1, Neutral, Ground). Ensure all connections are tight and secure.
- Initial Power-Up and Reset: After wiring, close the enclosure door. Restore power to the circuit. The unit should power on. If the display is blank or unresponsive, or if the AUTO function does not work as expected, perform a reset. To reset, press the RESET button. Some users have reported needing to press ENTER and RESET simultaneously if the unit does not function correctly after initial power-up. Ensure the device is ON before connecting the main power.
- Voltage Selection: If applicable, ensure the selector switch inside the unit is set to the correct input voltage (120V, 208V, 240V, or 277V) matching your electrical supply.

Figure 3: Close-up view of the internal wiring and circuit board of the Intermatic DT101, illustrating the connection points for electrical installation.
Operating Instructions
The DT101 allows for flexible programming of up to 28 ON/OFF events. Follow these steps to set the time and program schedules:
Setting Current Time and Date
- Press the MODE button repeatedly until "SET CLOCK" appears on the display.
- Use the + and - buttons to adjust the hour, then press ENTER/NEXT.
- Adjust minutes, then press ENTER/NEXT.
- Adjust the year, then press ENTER/NEXT.
- Adjust the month, then press ENTER/NEXT.
- Adjust the day, then press ENTER/NEXT.
- The display will return to the current time. The DT101 automatically adjusts for Daylight Saving Time.
Programming ON/OFF Events
- Press the MODE button repeatedly until "SET PROGRAM" appears.
- The display will show "PROG 1 ON". Use + and - to set the desired ON time for the first event. Press ENTER/NEXT.
- Select the days of the week for this ON event (e.g., MO TU WE TH FR SA SU for everyday, or specific days). Press ENTER/NEXT.
- The display will show "PROG 1 OFF". Set the desired OFF time for the first event. Press ENTER/NEXT.
- Select the days of the week for this OFF event. Press ENTER/NEXT.
- Repeat steps 2-5 for additional ON/OFF events (up to 28 total). To exit programming, press MODE.
Manual Override
The DT101 allows for temporary or permanent manual override of the programmed schedule:
- Temporary Override: Press the ON/OFF button once. The output will switch to the opposite state (ON if OFF, OFF if ON) until the next programmed event.
- Permanent Override: Press and hold the ON/OFF button for 3 seconds. The output will remain in its current state, ignoring all programmed events, until the button is pressed and held again for 3 seconds to return to automatic mode.
Maintenance
The Intermatic DT101 Digital Time Switch is designed for minimal maintenance. However, periodic checks can ensure its longevity and reliable operation:
- Battery Replacement: The two AAA batteries provide backup for settings during power outages. Replace them every 3-5 years, or if a low battery indicator appears on the display. Always replace batteries with the unit powered off at the circuit breaker.
- Cleaning: Clean the exterior of the unit with a soft, dry cloth. Do not use abrasive cleaners or solvents.
- Connection Check: Periodically, with power disconnected, inspect the wiring connections to ensure they remain tight and free from corrosion.
Troubleshooting
| Problem | Possible Cause | Solution |
|---|---|---|
| Display is blank or unit is unresponsive. | No power to the unit; incorrect wiring; dead batteries. | Check circuit breaker. Verify wiring connections. Replace AAA batteries. |
| Timer does not follow programmed schedule (stays ON/OFF). | Unit is in permanent manual override mode; incorrect initial setup sequence; programming error. | Press and hold ON/OFF button for 3 seconds to return to AUTO mode. Ensure batteries were installed and unit was ON before connecting main power. Perform a full reset (RESET button, or ENTER + RESET if needed) and re-program. Double-check programmed times and days. |
| Time or date is incorrect. | Time not set correctly; power outage without battery backup. | Re-set current time and date. Ensure batteries are installed and functional. |
| Cannot program events. | Unit not in programming mode; maximum events reached. | Press MODE until "SET PROGRAM" appears. The unit supports up to 28 events. |
Specifications
- Model Number: DT101D89
- Input Voltage: 120-277 VAC, 50/60 Hz (selectable)
- Switch Type: SPST (Single Pole Single Throw)
- Amperage: 20 Amp
- Number of Events: Up to 28 ON/OFF events
- Battery Backup: 2 x AAA batteries (not included)
- Dimensions: 3.2"D x 8"W x 5.4"H (8.1 cm D x 20.3 cm W x 13.7 cm H)
- Weight: 2.4 Pounds (1.09 kg)
- Color: Gray
- Features: To-the-minute accuracy, Temporary/Permanent manual override, Automatic Daylight Saving Time adjustment.
Warranty and Support
For warranty information and technical support, please contact Intermatic customer service or visit the official Intermatic website. Keep your purchase receipt as proof of purchase for warranty claims.
Intermatic Website: www.intermatic.com
Related documentsDT101


Ask a question about this manual
Ask about setup, troubleshooting, compatibility, parts, safety, or missing instructions. Manuals+ will review the question and use this page’s manual context to help answer it.