
Behringer B207MP3 Kit
Behringer Eurolive B207MP3 PA/Monitor System User Manual
Model: B207MP3 Kit
1. Introduction
This manual provides essential information for the safe and effective operation of your Behringer Eurolive B207MP3 Active 150-Watt 6.5" Powered PA/Monitor System, bundled with a Behringer ULTRAVOICE XM8500 Cardioid Vocal Microphone and an XLR Microphone Cable. Please read this manual thoroughly before using the product to ensure proper setup, operation, and maintenance.

Figure 1.1: The Behringer Eurolive B207MP3 PA/Monitor System, including the speaker, XM8500 microphone, and XLR cable.
2. Safety Instructions
Always observe the following basic safety precautions when operating this device:
- Read these instructions.
- Keep these instructions.
- Heed all warnings.
- Follow all instructions.
- Do not use this apparatus near water.
- Clean only with a dry cloth.
- Do not block any ventilation openings. Install in accordance with the manufacturer’s instructions.
- Do not install near any heat sources such as radiators, heat registers, stoves, or other apparatus (including amplifiers) that produce heat.
- Do not defeat the safety purpose of the polarized or grounding-type plug. A polarized plug has two blades with one wider than the other. A grounding-type plug has two blades and a third grounding prong. The wide blade or the third prong are provided for your safety. If the provided plug does not fit into your outlet, consult an electrician for replacement of the obsolete outlet.
- Protect the power cord from being walked on or pinched, particularly at plugs, convenience receptacles, and the point where they exit from the apparatus.
- Only use attachments/accessories specified by the manufacturer.
- Use only with the cart, stand, tripod, bracket, or table specified by the manufacturer, or sold with the apparatus. When a cart is used, use caution when moving the cart/apparatus combination to avoid injury from tip-over.
- Unplug this apparatus during lightning storms or when unused for long periods of time.
- Refer all servicing to qualified service personnel. Servicing is required when the apparatus has been damaged in any way, such as power-supply cord or plug is damaged, liquid has been spilled or objects have fallen into the apparatus, the apparatus has been exposed to rain or moisture, does not operate normally, or has been dropped.
3. Package Contents
Upon unpacking, please verify that all components listed below are present and in good condition:
- Behringer Eurolive B207MP3 Active 150-Watt 6.5" Powered PA/Monitor System
- Behringer ULTRAVOICE XM8500 Cardioid Vocal Microphone
- 15' 8mm XLR Microphone Cable
- Power Cable
- User Manual (this document)
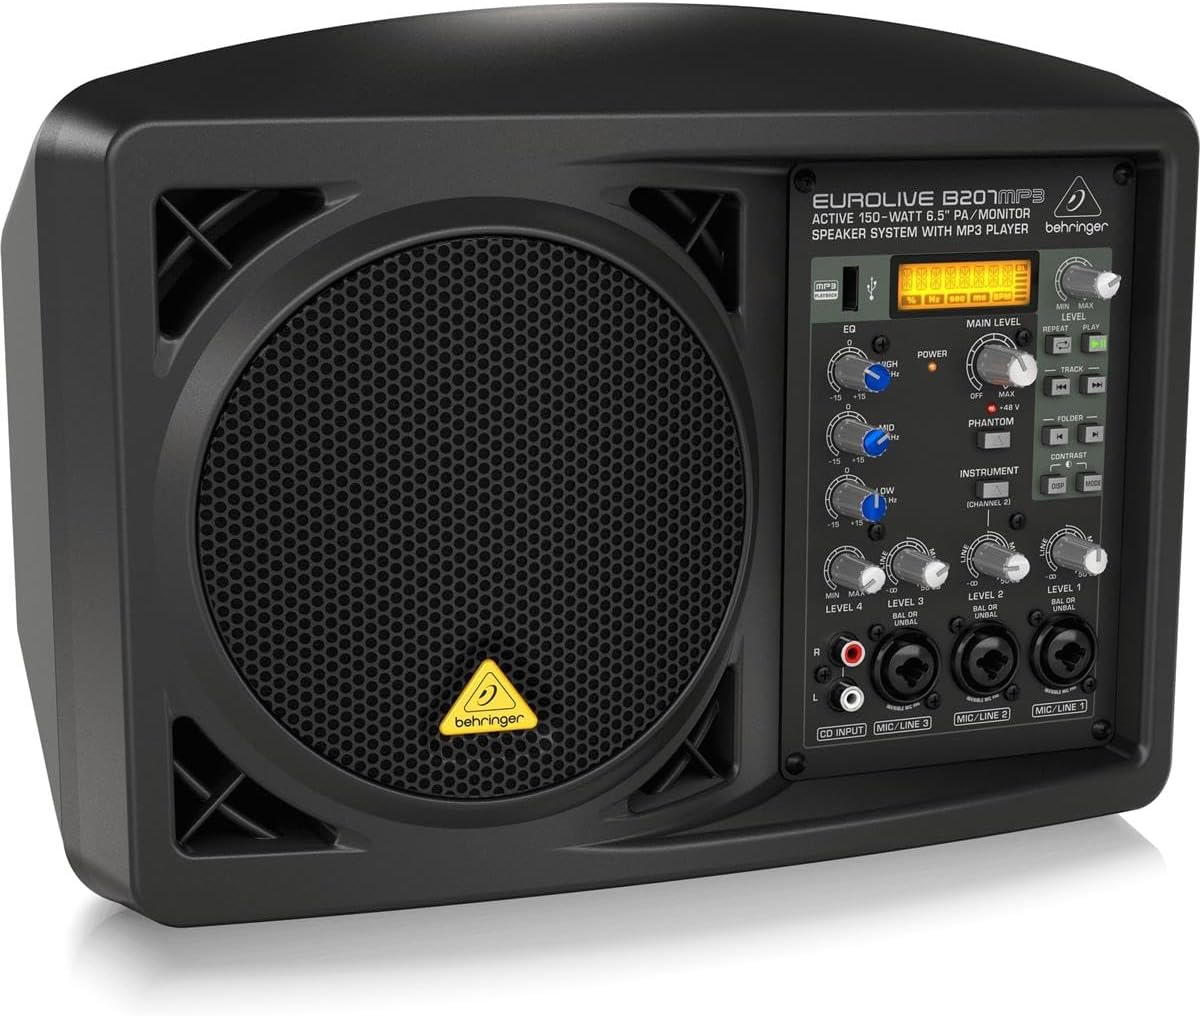
Figure 3.1: Front view of the B207MP3 speaker unit.

Figure 3.2: The Behringer ULTRAVOICE XM8500 Cardioid Vocal Microphone.
4. Setup
4.1 Power Connection
- Ensure the power switch on the rear panel of the B207MP3 is in the "OFF" position.
- Connect the supplied power cable to the AC IN socket on the rear panel of the B207MP3.
- Plug the other end of the power cable into a suitable AC power outlet.
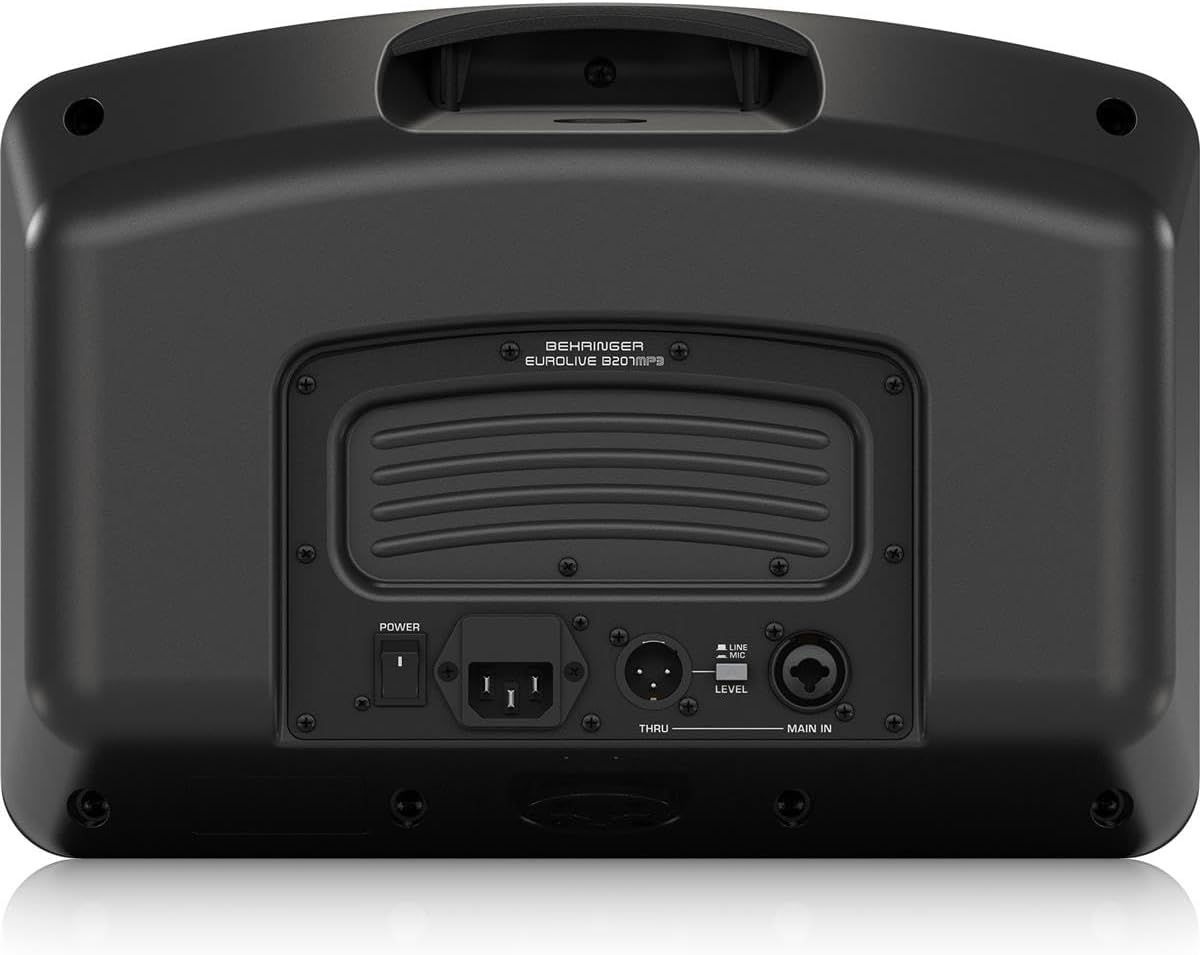
Figure 4.1: Rear panel connections of the B207MP3, including the power input.
4.2 Microphone Connection
- Connect one end of the 15' XLR microphone cable to the Behringer ULTRAVOICE XM8500 microphone.
- Connect the other end of the XLR microphone cable to one of the MIC/LINE inputs (e.g., MIC/LINE 1) on the front panel of the B207MP3.
- If using a condenser microphone (not included in this bundle), ensure the +48V Phantom Power switch is engaged if required by the microphone. The XM8500 is a dynamic microphone and does not require phantom power.

Figure 4.2: Front panel of the B207MP3, highlighting the MIC/LINE inputs.
4.3 Audio Source Connection (Optional)
The B207MP3 features multiple input options:
- CD Input: Use the RCA inputs for connecting CD players, media players, or other stereo line-level sources.
- MIC/LINE Inputs (Channels 1-3): These inputs accept XLR or 1/4" TRS/TS connectors for microphones or line-level instruments.
- USB Input: For MP3 playback from a USB drive.
Connect your desired audio sources to the appropriate inputs on the front panel.
5. Operating
5.1 Powering On/Off
- Before powering on, ensure all level controls (LEVEL 1-4, MAIN LEVEL) are set to their minimum position.
- Flip the POWER switch on the rear panel to the "ON" position. The power indicator on the front panel will illuminate.
- To power off, first reduce all levels to minimum, then flip the POWER switch to "OFF".
5.2 Control Panel Overview

Figure 5.1: Detailed view of the B207MP3 control panel.
- EQ Section (HIGH, MID, LOW): Adjusts the tonal characteristics of the overall mix.
- POWER Indicator: Illuminates when the unit is powered on.
- MAIN LEVEL: Controls the overall output volume of the system.
- PHANTOM Power (+48V): Activates phantom power for condenser microphones on channels 1-3.
- MP3 Player Controls: Buttons for play/pause, track navigation, repeat, and folder selection.
- LEVEL Controls (1-4): Adjust the input volume for each channel.
- CLIP Indicators: Illuminate when the input signal is too high, indicating potential distortion. Reduce the corresponding channel's LEVEL control.
- DSP/MODE: Button for digital signal processing effects and mode selection.
5.3 MP3 Player Operation
- Insert a USB flash drive containing MP3 files into the USB port on the front panel.
- The display will show track information.
- Use the PLAY/PAUSE button to start or stop playback.
- Use the TRACK buttons (forward/backward) to navigate between songs.
- The REPEAT button cycles through repeat modes (e.g., repeat one, repeat all).
- The FOLDER button allows navigation through folders on the USB drive.
5.4 Adjusting Levels
- Start with all LEVEL controls and the MAIN LEVEL control at their minimum.
- Gradually increase the LEVEL control for the channel you are using (e.g., MIC/LINE 1 for the microphone) until you hear sound.
- Observe the CLIP indicator. If it illuminates frequently, reduce the channel's LEVEL to prevent distortion.
- Slowly increase the MAIN LEVEL control to achieve the desired overall volume.
- Adjust the EQ controls (HIGH, MID, LOW) to fine-tune the sound to your preference.
6. Maintenance
Proper maintenance ensures the longevity and optimal performance of your Behringer Eurolive B207MP3 system and XM8500 microphone.
- Cleaning: Use a soft, dry cloth to clean the exterior surfaces of the speaker and microphone. Do not use liquid cleaners, abrasives, or solvents.
- Storage: When not in use, store the system in a cool, dry place, away from direct sunlight and extreme temperatures. The microphone should be stored in its protective case.
- Ventilation: Ensure that the ventilation openings on the speaker are not blocked during operation to prevent overheating.
- Cable Care: Avoid kinking or sharply bending cables. Store them neatly to prevent damage.

Figure 6.1: The Behringer XM8500 microphone stored in its protective case.
7. Troubleshooting
If you encounter issues with your system, refer to the following common problems and solutions:
| Problem | Possible Cause | Solution |
|---|---|---|
| No sound output. | Power not connected; Power switch off; Volume levels too low; Incorrect input selected; Damaged cable. | Check power connection and switch; Increase MAIN LEVEL and channel LEVEL controls; Ensure audio source is connected to the correct input; Test with a different cable. |
| Distorted sound. | Input signal too high (clipping); MAIN LEVEL too high; Damaged speaker. | Reduce channel LEVEL controls if CLIP indicator is active; Reduce MAIN LEVEL; Contact support if distortion persists at low levels. |
| MP3 player not reading USB. | Unsupported file format; USB drive not formatted correctly; Damaged USB drive. | Ensure files are MP3 format; Format USB drive to FAT32; Try a different USB drive. |
| Microphone not working. | Cable not connected properly; Channel LEVEL too low; Phantom power off (for condenser mics). | Check XLR cable connection at both ends; Increase microphone channel LEVEL; Activate +48V Phantom Power if using a condenser mic (not needed for XM8500). |
8. Specifications
Key technical specifications for the Behringer Eurolive B207MP3 PA/Monitor System:
- Output Wattage: 150 Watts
- Number of Channels: 4
- Connector Type: XLR, 1/4" TRS/TS, RCA, USB
- Item Weight (System): Approximately 0.01 Ounces (Note: This value from product data seems incorrect for a PA system, typically much heavier. Refer to official Behringer documentation for accurate weight.)
- Product Dimensions (System L x W x H): 10 x 14 x 8 inches
- Mounting Type: Tabletop
- Connectivity Technology: USB
- Compatible Devices: MP3 Player
- Microphone Type (XM8500): Cardioid Vocal Microphone
For detailed specifications, please refer to the official Behringer product page or contact Behringer support.
9. Warranty and Support
The Behringer Eurolive B207MP3 Active 150-Watt 6.5" Powered PA/Monitor System comes with a Behringer 3 Year Limited Warranty. Please retain your proof of purchase for warranty claims.
For warranty service, technical support, or further inquiries, please visit the official Behringer website or contact their customer support directly. You can find more information and resources on the Behringer Store on Amazon.
Related documentsB207MP3 Kit


Ask a question about this manual
Ask about setup, troubleshooting, compatibility, parts, safety, or missing instructions. Manuals+ will review the question and use this page’s manual context to help answer it.