1. Introduction
This manual provides detailed instructions for the AGPTEK HDMI KVM Extender Receiver. This device is designed to extend HDMI video and KVM (Keyboard, Video, Mouse) signals over a single Cat 5/5e/6/7 Ethernet cable, supporting resolutions up to 1080p at 60Hz. Please note that this product is the receiver unit only and requires a compatible AGPTEK HDMI KVM Extender transmitter unit (sold separately) for operation.

Image 1.1: Top view of the AGPTEK HDMI KVM Extender Receiver, showing the 'HDMI KVM EXTENDER RX Receiver' label.
2. Product Features
- High-Definition Transmission: Transmits Ultra HD picture signals up to 1080p at 60Hz.
- Ethernet Cable Compatibility: Supports STP & UTP compliant CAT5/5e/6/7 cables.
- Extended Range: Signal extension up to 120 meters (365 feet) over a single Ethernet cable.
- EDID Functionality: Copy EDID function to ensure compatibility with various display devices.
- Network Standard: Supports standard 802.3 Ethernet 10/100/1000Mbps.
- KVM Functionality: Transmits keyboard and mouse data via LAN.
- Status Indicators: LED indicators for power and USB connection status.
- Durable Design: Aluminum alloy housing for port stability and durability.
- Safety: Built-in ESD protection system for safer transmission.
- Multi-Receiver Support: A single transmitter can connect to multiple receivers via a router or network switch for multi-screen display.

Image 2.1: Visual representation of key features including TCP/IP agreement, KVM support, 120m extension, concise design, and 1080p HD support.
3. Package Contents
Please check the package contents upon opening to ensure all items are present:
- 1 x AGPTEK HDMI KVM Extender (Receiver Unit)
- 1 x CD (USB Driver Software)
- 1 x Power Adapter (DC 5V)
- 1 x User Manual (This document)
Image 3.1: The included DC 5V power adapter.
4. Installation Requirements
Before proceeding with the setup, ensure you have the following:
- Transmitter Unit: A compatible AGPTEK HDMI KVM Extender transmitter unit. This receiver unit cannot function independently.
- Source Device: A PC or other device with an HDMI graphics card (connected to the transmitter).
- Display Device: A monitor, HDTV, or SDTV with an HDMI input port (connected to the receiver).
- Network Cables: UTP/STP CAT5E/6 network cables, compliant with the IEEE-568B standard. Recommended cable lengths for optimal performance: CAT5 up to 80m, CAT5E up to 100m, CAT6 up to 120m.
5. Setup Instructions
Follow these steps to set up your AGPTEK HDMI KVM Extender Receiver:
- Connect Display: Connect an HDMI cable from your display device (monitor, TV) to the HDMI OUT port on the receiver unit.
- Connect KVM Devices: Connect your USB keyboard and/or mouse to the USB ports on the receiver unit.
- Connect Ethernet Cable: Connect a CAT5/5e/6/7 Ethernet cable from your network switch/router (or directly from the transmitter unit) to the LAN RX port on the receiver unit. Ensure the cable is securely seated.
- Connect Power: Plug the provided DC 5V power adapter into the DC 5V port on the receiver unit, then plug the adapter into a power outlet.
- Power On Transmitter: Ensure your AGPTEK HDMI KVM Extender transmitter unit is also powered on and correctly connected to your source device and the network.
- Verify Status: Check the LED indicators on the receiver unit. The power LED should be lit, and the LAN RX LED should indicate an active network connection.
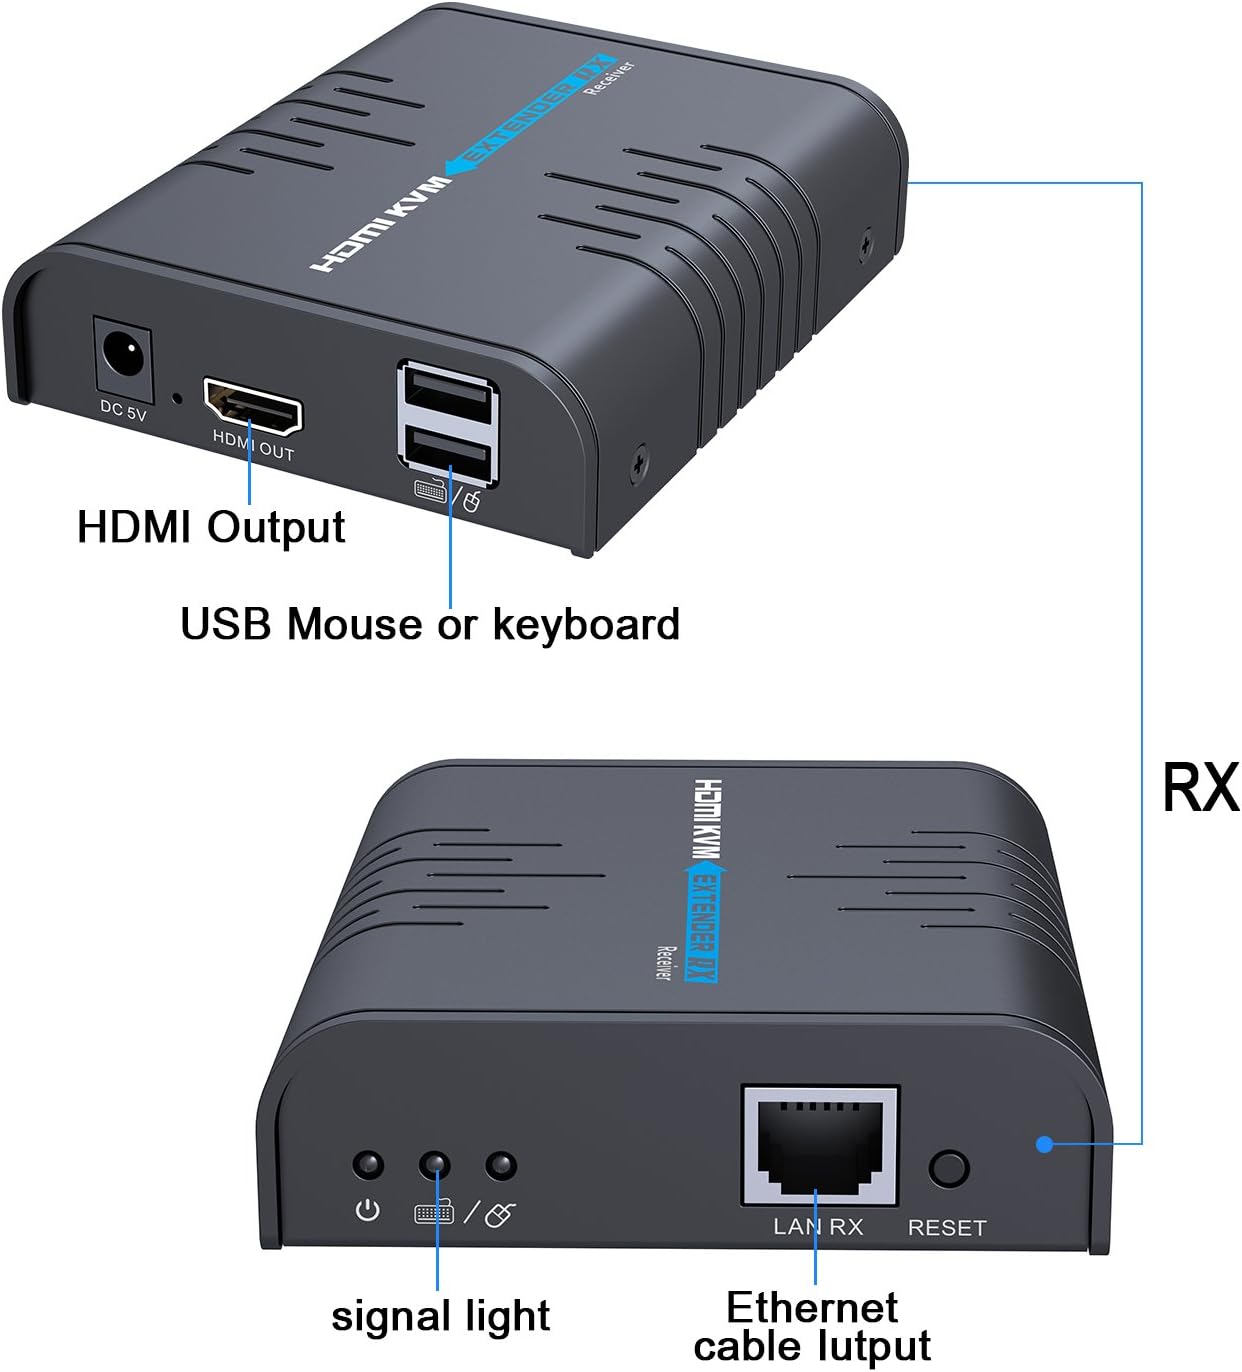
Image 5.1: Diagram showing the HDMI Output, USB ports for mouse/keyboard, signal light, Ethernet cable input (LAN RX), and Reset button on the receiver unit.

Image 5.2: Close-up view of the receiver unit with a USB mouse and keyboard connected, illustrating the KVM functionality.
System Diagram for Multiple Receivers:

Image 5.3: System diagram illustrating how a computer (source) connects to a transmitter (TX), which then connects to a router or switch. Multiple receiver units (RX) can connect to the same router/switch via Ethernet cables, each displaying the signal on a separate monitor.
6. Operation
Once all connections are made and both the transmitter and receiver units are powered on, the system should automatically detect and extend the HDMI and KVM signals. The display connected to the receiver will show the video output from the source device connected to the transmitter. The keyboard and mouse connected to the receiver will control the source device.
- Signal Transmission: The video and audio signals, along with keyboard and mouse data, are transmitted over the Ethernet cable.
- Multi-Screen Display: If you have multiple receiver units connected to the same network (via a router or switch) as the transmitter, each receiver will display the same source content, allowing for a multi-screen setup.
- USB Driver: If your keyboard or mouse is not recognized, install the USB driver software from the included CD on your source computer.
7. Troubleshooting
If you encounter issues, refer to the following troubleshooting tips:
- No Display/Signal:
- Ensure both the transmitter and receiver units are powered on and their respective power LEDs are lit.
- Verify all HDMI and Ethernet cables are securely connected and not damaged.
- Check that the Ethernet cable type (CAT5/5e/6/7) and length are within the recommended specifications (max 120m for CAT6).
- Confirm the display device is set to the correct HDMI input.
- Test the HDMI source and display directly without the extender to rule out issues with those components.
- Keyboard/Mouse Not Working:
- Ensure the USB cables from the keyboard/mouse are firmly connected to the receiver's USB ports.
- Install the USB driver software from the provided CD on the source computer.
- Try connecting the keyboard/mouse directly to the source computer to confirm they are functional.
- Intermittent Signal/Disconnections:
- Check the quality and integrity of your Ethernet cable. A damaged or low-quality cable can cause instability.
- Ensure the power adapters for both transmitter and receiver are providing stable power.
- If using a network switch/router, ensure it is functioning correctly and not overloaded.
- Reduce the cable length if it is close to the maximum recommended distance.
- Poor Picture Quality:
- Ensure you are using high-quality HDMI and Ethernet cables.
- Check the resolution settings on your source device.
8. Specifications
| Model Number | COMINU051167 |
| Brand | AGPTEK |
| Compatible Devices | Keyboard, Monitor, Mouse, Television |
| Connector Type | HDMI |
| Color | Black |
| Item Weight | 13.4 ounces (approx. 380g) |
| Package Dimensions | 6.06 x 4.72 x 3.11 inches |
| Max Resolution | 1080p @ 60Hz |
| Max Transmission Distance | 120m (CAT6) |
9. Maintenance
To ensure the longevity and optimal performance of your AGPTEK HDMI KVM Extender Receiver, follow these maintenance guidelines:
- Cleaning: Use a soft, dry cloth to clean the exterior of the device. Do not use liquid cleaners or aerosols.
- Environment: Keep the device in a cool, dry place, away from direct sunlight, heat sources, and excessive moisture.
- Ventilation: Ensure proper airflow around the unit to prevent overheating. Do not block ventilation openings.
- Cable Management: Avoid bending or kinking cables sharply, as this can damage them and affect signal quality.
- Power Off: Disconnect the power adapter when the device is not in use for extended periods.
10. Warranty and Support
AGPTEK products are designed for reliability and performance. This product comes with a manufacturer's warranty. For specific warranty details, please refer to the warranty card included in your package or visit the official AGPTEK website.
If you require technical assistance, encounter issues not covered in this manual, or need to inquire about warranty service, please contact AGPTEK customer support through their official channels. Have your product model number (COMINU051167) and purchase information ready when contacting support.


