
SatLink WS-6933
SatLink WS-6933 DVB-S/S2 Satellite Meter Finder User Manual
Model: WS-6933
1. Introduction
The SatLink WS-6933 is a compact, lightweight, and intuitive handheld digital satellite meter designed for the installation and verification of digital TV services in residential homes or multi-dwelling units. It is fully compliant with DVB-S/S2 standards and offers a rich set of features for efficient satellite signal acquisition and analysis.
2. Important Safety Instructions
- Read all instructions carefully before operating the device.
- Keep the device away from water and moisture.
- Do not attempt to disassemble or repair the device yourself. Refer all servicing to qualified personnel.
- Use only the provided power adapter for charging to prevent damage.
- Ensure proper ventilation when operating the device.
- Avoid exposing the device to extreme temperatures or direct sunlight.
3. Unboxing and Package Contents
Carefully open the product packaging and ensure all items listed below are present. The device comes protected by a yellow silicone case for durability.
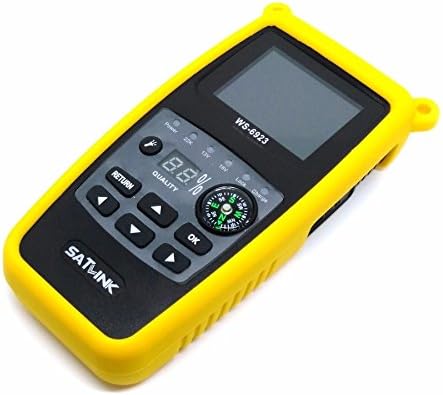
Figure 3.1: SatLink WS-6933 Satellite Meter Finder with its protective yellow silicone case.
Package Contents:
- 1 x WS-6933 Satellite Finder
- 1 x Silicone Case (pre-installed)
- 1 x USB Upgrade Cable
- 1 x Power Adapter (AC/DC 12V/1A)
- 1 x English User Manual
- 1 x Carrying Belt

Figure 3.2: The power adapter, USB cable, and carrying belt included with the device.
Unboxing Video:
Video 3.1: An unboxing video demonstrating the contents of the SatLink WS-6933 package and initial device overview.
4. Product Overview and Illustration
The WS-6933 features a 2.4-inch LCD screen, a built-in compass, and intuitive controls for easy operation.

Figure 4.1: Front view of the WS-6933, highlighting the screen, control buttons, and compass.
Front Panel Features:
- 2.4-inch LCD Screen: Displays menu, signal information, and settings.
- Control Buttons: Navigation (Up, Down, Left, Right), OK, Return.
- Compass: Integrated for directional guidance during satellite alignment.
- Indicator Lights: Display power status, 22KHz tone, 13V/18V LNB power, Lock, and Charge status.
- Quality Display: Digital percentage display for signal quality.

Figure 4.2: Side view of the WS-6933, showing the power switch, LNB input, USB port, and DC input.
Side and Rear Features:
- Power Switch: On/Off toggle for the device.
- LNB Input: F-type connector for connecting to the LNB.
- USB Port: For software upgrades and file transfer via PC.
- DC IN: Power input for charging the device.
- Flashlight: Integrated LED light for use in low-light conditions.

Figure 4.3: Back view of the WS-6933, showing the flashlight and ventilation.
5. Setup
- Charge the Device: Before first use, fully charge the internal 7.4V/800mAh Li-Ion battery using the provided 12V/1A AC/DC adapter. Connect the adapter to the DC IN port on the side of the device and plug it into a power outlet. The 'Charge' indicator light will illuminate.
- Attach Carrying Belt (Optional): For convenience during outdoor work, attach the carrying belt to the designated loops on the device's silicone case.
- Power On: Flip the power switch located on the side of the device to the 'ON' position. The SatLink logo will appear on the screen, followed by the main menu.
6. Operating Instructions
The WS-6933 features a user-friendly interface with a main menu providing access to various functions. Use the navigation buttons (Up, Down, Left, Right) to move between options and the 'OK' button to select. Use the 'Return' button to go back to the previous screen.
Main Menu Overview:
- Sat Setting: Configure satellite parameters.
- Signal Scan: Measure signal strength and quality.
- Tools: Access calculation tools for satellite alignment.
- Sat Manage: Add, edit, or delete satellite entries.
- TP Manager: Add, edit, or delete transponder entries.
- System Set: Adjust general device settings.
Detailed Functions:
- Sat Setting:
Navigate to 'Sat Setting' and press 'OK'. Here you can select the satellite name, LNB type, and input frequency parameters (Low Freq, High Freq, TP Num, Frequency). This is crucial for accurate signal detection.
- Signal Scan:
Select 'Signal Scan' from the main menu. This screen displays real-time signal strength (S) and quality (Q) percentages, along with other parameters like BER, PWR, S/N, and LNB power (13V/18V). The device also supports 22KHz tone and DISEQC 1.0/1.1 for multi-LNB setups. Sound and light alarms will indicate signal lock.
- Tools:
Access 'Tools' for helpful calculations. This section provides information such as Satellite Name, Sat Longitude, Local Longitude, Local Latitude, Azimuth, Elevation, and Polarization, assisting in precise dish alignment.
- Sat Manage:
In 'Sat Manage', you can 'Add Satellite', 'Edit Satellite', or 'Delete Satellite' entries. This allows customization of the satellite list based on your specific needs and regional bands.
- TP Manager:
The 'TP Manager' allows you to 'Add Transponder', 'Edit Transponder', or 'Delete Transponder' entries. This is useful for managing specific transponder frequencies and symbol rates.
- System Set:
Under 'System Set', you can configure various device preferences:
- OSD Language: Change the display language (default is English, other options available).
- Key Tone: Turn button press sounds ON/OFF.
- Lock TONE: Turn signal lock tone ON/OFF.
- Flashlight: Turn the built-in flashlight ON/OFF.
- PWR Unit: Adjust power unit display.
- Local Longitude/Latitude: Input local coordinates for accurate azimuth and elevation calculations.
Operation Demonstration Video:
Video 6.1: A demonstration of the SatLink WS-6933's menu navigation and key functions, including signal scanning and system settings.
7. Maintenance
- Cleaning: Use a soft, dry cloth to clean the device. Do not use liquid cleaners or aerosols.
- Storage: Store the device in a cool, dry place away from direct sunlight and extreme temperatures.
- Battery Care: To prolong battery life, avoid fully discharging the battery frequently. Charge the device regularly, even if not in use for extended periods.
- Software Updates: Periodically check the manufacturer's website for software updates to ensure optimal performance and access to new features. Use the provided USB cable for updates.
8. Troubleshooting
| Problem | Possible Cause | Solution |
|---|---|---|
| Device does not power on. | Low battery or power switch is off. | Charge the device. Ensure the power switch is in the 'ON' position. |
| No signal detected. | Incorrect satellite settings, LNB not connected, or dish misalignment. | Verify satellite settings in 'Sat Setting'. Check LNB cable connection. Adjust dish alignment using the signal scan feature. |
| Signal quality is low. | Weak signal from LNB, cable issue, or minor dish misalignment. | Check LNB and cable for damage. Fine-tune dish alignment. |
| Screen is unresponsive. | Device frozen. | Power off the device, then power it back on. If the issue persists, contact support. |
9. Specifications
| Feature | Specification |
|---|---|
| Model Number | WS-6933 |
| Product Dimensions | 6.3 x 3.15 x 1.57 inches (16 x 8 x 4 cm) |
| Item Weight | 1.34 pounds (610 grams) |
| Display | 2.4 inch LCD Screen |
| Battery | 7.4V/800mAh Li-Ion Battery (1 Lithium Ion battery required) |
| Power Supply | 12V/1A AC/DC Adapter |
| DVB Compliance | DVB-S/S2 |
| DISEQC Support | DISEQC 1.0/1.1, 0/22KHz Tone |
| LNB Power Supply | 13V/18V (Max 300mA) |
| Connectivity | USB (for software upgrade and file transfer) |
| Additional Features | Mechanical Compass, Beep Integrated, LNB short protect, Flashlight |
10. Warranty and Support
For warranty information and technical support, please refer to the contact details provided on the product packaging or visit the official SatLink website. Keep your purchase receipt as proof of purchase for any warranty claims.
Related documentsWS-6933


Ask a question about this manual
Ask about setup, troubleshooting, compatibility, parts, safety, or missing instructions. Manuals+ will review the question and use this page’s manual context to help answer it.