1. Introduction
This manual provides detailed instructions for the setup, operation, and maintenance of your Wisi OR 397 A Irdeto HDTV Satellite Receiver. This receiver is designed for digital satellite television and radio reception, supporting both DVB-S2 (HDTV) and DVB-S standards. It features an integrated Irdeto card reader for ORF cards, HDMI output for high-definition viewing, and USB recording capabilities.
Package Contents:
- Wisi OR 397 A HD Irdeto Satellite Receiver
- Infrared Remote Control (with batteries)
- User Manual
Key Features:
- Integrated Irdeto card reader for ORF, ATV, Puls4, etc.
- Reception of DVB-S2 (HDTV) and DVB-S TV and radio programs
- USB Recording (PVR function) to external hard drive (requires ORF card for encrypted channels)
- Pre-programmed with Austrian channel list
- Powerful Electronic Program Guide (EPG) with multi-day preview
- USB Media Player for JPEG photos, MP3 music, and MP4 videos
- Energy-saving standby mode (0.5 W)
- Software updates via ASTRA satellite
- Parental control and Unicable function
2. Product Overview
Front Panel

Image 2.1: Front Panel Layout
This image displays the front panel of the Wisi OR 397 A receiver. It shows the power button, channel up/down buttons, a USB input port, and the smartcard slot.
- Power On/Off: Button to switch the device on or off.
- Channel Down: Button to switch to the previous channel.
- Channel Up: Button to switch to the next channel.
- USB Input: Port for connecting USB devices, such as external hard drives for recording or USB sticks for media playback.
- Smartcard Slot: Insert for your ORF+ Smartcard. Ensure the smartcard is inserted with the chip facing downwards.
Rear Panel
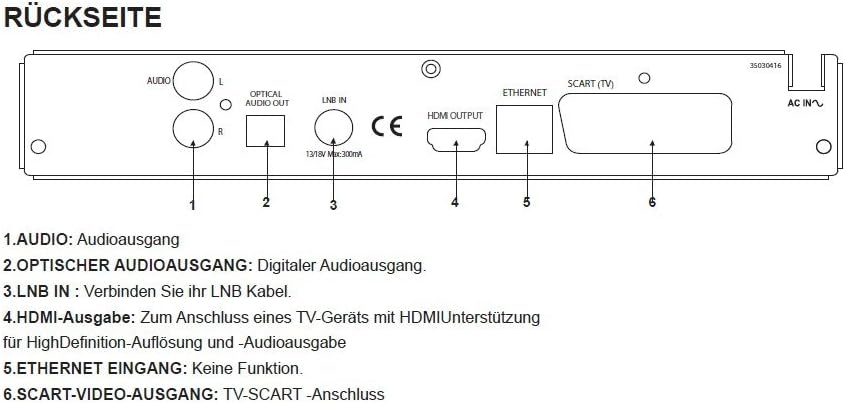
Image 2.2: Rear Panel Connections
This image illustrates the rear panel of the Wisi OR 397 A receiver, highlighting various input and output ports for audio, video, and satellite signal.
- AUDIO (L/R): Analog audio output ports (RCA) for connecting to an amplifier or stereo system.
- OPTICAL AUDIO OUTPUT: Digital audio output (S/PDIF) for high-quality digital audio connection.
- LNB IN: Connect your LNB cable from the satellite dish to this input.
- HDMI Output: Connects to an HDMI-enabled TV for high-definition video and audio output.
- ETHERNET INPUT: This port is present but has no active function for this model.
- SCART VIDEO OUTPUT: SCART connection for older televisions or video recorders.
3. Setup
3.1 Initial Connections
- Satellite Dish Connection: Connect the LNB cable from your satellite dish to the LNB IN port on the rear panel of the receiver.
- TV Connection:
- For High Definition (HD) viewing, connect an HDMI cable from the HDMI Output port on the receiver to an HDMI input on your television.
- Alternatively, for standard definition (SD) viewing or older TVs, connect a SCART cable from the SCART VIDEO OUTPUT port on the receiver to the SCART input on your television.
- Audio System Connection (Optional):
- For digital audio, connect an optical cable from the OPTICAL AUDIO OUTPUT to your audio receiver or soundbar.
- For analog audio, connect RCA cables from the AUDIO (L/R) ports to your audio system.
- Smartcard Insertion: Carefully insert your ORF+ Smartcard into the Smartcard Slot on the front panel, ensuring the chip faces downwards.
- Power Connection: Connect the power cable to the receiver and then to a power outlet.
3.2 First Time Setup
Upon powering on the receiver for the first time, it will guide you through an initial setup process. Follow the on-screen prompts to configure language, time zone, and perform a channel scan. The receiver comes pre-programmed with the current Austrian channel list, simplifying this process.
4. Operating Instructions
4.1 Basic Functions
- Power: Use the power button on the front panel or the remote control to turn the receiver on or off.
- Channel Selection: Use the Channel Up/Down buttons on the front panel or the remote control to navigate through channels. You can also enter channel numbers directly using the remote.
- Volume Control: Adjust the volume using the remote control.
- Menu Navigation: Use the 'Menu' button on the remote to access settings and features. Navigate using arrow keys and confirm with 'OK'.
4.2 Electronic Program Guide (EPG)
The receiver features a powerful EPG that provides a multi-day program preview. Press the 'EPG' button on your remote control to access it. You can view program schedules, read program information, and set reminders or recordings directly from the EPG.
4.3 USB Recording (PVR)
To use the PVR function, connect an external USB hard drive to the USB Input port on the front panel. Ensure the hard drive is formatted correctly (FAT32 or NTFS). You can schedule recordings via the EPG or initiate instant recordings while watching a program. Please note that USB recording of encrypted channels (e.g., ORF) is only possible with an inserted and active ORF smartcard. Program providers may impose additional restrictions on recording.
4.4 Media Player
The integrated USB Media Player allows you to play various media files from a connected USB storage device. Connect a USB stick or hard drive to the USB Input. Navigate to the Media Player section in the main menu to browse and play JPEG photos, MP3 music, and MP4 videos.
4.5 Parental Control
The parental control function allows you to restrict access to certain channels or programs based on age ratings. Access this feature through the main menu settings and follow the instructions to set up a PIN and configure restrictions.
5. Maintenance
5.1 Software Updates
The Wisi OR 397 A receiver supports software updates via the ASTRA satellite. It is recommended to periodically check for and install available updates to ensure optimal performance and access to the latest features. Consult the system settings menu for options related to software updates.
5.2 Cleaning
To clean the receiver, use a soft, dry cloth. Do not use liquid or aerosol cleaners, as they may damage the device. Ensure the receiver is unplugged before cleaning.
6. Troubleshooting
If you encounter issues with your Wisi OR 397 A receiver, please refer to the following common solutions before contacting support:
- No Picture/Sound:
- Check all cable connections (HDMI, SCART, LNB, audio).
- Ensure the TV is set to the correct input source (HDMI 1, AV, etc.).
- Verify the receiver is powered on.
- No Signal:
- Check the LNB cable connection.
- Ensure the satellite dish is correctly aligned.
- Perform a channel scan from the menu.
- Encrypted Channel Issues (e.g., ORF):
- Ensure your ORF smartcard is correctly inserted (chip facing down).
- Verify your smartcard subscription is active.
- Check for any service messages on screen.
- Remote Control Not Working:
- Replace the batteries (2x AAA).
- Ensure there are no obstructions between the remote and the receiver.
- Receiver Unresponsive:
- Perform a power cycle: unplug the receiver from the power outlet, wait 30 seconds, then plug it back in.
7. Specifications

Image 7.1: Technical Specifications and Remote Control
This image provides a comprehensive table of the Wisi OR 397 A's technical data, including dimensions, weight, and supported audio/video formats, alongside a visual of the remote control.
| Feature | Description |
|---|---|
| Brand | Wisi |
| Model Number | OR 397 A |
| Color | Black |
| Reception Standards | DVB-S2 (HDTV), DVB-S |
| Card Reader | Integrated Irdeto Secure Card Reader (for ORF, ATV, Puls4, etc.) |
| Video Output | 1x HDMI 1.4, 1x SCART (TV), 1x Cinch-Video (RCA yellow) |
| Audio Output | Analog (RCA L/R), Digital (Optical S/PDIF), Dolby Digital (AC3) |
| USB Ports | 1x USB 2.0 (compatible with USB 1.1/2.0, 5V DC, max. 500mA) |
| Memory Slots | 5000 for TV and Radio channels |
| Power Consumption | 0.5 Watt in Standby mode |
| Voltage | 12 Volts (DC) |
| Dimensions (LxWxH) | 230 x 160 x 45 mm |
| Weight | 0.7 kg |
| Operating Temperature | 0°C to +45°C |
| Storage Temperature | -10°C to +70°C |
8. Warranty and Support
For warranty information, please refer to the documentation provided at the time of purchase or contact your retailer. For technical support or further assistance, please consult the official Wisi website or contact their customer service department. Keep your purchase receipt and product model number (OR 397 A) readily available when seeking support.


