1. Introduction
This manual provides comprehensive instructions for the safe and efficient operation, installation, and maintenance of your Daewoo DWF-DG241BWW2 automatic washing machine. Please read this manual thoroughly before using the appliance and retain it for future reference.
2. Safety Information
To reduce the risk of fire, electric shock, or injury, observe the following basic precautions:
- Ensure the washing machine is properly grounded.
- Do not install or store the appliance where it will be exposed to weather or freezing temperatures.
- Do not allow children to play on or in the appliance. Close supervision is necessary when the appliance is used near children.
- Do not reach into the appliance if the tub or agitator is moving.
- Do not wash articles that have been previously cleaned in, washed in, soaked in, or spotted with gasoline, dry-cleaning solvents, or other flammable or explosive substances.
- Always disconnect the appliance from the power supply before cleaning or performing any maintenance.
3. Product Overview
The Daewoo DWF-DG241BWW2 is a 12 kg automatic top-load washing machine designed for efficient laundry care. It features a durable construction and an intuitive digital control panel.

Figure 1: Front view of the Daewoo DWF-DG241BWW2 washing machine. This image shows the appliance's overall white exterior, the top-loading lid, and the digital control panel located at the rear of the top surface.
Control Panel (EZ PAD Digital)
The EZ PAD digital control panel allows for easy selection of wash cycles, water levels, and other settings. Refer to the diagram below for key features.
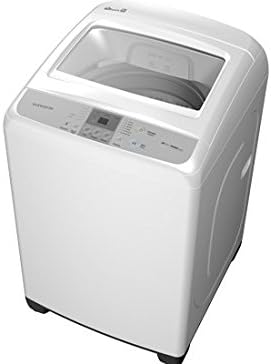
Figure 2: Angled view of the Daewoo DWF-DG241BWW2 washing machine, highlighting the tempered glass top-loading lid in an open position and providing a closer look at the EZ PAD digital control panel.
Key Components:
- Tempered Glass Lid: Provides visibility into the wash tub and ensures safety.
- Wash Tub: Stainless steel interior for durability and hygiene.
- Detergent Dispenser: For adding detergent and fabric softener.
- Water Inlet Hoses: Connections for hot and cold water supply.
- Drain Hose: For expelling used water.
- Adjustable Leveling Feet: To ensure stability during operation.
4. Setup and Installation
4.1 Unpacking
Carefully remove all packaging materials, including the shipping bolts (if present), from the washing machine. Retain packaging for potential future transport.
4.2 Location Requirements
- Place the washer on a firm, level floor capable of supporting its weight (35 kg dry, plus water and laundry).
- Avoid direct sunlight, heat sources, or areas where temperatures may drop below freezing.
- Ensure adequate clearance around the machine for ventilation and maintenance.
4.3 Leveling the Washer
Use a level to check if the machine is perfectly horizontal. Adjust the front leveling feet by turning them clockwise or counter-clockwise until the washer is stable and level. An unlevel washer can cause excessive vibration and noise.
4.4 Water Supply Connection
- Connect the hot water inlet hose to the hot water faucet and the corresponding inlet on the back of the washer.
- Connect the cold water inlet hose to the cold water faucet and the corresponding inlet on the back of the washer.
- Ensure all connections are tight to prevent leaks. Turn on the water supply and check for any drips.
4.5 Drain Hose Installation
Insert the drain hose into a standpipe or laundry tub. Ensure the drain hose is securely fastened to prevent it from dislodging during the wash cycle, which could cause flooding. The top of the standpipe or tub should be between 80 cm and 120 cm from the floor.
4.6 Electrical Connection
Plug the power cord into a grounded 120 Volt, 60 Hz electrical outlet. Do not use extension cords or adapters. Ensure the electrical circuit is dedicated to the washing machine and protected by a fuse or circuit breaker.
5. Operating Instructions
5.1 Preparing Laundry
- Sort laundry by fabric type, color, and soil level.
- Check garment care labels for specific washing instructions.
- Empty pockets and close zippers or hooks to prevent damage.
5.2 Loading the Washer
Open the tempered glass lid and load items loosely into the wash tub. Do not overload the machine; ensure there is enough space for clothes to move freely during agitation. For best results, distribute items evenly around the agitator.
5.3 Adding Detergent and Additives
Add the recommended amount of high-efficiency (HE) detergent to the detergent dispenser. If using fabric softener, add it to the designated compartment in the dispenser. Do not exceed the maximum fill line.
5.4 Selecting a Wash Cycle
Close the lid. Use the EZ PAD digital control panel to select the desired wash cycle (e.g., Normal, Heavy Duty, Delicates). The display will show the selected cycle and estimated time.
5.5 Adjusting Settings (Optional)
Depending on the selected cycle, you may be able to adjust settings such as water temperature, spin speed, or rinse options using the control panel buttons.
5.6 Starting the Wash
Press the Start/Pause button to begin the wash cycle. The machine will automatically fill with water and proceed through the selected cycle.
5.7 Pausing and Unloading
To pause a cycle, press the Start/Pause button. To resume, press it again. Once the cycle is complete, the machine will signal, and you can open the lid to unload your clean laundry.
6. Wash Cycles
Your Daewoo DWF-DG241BWW2 washing machine offers several wash cycles to suit various laundry needs:
- Normal: For everyday cottons, linens, and mixed loads with average soil.
- Heavy Duty: Ideal for heavily soiled, durable items like work clothes, towels, or jeans.
- Delicates: Gentle cycle for fragile items such as lingerie, silk, or delicate synthetics.
- Quick Wash: A shorter cycle for lightly soiled items or when you need clothes cleaned quickly.
- Rinse: An additional rinse cycle for extra thorough rinsing, useful for sensitive skin or when using extra detergent.
7. Maintenance and Care
7.1 Cleaning the Exterior
Wipe the exterior surfaces with a soft, damp cloth and mild, non-abrasive cleaner. Avoid harsh chemicals or abrasive pads that could damage the finish.
7.2 Cleaning the Detergent Dispenser
Periodically remove the detergent dispenser drawer and rinse it under warm water to remove any detergent or fabric softener residue. This prevents clogs and ensures proper dispensing.
7.3 Cleaning the Wash Tub
To prevent odors and residue buildup, run a "Tub Clean" cycle (if available) or a hot wash cycle with a cup of white vinegar or a washing machine cleaner once a month. Leave the lid open after use to allow the tub to air dry.
7.4 Water Inlet Filters
Periodically check the screens in the water inlet hoses for debris. If clogged, turn off the water supply, disconnect the hoses, and clean the screens with a brush or pliers. Reconnect securely.
8. Troubleshooting
Before contacting service, review the following common issues and their solutions:
| Problem | Possible Cause | Solution |
|---|---|---|
| Washer does not start | Power cord unplugged; Lid not closed properly; Circuit breaker tripped. | Ensure power cord is securely plugged in; Close lid completely; Reset circuit breaker. |
| No water fill or slow fill | Water supply faucets turned off; Inlet hoses kinked; Inlet screens clogged. | Turn on water supply; Straighten hoses; Clean inlet screens. |
| Water not draining | Drain hose kinked or clogged; Drain pump filter clogged. | Straighten drain hose; Check for obstructions; Clean drain pump filter (refer to specific instructions if available). |
| Excessive vibration/noise | Washer not level; Load unbalanced; Shipping bolts not removed. | Level the washer; Redistribute laundry evenly; Ensure shipping bolts are removed. |
| Lid will not open | Safety lock engaged during cycle or immediately after. | Wait for the cycle to complete and the lid lock to disengage. Power cycle the machine if necessary. |
9. Specifications
| Feature | Specification |
|---|---|
| Brand | DAEWOO |
| Model Number | DWF-DG241BWW2 |
| Capacity | 12 kg (26.46 lbs) |
| Dimensions (W x D x H) | 61 x 65 x 97 cm |
| Weight | 35 kg |
| Voltage | 120 Volts |
| Material | Iron (Chassis/Frame) |
| Access Location | Top Load |
| Control Type | Digital control panel (EZ PAD) |
| Operation Mode | Fully Automatic |
| Cycle Options | Normal, Heavy Duty, Delicates, Quick Wash, Rinse |
10. Warranty and Support
For warranty information or technical support, please refer to the warranty card included with your purchase or contact Daewoo customer service. Keep your proof of purchase for warranty claims.
For further assistance, visit the official Daewoo website or contact their authorized service centers.


