
Introduction
This manual provides detailed instructions for the safe and effective use of your Meike MK-320 TTL Mini Flash Speedlite. Please read this manual thoroughly before using the product to ensure proper operation and to prevent damage.
The Meike MK-320 is a compact and versatile flash unit designed for Fujifilm cameras with a standard hot shoe. It features TTL automatic flash control, manual power adjustment, stroboscopic mode, and a flexible tilt/swivel head for various lighting scenarios.
Safety Precautions
- Do not disassemble or attempt to repair the flash unit yourself. Refer to qualified service personnel.
- Keep the flash unit dry. Do not expose it to rain, moisture, or high humidity.
- Avoid direct eye contact with the flash light, especially at close range, as it can cause temporary vision impairment.
- Use only specified AA size batteries (Alkaline or Ni-MH). Do not mix old and new batteries or different types of batteries.
- Remove batteries if the flash unit will not be used for an extended period to prevent leakage.
- Keep out of reach of children.
Package Contents
Verify that all items are present in your package:
- Meike MK-320 Flash for Fujifilm x 1
- Flash stand x 1
- Carry pouch x 1
- Mini flash diffuser x 1
- User manual x 1 (This document)
- Retail package x 1
Parts Identification
Familiarize yourself with the components of your Meike MK-320 flash unit.

- LCD Lattice Screen: Displays current settings and flash mode.
- Flash/Modeling Light Button: Activates the modeling light or test flash.
- C1 Function Button: For custom functions (refer to advanced settings).
- Mode Button: Cycles through flash modes (TTL, M, RPT, S1, S2).
- Indicator: Status light.
- (LEFT)/(RIGHT) Buttons: Navigate menus or adjust values.
- SET Button: Confirms selections.
- Locking Ring: Secures the flash to the camera hot shoe.
- Button of Power: Turns the flash unit on/off.
- LED Focusing Light: Assists camera autofocus in low light.
Setup
1. Installing Batteries
The MK-320 requires two AA size batteries (Alkaline or Ni-MH). Ensure correct polarity when inserting.
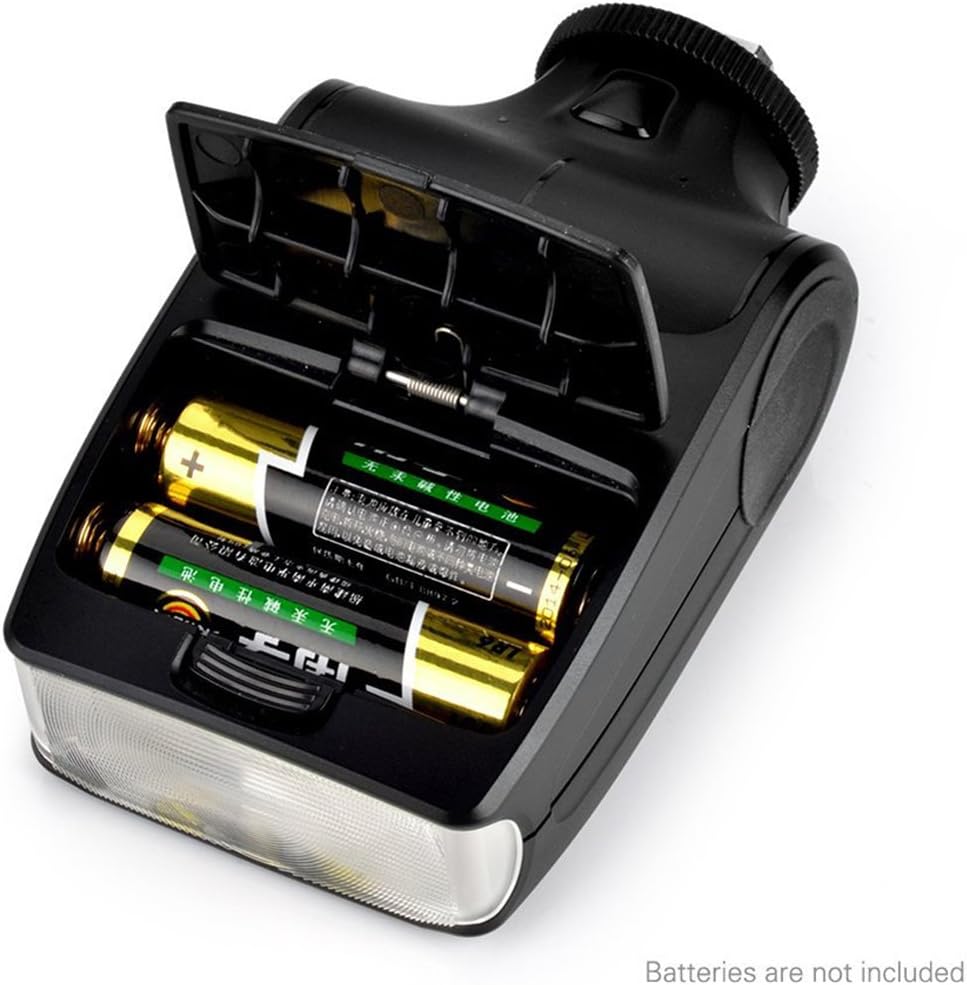
- Open the battery compartment cover located on the side of the flash unit.
- Insert two AA batteries, ensuring the positive (+) and negative (-) terminals align with the markings inside the compartment.
- Close the battery compartment cover securely.
Note: Remove batteries if the flash is not used for extended periods to prevent leakage.
2. Mounting the Flash on Camera
The MK-320 attaches to your camera's hot shoe.


- Slide the flash's hot shoe mount into your camera's hot shoe slot.
- Rotate the locking ring clockwise until the flash is securely fastened to the camera. Do not overtighten.
- To remove, rotate the locking ring counter-clockwise and slide the flash off.
3. Powering On/Off
Press and hold the Button of Power to turn the flash unit on or off.
Operating Instructions
1. Flash Modes
Press the Mode Button to cycle through the available flash modes:
- TTL (Through-The-Lens) Mode: The flash automatically adjusts its output based on the camera's metering system. This is the recommended mode for general use.
- M (Manual) Mode: You manually set the flash power output from 1/1 (full power) to 1/128. Use the (LEFT)/(RIGHT) Buttons to adjust the power level.
- RPT (Stroboscopic) Mode: The flash fires multiple times during a single exposure, creating a stroboscopic effect. You can set the flash frequency and number of flashes.
- S1 (Optical Slave) Mode: The flash fires in response to another flash unit's light pulse. It ignores the camera's pre-flash.
- S2 (Pre-flash Cancel Slave) Mode: Similar to S1, but designed to ignore the pre-flash emitted by a master flash unit, making it suitable for cameras that use pre-flash for exposure metering.

2. Adjusting Flash Head Angle
The flash head can be tilted and swiveled to direct light for bounce flash or creative lighting.


- Up-down rotation angle: -7° (down) to 90° (up).
- Left-right rotation angle: 60° (left) to 90° (right).
Gently adjust the flash head to the desired angle. It will click into place at common positions.
3. LED-Assistive Preview Focus
The built-in LED light can assist your camera's autofocus in low-light conditions. Press the Flash/Modeling Light Button to activate the LED light.
4. Front and Rear Curtain Synchronization
The MK-320 supports both front and rear curtain synchronization. This setting is typically controlled via your camera's flash menu. Consult your camera's manual for specific instructions on setting flash synchronization modes.
- Front-curtain sync: The flash fires immediately after the first curtain opens.
- Rear-curtain sync: The flash fires just before the second curtain closes. This is often used to create motion blur effects where the blur trails behind the moving subject.
Maintenance
- Cleaning: Use a soft, dry cloth to clean the flash unit. For stubborn dirt, slightly dampen the cloth with water and then wipe dry. Do not use organic solvents like alcohol or thinner.
- Storage: Store the flash unit in a cool, dry place away from direct sunlight and high humidity. Remove batteries if storing for extended periods.
- Battery Care: Always use fresh, high-quality batteries. Replace all batteries at the same time. Do not dispose of batteries in fire.
Troubleshooting
| Problem | Possible Cause | Solution |
|---|---|---|
| Flash does not fire. |
|
|
| Flash fires but image is too dark (underexposed). |
|
|
| Flash fires but image is too bright (overexposed). |
|
|
| Slow recycle time. |
|
|
Specifications
| Feature | Detail |
|---|---|
| Circuit Design | Insulated Gate Bipolar Transistor (IGBT) |
| Guide Number | 32 (ISO100, 105mm) |
| Flash Mode | TTL, M, RPT, S1, S2 |
| Power Supply | 2x AA size batteries (Alkaline or Ni-MH) |
| Up-down Rotation Angle | -7° (down) ~ 90° (up) degrees |
| Left-right Rotation Angle | 60° (left) ~ 90° (right) degrees |
| Lighting Times | 100-1500 times (AA alkaline cell used) |
| Recycle Time | Approx. 5s (for AA Ni-MH battery) |
| Color Temperature | 5600K |
| Flash Duration | 1/200s - 1/20000s |
| Flash Control | 8 levels of output control (1/128~1/1) |
| Light Sensing Distance | 15m indoor, 10m outdoor |
| External Interface | Hot shoe, Mini USB |
| Dimensions | 110 x 65 x 35mm (4.33 x 2.56 x 1.38 inches) |
| Net Weight | 150g (5.29 oz) |
| Compatible Mountings | Fujifilm (X100T, X100S, X30, X20, X-E1, X-E2, X-A1, X-T1, X-Pro1, X100, X10, X-S1, X-M1) |
| Item Model Number | MKFFA-SL320F |
Warranty and Support
Meike products are designed and manufactured to high-quality standards. For warranty information and technical support, please refer to the official Meike website or contact your local distributor.
Please retain your proof of purchase for any warranty claims.
For further assistance, you may visit the Meike Store on Amazon.

