
1. Introduction
This manual provides essential instructions for the safe and efficient operation of your JVC LT-32EM75 32-inch 720p LED TV. Please read this manual thoroughly before using the television and retain it for future reference. Proper installation, setup, and maintenance are crucial for optimal performance and longevity of your device.
Important Safety Information
- Do not block ventilation openings. Ensure adequate space around the TV for proper airflow.
- Do not place the TV near heat sources such as radiators, heat registers, stoves, or other apparatus (including amplifiers) that produce heat.
- Protect the power cord from being walked on or pinched, particularly at plugs, convenience receptacles, and the point where they exit from the apparatus.
- Only use attachments/accessories specified by the manufacturer.
- Unplug this apparatus during lightning storms or when unused for long periods.
- Refer all servicing to qualified service personnel. Servicing is required when the apparatus has been damaged in any way, such as power-supply cord or plug is damaged, liquid has been spilled or objects have fallen into the apparatus, the apparatus has been exposed to rain or moisture, does not operate normally, or has been dropped.
2. Package Contents
Before proceeding with the setup, please verify that all items listed below are included in your package:
- JVC LT-32EM75 32-inch 720p LED TV
- TV Stand (Base and Neck)
- Remote Control
- Power Cord
- User Manual (this document)
- Screws for Stand Assembly
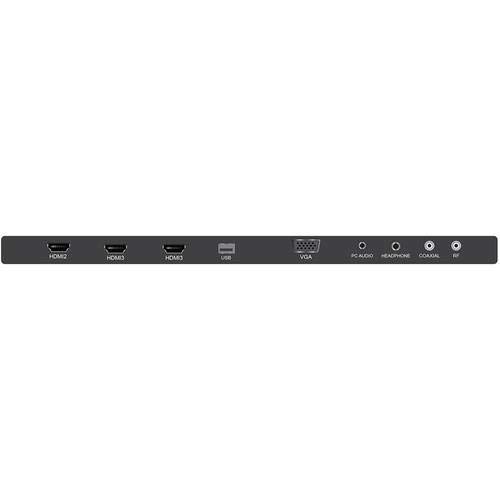
Figure 2.1: JVC LT-32EM75 32-inch 720p LED TV. This image shows the front view of the television with its stand.
3. Setup
3.1 Attaching the TV Stand
- Carefully place the TV screen-down on a soft, clean surface to prevent scratches.
- Align the stand neck with the mounting holes on the bottom of the TV.
- Secure the stand neck to the TV using the provided screws.
- Attach the stand base to the stand neck, ensuring it clicks into place or is secured with screws if applicable.
- Carefully lift the TV and place it on a stable, level surface.
3.2 Connecting External Devices
Your JVC LT-32EM75 TV features multiple input ports for connecting various devices. Ensure the TV is powered off before making any connections.

Figure 3.1: Rear view of the JVC LT-32EM75 TV showing input ports. This image illustrates the location of HDMI, USB, and other connection ports.
- HDMI Devices: Connect up to three HDMI-enabled devices (e.g., Blu-ray player, game console, cable box) to the HDMI ports. Use high-quality HDMI cables for best picture and sound.
- Antenna/Cable: Connect an antenna or cable TV coaxial cable to the "ANT/CABLE" input for over-the-air or basic cable channels.
- USB Devices: Insert a USB flash drive into the USB port to view photos or play compatible media files.
- Audio Output: Use the digital audio output (optical) or headphone jack to connect external audio systems or headphones.
3.3 Power Connection and Initial Scan
- Plug the power cord into the TV's power input, then into a standard electrical outlet (AC 120V, 60Hz).
- Press the Power button on the TV or remote control to turn on the TV.
- Follow the on-screen instructions to complete the initial setup, including language selection and channel scanning. This process will detect available channels from your antenna or cable connection.
4. Operating the TV
4.1 Remote Control Functions
The included remote control allows you to access all TV functions. Ensure two AAA batteries are inserted with correct polarity.

Figure 4.1: JVC LT-32EM75 Remote Control. This image displays the layout of the remote control buttons, including power, volume, channel, input, and menu navigation.
- POWER: Turns the TV on or off.
- INPUT: Selects the input source (HDMI 1, HDMI 2, HDMI 3, TV, USB).
- VOL +/-: Adjusts the volume level.
- CH +/-: Changes channels.
- MENU: Opens the main menu for settings adjustments.
- ARROW BUTTONS (Up/Down/Left/Right): Navigates through menu options.
- ENTER/OK: Confirms selections.
- EXIT: Closes the current menu or on-screen display.
4.2 Basic Operations
- Changing Input Source: Press the INPUT button on the remote repeatedly to cycle through available input sources, or press it once to bring up the input menu and select your desired source using the arrow buttons and ENTER.
- Adjusting Picture Settings: Press MENU, navigate to "Picture" settings. Here you can adjust Brightness, Contrast, Color, Tint, Sharpness, and select Picture Modes (e.g., Standard, Dynamic, Movie).
- Adjusting Sound Settings: Press MENU, navigate to "Sound" settings. Options include Bass, Treble, Balance, and Sound Modes (e.g., Standard, Music, Movie). Note that the built-in speakers may have limitations in sound quality.
5. Maintenance
5.1 Cleaning the TV Screen
- Always unplug the TV before cleaning.
- Use a soft, lint-free cloth (e.g., microfiber cloth) to gently wipe the screen.
- For stubborn marks, lightly dampen the cloth with water or a specialized screen cleaner. Never spray cleaner directly onto the screen.
- Avoid using abrasive cleaners, alcohol, benzene, or thinners, as these can damage the screen coating.
5.2 Cleaning the TV Casing
- Wipe the casing with a soft, dry cloth.
- If necessary, use a slightly damp cloth. Do not allow water to enter the TV's interior.
6. Troubleshooting
Before contacting customer support, please refer to the following troubleshooting guide for common issues.
| Problem | Possible Cause | Solution |
|---|---|---|
| No power | Power cord not connected; Power outlet not working; TV is off. | Ensure power cord is securely plugged into TV and outlet. Test outlet with another device. Press the Power button on the TV or remote. |
| No picture, but sound is present | Incorrect input source selected; External device not powered on or connected properly. | Press the INPUT button to select the correct source. Check connections of external devices and ensure they are powered on. |
| No sound, but picture is present | Volume is muted or too low; Incorrect audio output selected; External device audio issue. | Press VOL + or unmute the TV. Check audio settings in the menu. Ensure external device audio settings are correct. |
| Remote control not working | Batteries are dead or incorrectly inserted; Obstruction between remote and TV; Remote sensor on TV is blocked. | Replace batteries with new ones, ensuring correct polarity. Remove any obstructions. Ensure the TV's remote sensor is clear. |
| Poor picture quality (e.g., blurry, grainy) | Weak antenna signal; Incorrect picture settings; Low-quality source material. | Adjust antenna position or check cable connection. Reset picture settings to default or adjust manually. Ensure source device is outputting high-quality signal. |
| Sound quality is not optimal | Built-in speaker limitations; Incorrect sound settings. | Adjust sound settings (Bass, Treble, Sound Mode) in the TV menu. Consider connecting external speakers or a soundbar for improved audio experience. |
7. Specifications
| Feature | Detail |
|---|---|
| Model Name | LT-32EM75 |
| Screen Size | 32 Inches |
| Display Technology | LED |
| Resolution | 720p |
| Refresh Rate | 60 Hz |
| Connectivity Technology | HDMI |
| HDMI Ports | 3 |
| Voltage | 120 Volts |
| Wattage | 45 watts |
| Item Weight | 10 Pounds (approx. 4.5 kg) |
| Product Dimensions (L x W x H) | 40 x 10 x 25 inches (with stand) |
| Mounting Type | Table Mount |
8. Warranty and Support
8.1 Manufacturer's Warranty
This JVC LT-32EM75 television typically comes with a 1-year manufacturer's warranty from the date of purchase. This warranty covers defects in materials and workmanship under normal use. Please retain your proof of purchase for warranty claims. For specific terms and conditions, refer to the warranty card included with your product or visit the official JVC support website.
8.2 Customer Support
If you encounter issues not covered in the troubleshooting section or require further assistance, please contact JVC customer support. You can usually find contact information (phone number, email, or support website) on the official JVC website or in the documentation provided with your TV.
Note: JVC does not sell extended warranties for this specific model.


