
1. Introduction
The Intel® Ethernet Converged Network Adapter X550-T2 is a high-performance network adapter designed for data center environments. It provides 10 Gigabit Ethernet (10GbE) connectivity over standard CAT 6a cabling with RJ45 connectors, offering a cost-effective solution for network upgrades. This adapter is backward compatible with existing 1000BASE-T networks, simplifying the transition to 10GbE. It supports NBASE-T technology for 2.5 and 5.0 GbE over CAT 5e cabling and features PCI Express (PCIe) v3.0 for high-speed data transfer.
Key features include:
- Low cost, low power 10GbE performance.
- Integrated MAC and PHY for 10GBASE-T.
- Standard CAT 6a cabling with RJ45 connectors.
- Support for NBASE-T technology (2.5 and 5.0 GbE over CAT 5e).
- Backward compatibility with 1000BASE-T networks.
- PCI Express (PCIe) v3.0 with up to 8.0 GT/s.
- Unified networking for LAN, iSCSI, and FCoE.
- Flexible I/O virtualization for port partitioning and Quality of Service (QoS).
2. Safety Information
Please read and follow these safety guidelines to prevent damage to the product or injury to yourself:
- Always disconnect power from your computer before installing or removing any internal components.
- Wear an anti-static wrist strap or frequently touch a grounded metal object to discharge static electricity before handling the network adapter.
- Handle the adapter by its edges to avoid touching sensitive components.
- Ensure proper ventilation within your computer chassis to prevent overheating.
- Do not expose the adapter to moisture or extreme temperatures.
3. Package Contents
Verify that your package contains the following items:
- Intel® Ethernet Converged Network Adapter X550-T2
- Documentation (e.g., Quick Start Guide, Warranty Information)
- Low-profile bracket (if applicable for your system)

Figure 3.1: Retail packaging for the Intel X550-T2 Network Adapter. The box displays product information such as version, batch, serial numbers, and UPC codes.
4. Setup and Installation
4.1. Hardware Installation
- Prepare your computer: Turn off your computer and disconnect the power cord. Open the computer case.
- Locate an available PCIe slot: Identify an available PCI Express (PCIe) slot on your motherboard. The X550-T2 adapter requires a PCIe v3.0 x4 or higher slot for optimal performance.
- Remove the slot cover: Remove the metal slot cover from the back of the computer chassis corresponding to the chosen PCIe slot.
- Insert the adapter: Carefully align the adapter with the PCIe slot and press it firmly into place until it is fully seated. Secure the adapter with the screw or retention clip provided by your computer case.

Figure 4.1: Front view of the Intel X550-T2 network adapter, showing the heatsink and dual RJ45 ports.
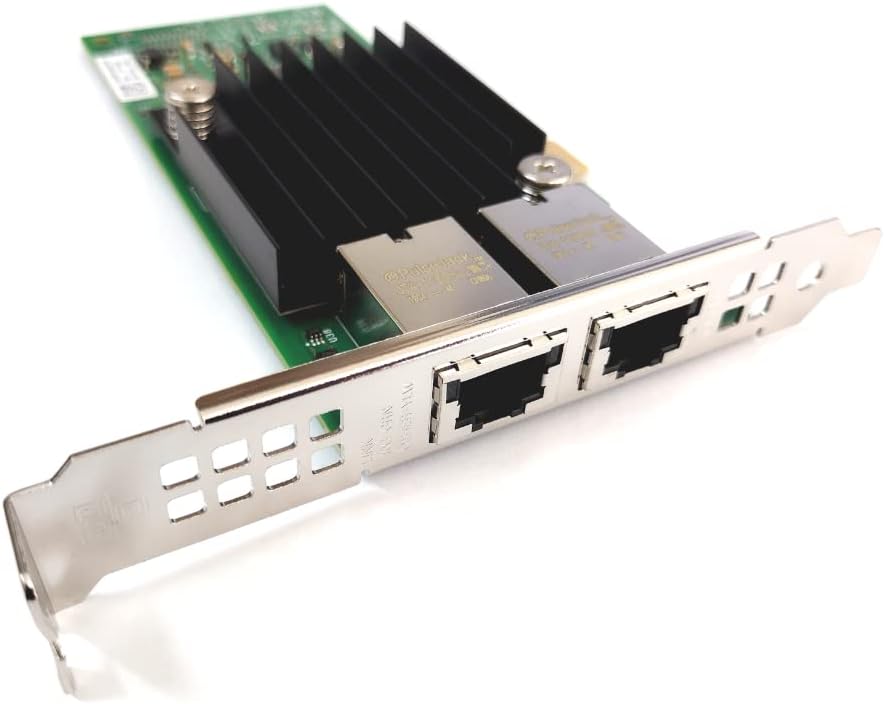
Figure 4.2: Close-up view of the dual RJ45 Ethernet ports on the Intel X550-T2 adapter, designed for 10GbE connectivity.
- Close the computer case: Replace the computer case cover and reconnect the power cord.
4.2. Driver Installation
After hardware installation, you will need to install the appropriate drivers for your operating system. Intel provides drivers for various operating systems, including Windows, Linux, and VMware ESXi.
- Power on your computer: Start your computer. The operating system may detect new hardware and attempt to install generic drivers.
- Download drivers: Visit the official Intel support website and navigate to the support page for the X550-T2 network adapter. Download the latest drivers compatible with your operating system.
- Install drivers: Follow the on-screen instructions to install the drivers. This typically involves running an executable file or using your operating system's device manager to update the driver.
- Reboot (if prompted): Restart your computer if prompted by the driver installation process.
4.3. Network Configuration
Once drivers are installed, configure your network settings:
- Connect CAT 6a (or higher) Ethernet cables from the adapter's RJ45 ports to your 10GbE switch or network device.
- Verify network connectivity through your operating system's network settings.
- Configure IP addresses, subnet masks, and gateway settings as required by your network environment.
5. Operating the Adapter
The Intel X550-T2 adapter operates automatically once properly installed and configured. It provides high-speed network connectivity for data transfer, server applications, and virtualized environments.
- Link/Activity LEDs: Observe the LED indicators on the adapter's ports. These typically indicate link status (e.g., solid green for a valid link) and network activity (e.g., blinking amber for data transfer). Refer to your system's or adapter's specific documentation for LED behavior.
- Performance Monitoring: Use your operating system's network monitoring tools to observe data transfer rates and ensure the adapter is operating at its expected 10GbE (or 2.5/5GbE) speeds.
6. Maintenance
Regular maintenance helps ensure the longevity and optimal performance of your network adapter:
- Driver Updates: Periodically check the Intel support website for updated drivers. Newer drivers can provide performance enhancements, bug fixes, and improved compatibility.
- Physical Inspection: Occasionally inspect the adapter for dust accumulation, especially on the heatsink. Use compressed air to gently clean dust from the heatsink and surrounding components.
- Cable Integrity: Ensure all Ethernet cables are securely connected and free from damage. Damaged cables can lead to intermittent connectivity or reduced performance.

Figure 6.1: Back view of the Intel X550-T2 network adapter's printed circuit board (PCB), showing various components and regulatory markings.
7. Troubleshooting
If you encounter issues with your Intel X550-T2 network adapter, consider the following troubleshooting steps:
- Adapter Not Detected:
- Ensure the adapter is fully seated in the PCIe slot.
- Try a different PCIe slot if available.
- Check your system's BIOS/UEFI settings to ensure the PCIe slot is enabled.
- No Link Light/Connectivity:
- Verify that the Ethernet cable is securely connected to both the adapter and the network switch/router.
- Test with a different Ethernet cable.
- Ensure your network switch/router port is active and configured correctly for 10GbE.
- Check the network adapter's status in your operating system's device manager; reinstall drivers if necessary.
- Slow Performance:
- Ensure you are using CAT 6a or higher cabling for 10GbE.
- Verify that your network switch/router supports 10GbE and is configured for it.
- Update to the latest drivers from Intel.
- Check for network congestion or other devices consuming bandwidth.
8. Specifications
| Feature | Specification |
|---|---|
| Brand | Intel |
| Model Number | X550T2 |
| Series | X550 |
| Hardware Interface | Ethernet, PCI Express v3.0 |
| Data Link Protocol | Ethernet |
| Data Transfer Rate | 10000 Megabits Per Second (10GbE) |
| Compatible Devices | Desktop |
| Item Weight | 6.4 ounces |
| Product Dimensions (LxWxH) | 8.6 x 5.7 x 1.2 inches |
| UPC | 735858310208, 735858307352 |
9. Warranty and Support
Intel products are backed by a limited warranty. For specific warranty terms and conditions, please refer to the documentation included with your product or visit the official Intel website.
For technical support, driver downloads, and additional resources, please visit the Intel support website:
When contacting support, please have your product model (X550-T2) and any relevant system information ready.


