
Product Overview
The myTouchSmart In-Wall Digital Timer (Model 26893) is designed to simplify your daily routine by automating indoor and outdoor lighting and appliances. This versatile timer is compatible with LED, CFL, incandescent, and halogen bulbs, offering convenient control over your home's environment. Its programmable features and manual override options provide flexibility for various schedules, while the blue LED indicators offer clear status updates. A built-in battery backup ensures your settings are retained during power outages, providing peace of mind.
Important Safety Information
WARNING: RISK OF ELECTRIC SHOCK.
- Turn OFF power at the circuit breaker or fuse box before installation.
- Installation requires a neutral wire. If you are unsure, consult a qualified electrician.
- Do not use with dimmable fixtures unless explicitly stated as compatible.
- Ensure all wire connections are secure and properly insulated.
- This device is intended for indoor/outdoor use as specified.
Package Contents
- myTouchSmart In-Wall Digital Timer (Model 26893)
- Installation Manual
- Mounting Screws
- Wire Nuts (if applicable)
Note: Wall plate not included.
Product Features

The myTouchSmart In-Wall Digital Timer features a clear digital display for time and program settings. It includes dedicated ON/OFF override buttons for immediate control, and four programmable ON/OFF buttons allowing for two custom daily schedules. Blue LED indicator lights provide visual confirmation of active settings, even in low light conditions. The timer is designed for easy replacement of existing wall switches, requiring a neutral wire for installation. It also includes a battery backup to preserve programmed settings during power interruptions.

This image displays the side view of the myTouchSmart In-Wall Digital Timer, highlighting its screw terminals. These terminals are clearly labeled for Load, Ground, Line, Neutral, and Traveler connections, facilitating a secure and organized wiring process. The compact design of the timer ensures it fits neatly into standard electrical boxes, replacing existing switches efficiently.

The product dimensions are 1.75 inches deep, 1.75 inches wide, and 4.13 inches high. These compact measurements ensure the timer can be installed in most standard in-wall electrical boxes without significant modification.
Setup and Installation
Before beginning installation, ensure power is turned off at the circuit breaker. This timer requires a neutral wire for proper operation. Follow the steps below for a safe and correct installation.
Installation Steps:
- Turn off power to the switch at the circuit breaker or fuse box.
- Remove the existing wall plate and mounting screws.
- Carefully pull the existing switch from the switch box without disconnecting wires.
- Identify and label the Line, Load, and Ground wires from your existing setup. A neutral wire is required for this timer.
- Disconnect the wires from the old switch.
- Connect the green or bare copper ground wire to the ground terminal on the new timer.
- Connect the black load wire to the Load terminal.
- Connect the line wire to the Line terminal.
- Connect one end of the provided white jumper wire to the neutral terminal on the timer and the other end to the bundle of neutral wires in the switch box using a wire nut.
- Carefully push the new timer into the switch box, ensuring wires are not pinched or crushed.
- Secure the timer using the supplied screws and reinstall the wall plate.
- Reapply power at the fuse box or circuit breaker to complete the installation.
Installation Video Guide:
This video provides a detailed guide on how to install an in-wall switch, demonstrating the wiring process and safety precautions. It covers identifying different wires (load, line, ground, neutral) and connecting them to the appropriate terminals on the switch. This visual aid is particularly helpful for users performing the installation for the first time.
Operating Instructions
Setting the Current Time:
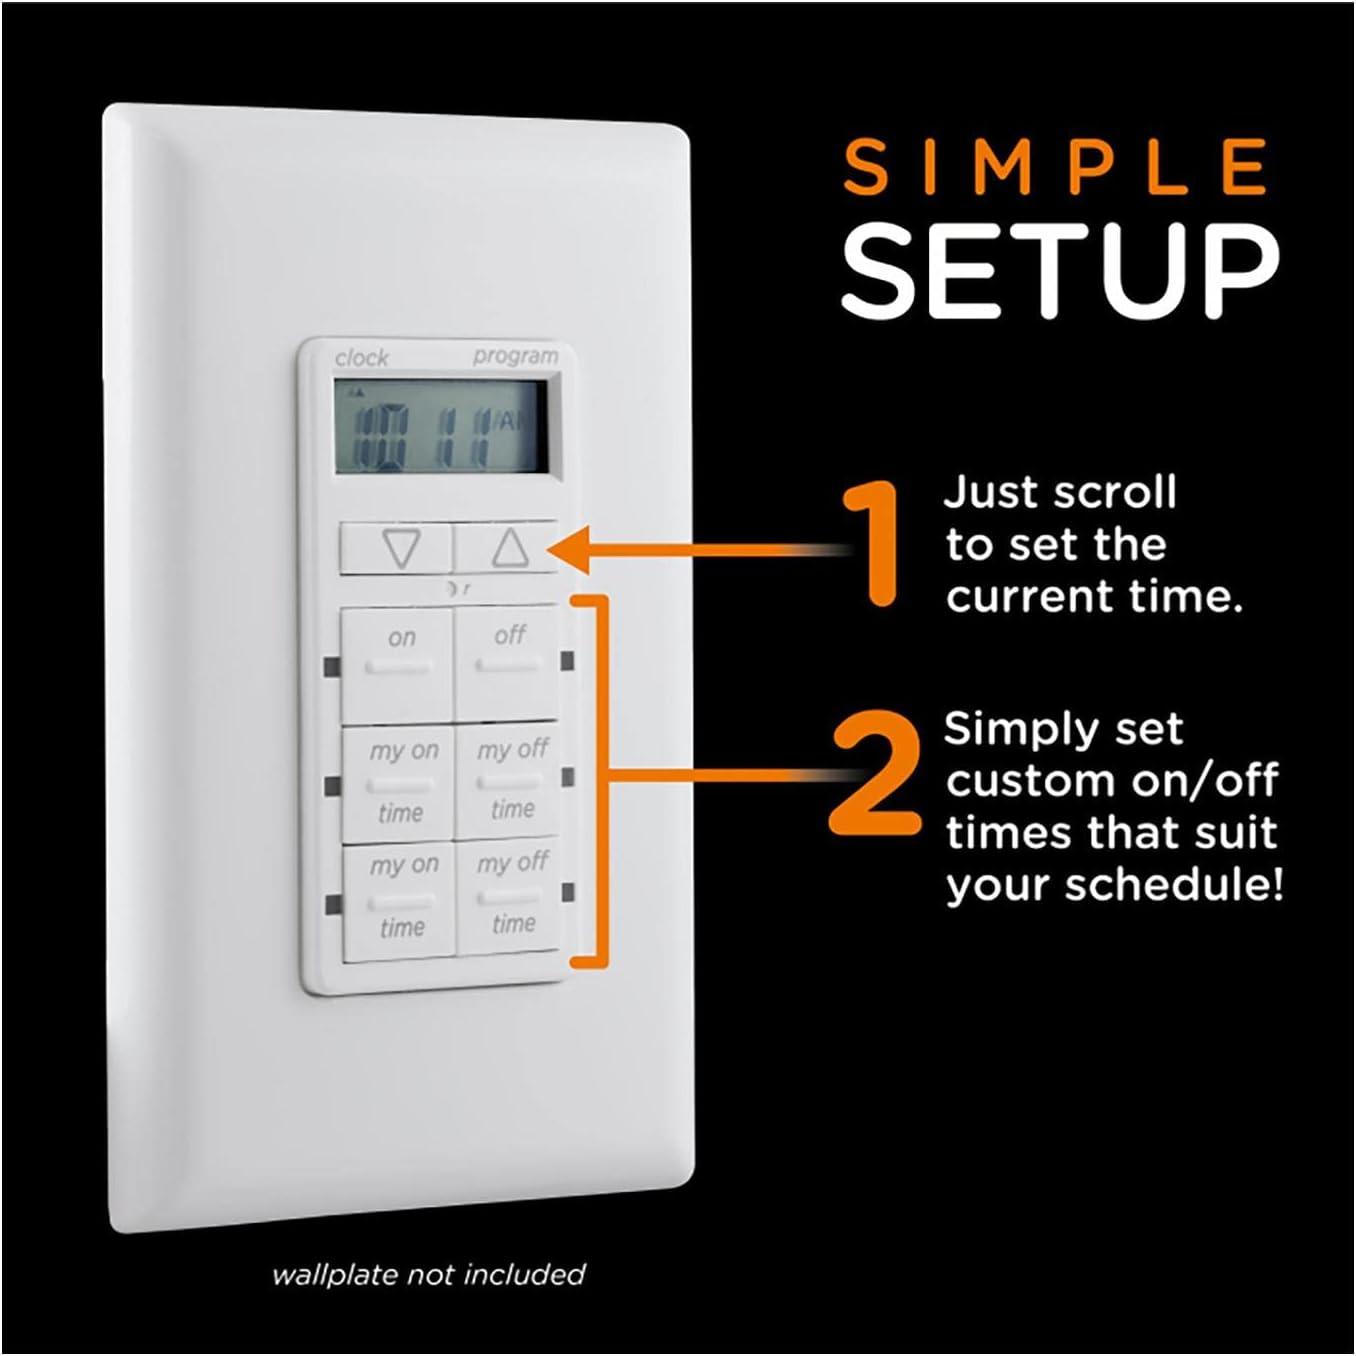
To set the current time, use the Up and Down arrow buttons located at the top of the timer's control panel. The digital display will show the time as you adjust it. Once the correct time is displayed, the timer will automatically save it after a few seconds of inactivity.
Programming ON/OFF Times:
The timer allows for two custom daily ON/OFF schedules using the "my on" and "my off" buttons. Each pair of "my on" and "my off" buttons corresponds to a separate program.
- Press the "my on" button for the desired program (e.g., first "my on" for Program 1). The display will show the current ON time for that program.
- Use the Up and Down arrow buttons to adjust the ON time.
- Press the corresponding "my off" button. The display will show the current OFF time for that program.
- Use the Up and Down arrow buttons to adjust the OFF time.
- Repeat for the second program if desired.
- The blue LED indicators next to the "my on" and "my off" buttons will illuminate when a program is active.
Manual ON/OFF Override:
To manually turn the connected device ON or OFF, simply press the large "on" or "off" buttons at the top of the programmable section. This will override any active programs until the next scheduled ON/OFF time.
This video demonstrates the basic operation of the myTouchSmart In-Wall Digital Timer, including setting the time, programming ON/OFF cycles, and using the manual override buttons. It highlights the blue LED indicators that show the timer's status.
Maintenance
- Clean the timer's surface with a soft, dry cloth. Do not use abrasive cleaners or solvents.
- Ensure the timer is not exposed to excessive moisture or extreme temperatures.
- The internal battery backup is designed for long-term use and typically does not require replacement.
Troubleshooting
| Problem | Possible Cause | Solution |
|---|---|---|
| Timer not turning ON/OFF at programmed times. | Incorrect time setting or program not activated. | Verify current time and ensure programs are correctly set and active (blue LEDs illuminated). |
| Display is blank or not responding. | No power to the switch or internal battery issue. | Check circuit breaker. Ensure proper wiring during installation. If problem persists, contact support. |
| Lights/fans flicker or do not operate correctly. | Incompatibility with connected load (e.g., certain dimmable LEDs) or loose wiring. | Ensure connected devices are compatible. Recheck all wiring connections. |
Specifications
- Model: 26893
- Electrical Ratings: 120VAC, 60 Hz, 15A General/Resistive, 1200W Tungsten, 1200VA Ballast, ½ HP
- Compatibility: LED, CFL, Incandescent, Halogen bulbs
- Dimensions: 1.75"D x 1.75"W x 4.13"H
- Certifications: UL Listed
- Features: 4 Programmable ON/OFF buttons, 2 Easy ON/OFF override buttons, 24-Hour Daily Cycles, Blue LED Indicators, Battery Backup
- Neutral Wire: Required
Warranty and Support
For warranty information or technical support, please refer to the official myTouchSmart website or contact their customer service. You may also find additional resources and FAQs on the product's Amazon listing page.
User Guide (PDF): Download Here
Installation Manual (PDF): Download Here


