1. Introduction
Thank you for choosing the Aurora S1 10-Inch Single Row LED Off-Road Light Bar. This manual provides essential information for the safe and effective installation, operation, and maintenance of your new light bar. Please read these instructions thoroughly before installation and retain them for future reference.

Front view of the Aurora S1 10-Inch Single Row LED Off-Road Light Bar, showcasing its compact design and LED array.
2. Safety Information
Always observe the following safety precautions to prevent injury or damage to the product and vehicle:
- Disconnect the vehicle's battery before beginning any electrical installation.
- Ensure all wiring connections are secure and properly insulated to prevent short circuits.
- Wear appropriate personal protective equipment, including eye protection, during installation.
- Mount the light bar securely to prevent it from becoming a projectile during vehicle operation.
- Do not look directly into the light bar when it is illuminated, as it can cause eye strain or damage.
- Consult a professional if you are unsure about any part of the installation process.
3. Package Contents
Verify that all components are present before proceeding with installation:
- Aurora S1 10-Inch Single Row LED Off-Road Light Bar
- Deluxe Wiring Harness (includes on/off switch with LED indicator, in-line fuse, 12V 40A relay)
- Mounting Brackets and Hardware (security nuts, bolts, Allen wrench)
4. Specifications
| Feature | Detail |
|---|---|
| Model | ALO-S1-10-P7E7J |
| Dimensions (L x W x H) | 11.9 x 3.2 x 1.8 inches (301.6 x 82.3 x 44.6 mm) |
| Wattage | 50W |
| Amperage Draw | 2.3A |
| Lumens | 4,280 (rated) |
| Beam Pattern | Combination |
| IP Rating | IP69K |
| Material | 6063 Aluminum Housing, GE Lexan Lens, 316 Stainless Steel Screws |
| Connector Type | Deutsch |
| Weight | 1.06 pounds (481.94 Grams) |

A technical diagram providing detailed measurements (A, B, C, D, E, F, G) for different lengths of the Aurora S1 light bar, including the 10-inch model, and the number of LEDs per size.
5. Installation
5.1 Mounting the Light Bar
- Identify a suitable mounting location on your vehicle that provides clear light projection and secure attachment.
- Attach the provided mounting brackets to the light bar using the supplied hardware. Ensure the security nuts are tightened appropriately with the Allen wrench.
- Position the light bar in the desired location and mark the drilling points for the brackets.
- Drill pilot holes and securely fasten the light bar to the vehicle using appropriate hardware (not included, if different from supplied).

Close-up of the stainless steel mounting bracket, designed for secure attachment, featuring security nuts and accompanied by an Allen wrench for installation.
5.2 Wiring Instructions
The Aurora S1 light bar includes a deluxe wiring harness for simplified installation. It is recommended to have this step performed by a qualified automotive electrician if you are unfamiliar with vehicle electrical systems.
- Disconnect Battery: Before starting, disconnect the negative terminal of your vehicle's battery to prevent electrical shorts.
- Connect Light Bar: Connect the Deutsch connector from the light bar to the corresponding connector on the wiring harness. Ensure a firm, waterproof connection.
- Connect Power: Connect the positive (+) wire from the wiring harness to the positive terminal of your vehicle's battery.
- Connect Ground: Connect the negative (-) wire from the wiring harness to a suitable ground point on the vehicle chassis.
- Mount Switch: Install the on/off switch in a convenient and accessible location within the vehicle's cabin.
- Secure Wiring: Route and secure all wiring away from moving parts, hot surfaces, and sharp edges using zip ties or cable clamps.
- Reconnect Battery: Once all connections are secure and verified, reconnect the vehicle's battery.
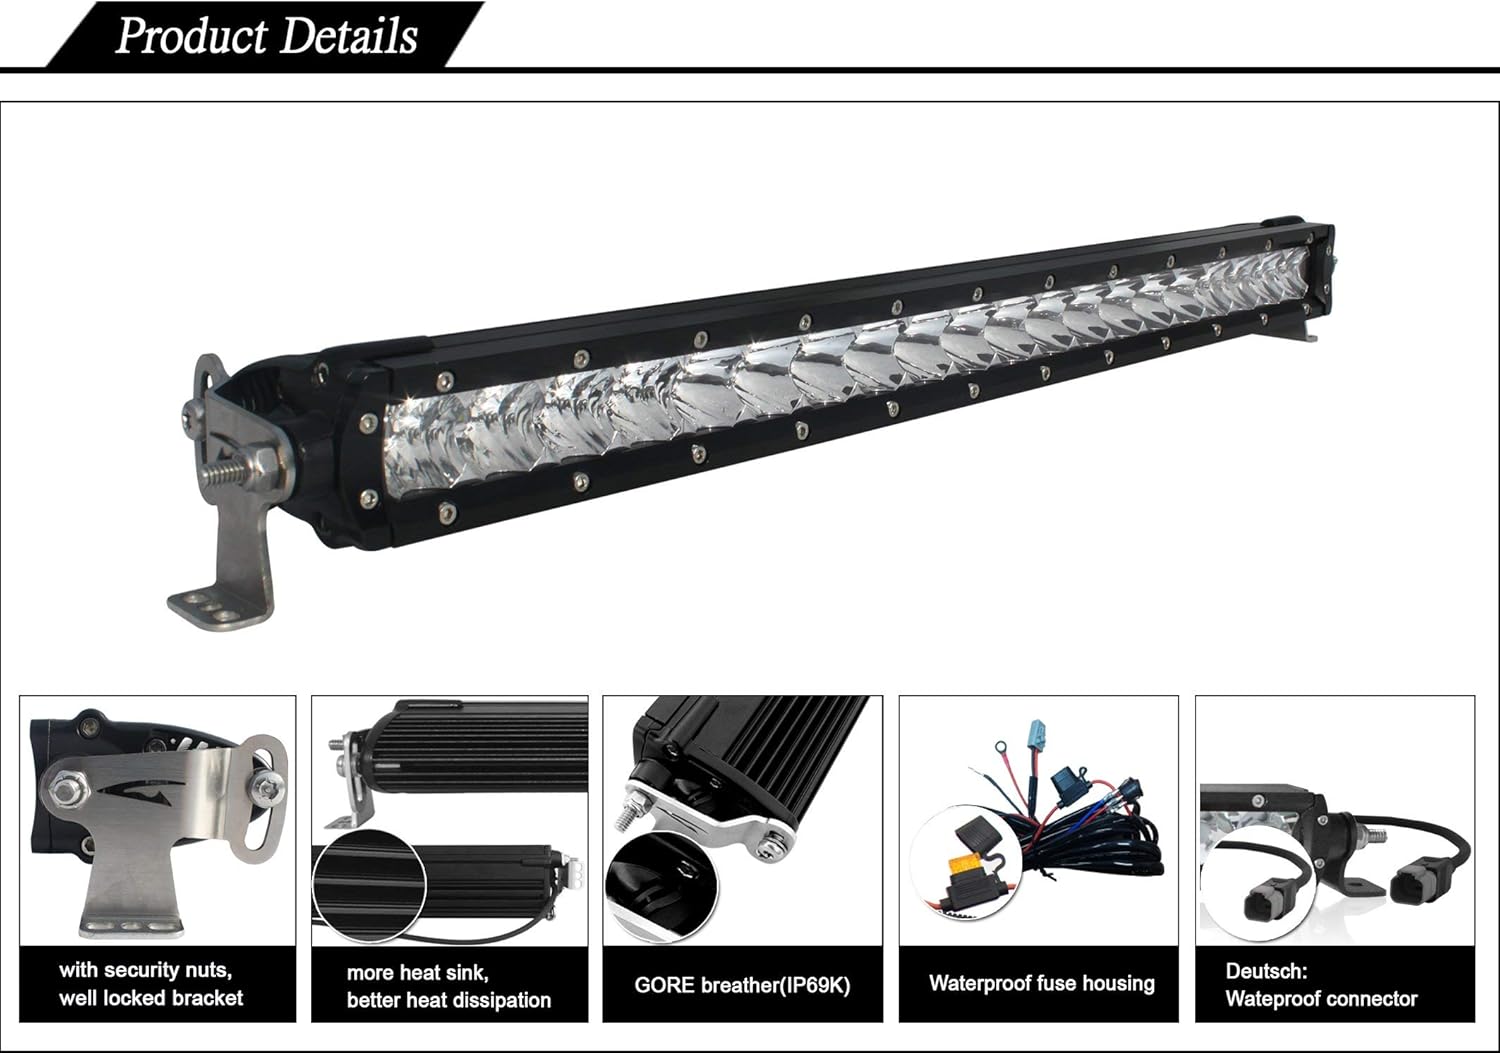
This image illustrates key features: a robust heat sink for efficient thermal management, a GORE breather for condensation prevention, a waterproof fuse housing, a secure Deutsch connector, and a well-locked mounting bracket with security nuts.
6. Operating Instructions
To operate the Aurora S1 LED Light Bar:
- Ensure the vehicle's battery is connected and the light bar is properly installed.
- Press the on/off switch located in your vehicle's cabin to illuminate the light bar. The LED indicator on the switch will light up when the bar is active.
- Press the switch again to turn off the light bar.
7. Maintenance
Regular maintenance ensures optimal performance and longevity of your Aurora S1 LED Light Bar:
- Cleaning: Clean the lens and housing periodically with a soft cloth and mild soap and water. Avoid abrasive cleaners or solvents that could damage the Lexan lens or Dupont paint finish.
- Connection Check: Periodically inspect all electrical connections, especially the Deutsch connector, for tightness and corrosion.
- Mounting Security: Verify that the mounting brackets and hardware remain secure, especially after off-road use or exposure to vibrations.
- Durability Features: The light bar features an IP69K rating for dust and water ingress, a GE Lexan lens resistant to scratches and UV, a patented breather apparatus to prevent condensation, and a Dupont painted housing for long-term durability.

This image highlights the robust exterior construction, detailing the IP69K rating for extreme durability, 6063 aluminum housing, GE Lexan lens, patented breather, Deutsch connector, 316 stainless steel fasteners, and Dupont painting for long-lasting finish.

This image describes the internal components, emphasizing the use of USA-made Cree LED chips, a Printed Circuit Board Assembly (PCBA) with advanced protection features for temperature, voltage, and current, and integrated over-voltage protection.
8. Troubleshooting
If you encounter issues with your light bar, refer to the following common problems and solutions:
| Problem | Possible Cause | Solution |
|---|---|---|
| Light bar does not turn on. | No power, blown fuse, loose connection, faulty switch. | Check battery connections. Inspect the in-line fuse in the wiring harness and replace if blown. Ensure all Deutsch and power/ground connections are secure. Test the switch functionality. |
| Light bar is dim or flickers. | Insufficient power, loose connection, damaged wiring. | Verify adequate voltage from the power source. Check all wiring for damage or loose connections. Ensure proper grounding. |
| Condensation inside the lens. | Extreme temperature changes, breather apparatus obstruction. | The patented breather apparatus is designed to prevent this. If persistent, ensure the breather is not obstructed. Minor condensation often dissipates with use. |
9. Warranty and Support
The housing of your Aurora S1 LED Light Bar is coated with Outdoor Dupont painting, guaranteeing its finish will remain unchanged for 5 years under normal conditions. For specific warranty details on other components and for technical support, please refer to the official Aurora product website or contact their customer service directly.

This image outlines the rigorous testing and certifications, including Salt & Fog testing, Lens Impact testing, Vibration testing, UV testing, CE certification, and RoHS compliance, ensuring product reliability and safety.


