Introduction
This manual provides detailed instructions for the setup, operation, and maintenance of your DIRECTV HR24-200 Digital Satellite Receiver. The HR24-200 is designed to enhance your television viewing experience by offering advanced recording capabilities and access to a wide range of content. It allows you to record two programs simultaneously, store up to 100 hours of HD content or 400 hours of SD programming, and access on-demand video and music services. With 500GB of storage, it provides personalized content management.
Safety Information
Please read all safety instructions before operating this device. Keep this manual for future reference.
- Do not expose the receiver to rain or moisture.
- Ensure proper ventilation to prevent overheating.
- Only use the power adapter supplied with the unit.
- Do not open the receiver casing; refer all servicing to qualified personnel.
Package Contents
Verify that your package contains the following items:
- DIRECTV HR24-200 Digital Satellite Receiver
- Power Cord
- DIRECTV Remote Control
- HDMI Cable
Note: Additional cables (e.g., component video, Ethernet) may be required depending on your setup and are sold separately.
Setup Instructions
1. Unpacking and Placement
Carefully remove the receiver from its packaging. Place the receiver on a flat, stable surface with adequate ventilation. Avoid placing it near heat sources or in enclosed spaces.
2. Connecting to Your Television
The HR24-200 offers multiple connection options for your TV. HDMI is recommended for the best picture and sound quality.
- HDMI Connection: Connect one end of an HDMI cable to the HDMI OUT port on the back of the receiver and the other end to an available HDMI IN port on your television.
- Component Video Connection (Optional): If your TV does not have an HDMI port, connect component video cables (red, green, blue) from the VIDEO OUT ports on the receiver to the corresponding COMPONENT IN ports on your TV. Connect red and white audio cables from the AUDIO OUT ports on the receiver to the AUDIO IN ports on your TV.
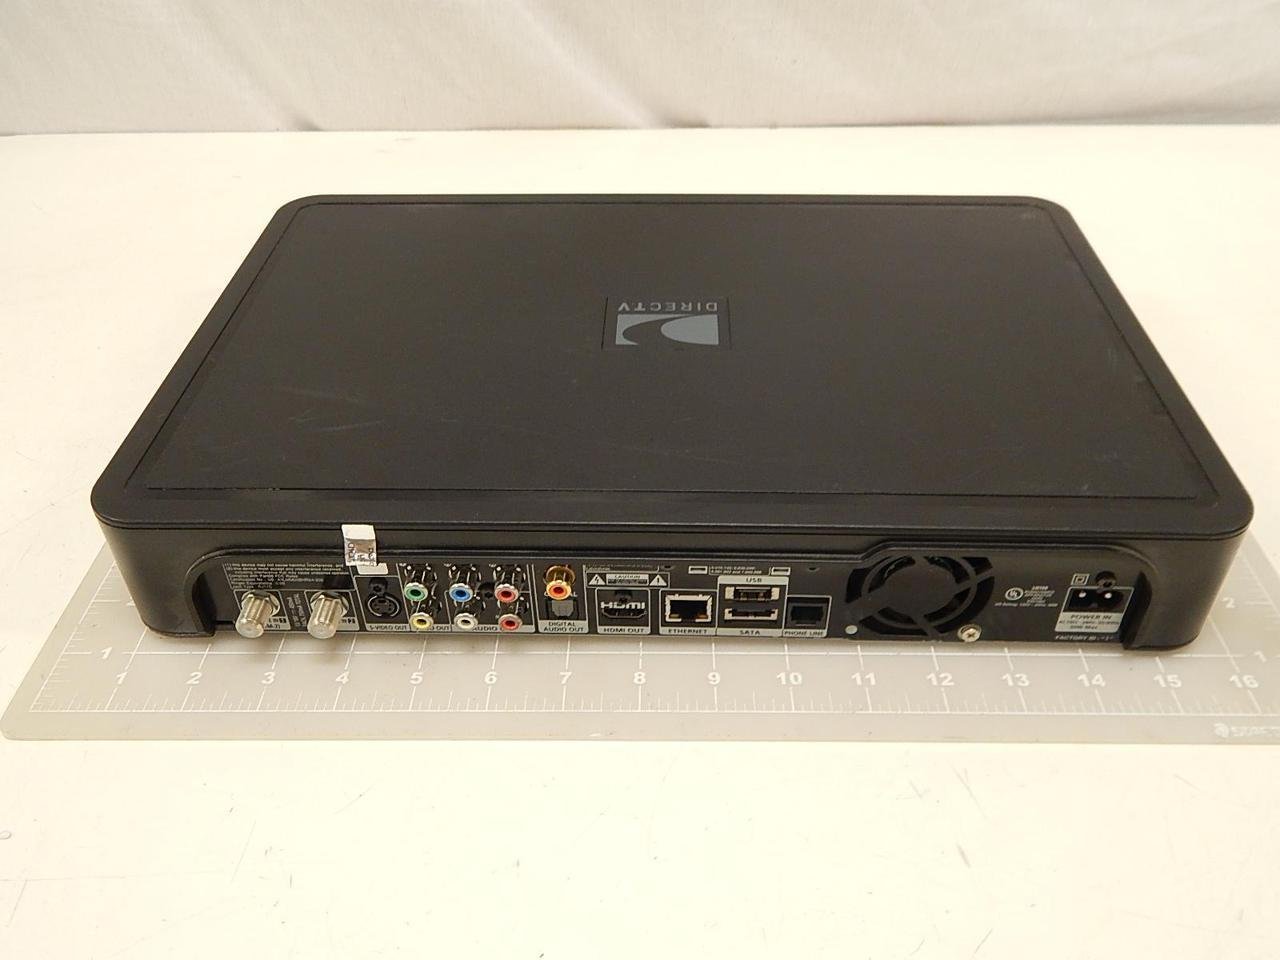
Image: Rear panel of the DIRECTV HR24-200 receiver. This image displays the various input and output ports, including satellite in, video out (component and composite), audio out (stereo and digital optical), HDMI out, Ethernet, eSATA, and power input. This is where you connect the receiver to your satellite dish, television, and home network.
3. Connecting to Satellite Dish
Connect the coaxial cable from your DIRECTV satellite dish to the SAT IN port on the back of the receiver.
4. Connecting to Network (Optional)
For access to on-demand content and other internet features, connect an Ethernet cable from your home router to the ETHERNET port on the back of the receiver.
5. Powering On
Connect the power cord to the POWER input on the receiver and then plug the other end into a wall outlet. The receiver will begin its startup sequence.
6. Initial Setup Wizard
Follow the on-screen instructions to complete the initial setup. This typically includes selecting your language, setting up your remote control, and configuring satellite dish settings. If you encounter issues, refer to the Troubleshooting section.
Operating Instructions
1. Front Panel Controls

Image: Front panel of the DIRECTV HR24-200 receiver. This image shows the power button, guide, menu, select, and record buttons, along with channel up/down and volume up/down controls. The DIRECTV HD DVR logo is visible on the right.
The front panel provides basic controls for operating the receiver:
- POWER: Turns the receiver on or off.
- GUIDE: Displays the program guide.
- MENU: Accesses the main menu.
- SELECT: Confirms selections.
- REC: Initiates recording of the current program.
- CH +/-: Changes channels.
- VOL +/-: Adjusts volume (if controlled by receiver).
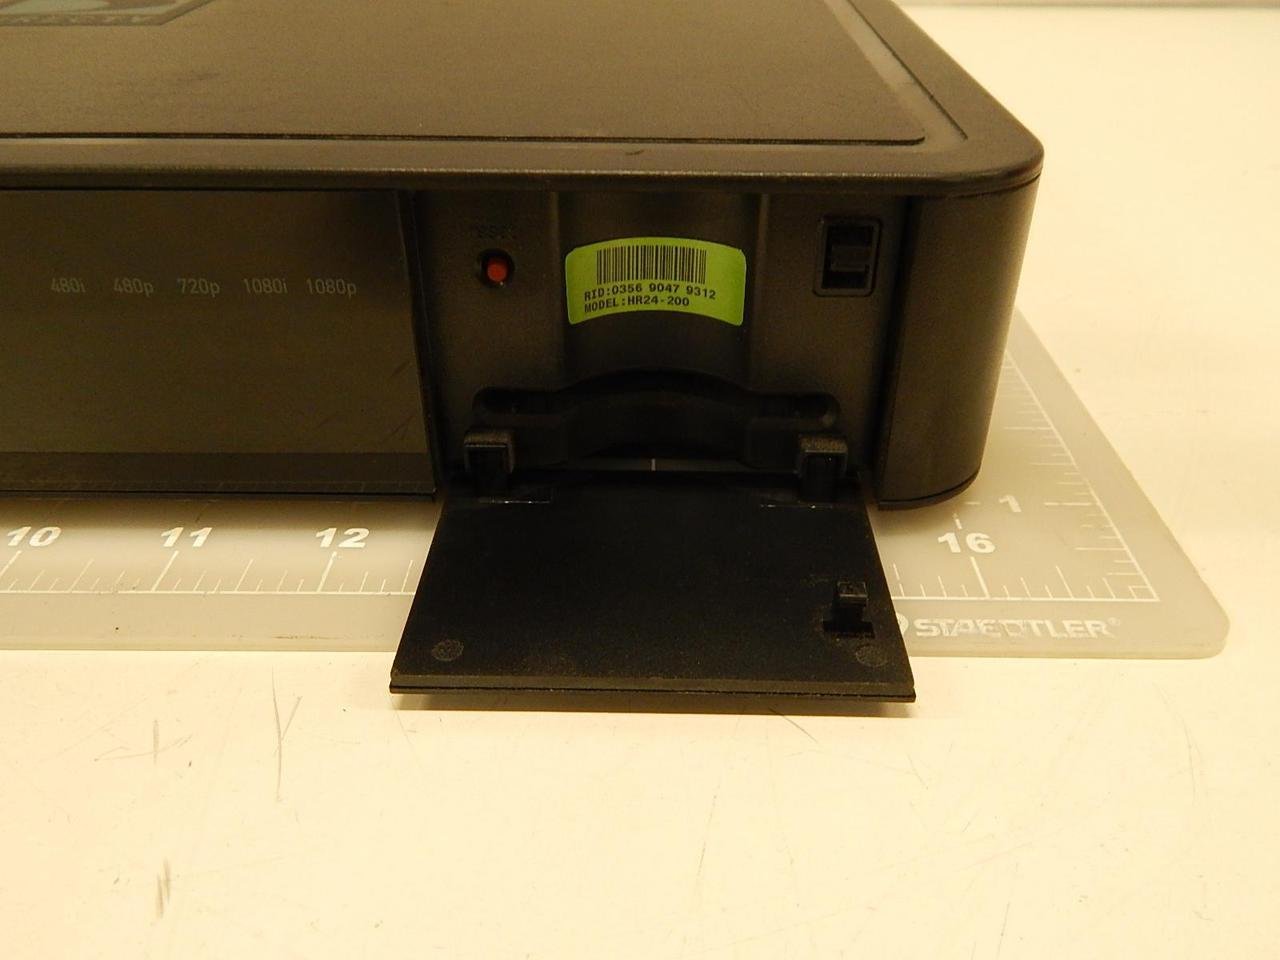
Image: Front panel of the DIRECTV HR24-200 receiver with the access card flap open. This reveals the slot for the DIRECTV access card and a label indicating the model number (HR24-200) and other identification details. The access card is essential for receiving DIRECTV programming.
2. Remote Control Functions
Use the DIRECTV remote control for full functionality. Refer to your remote control's specific manual for detailed button descriptions.
- Power: Turns the receiver and TV on/off.
- Guide: Accesses the program guide.
- Menu: Opens the main menu for settings and features.
- Record: Records the current program or schedules a recording.
- List: Accesses your recorded programs.
- Rewind/Fast Forward/Pause/Play: Control playback of live TV or recorded programs.
3. Recording Programs
The HR24-200 allows you to record up to two programs simultaneously.
- Instant Recording: While watching a program, press the REC button on your remote.
- Scheduled Recording: Navigate to the desired program in the Guide and press REC. You can choose to record a single episode or set up a Series Link for all episodes.
4. Playing Back Recordings
Press the LIST button on your remote to access your recorded programs. Select the desired program and press SELECT to begin playback.
5. On-Demand Content
If your receiver is connected to the internet, you can access DIRECTV's on-demand library. Navigate to the On Demand section via the main menu to browse available content.
Maintenance
1. Cleaning
Wipe the exterior of the receiver with a soft, dry cloth. Do not use liquid cleaners or abrasive materials.
2. Software Updates
The HR24-200 receiver automatically downloads and installs software updates. Ensure the receiver remains powered on and connected to the satellite signal for updates to occur.
Troubleshooting
If you experience issues with your HR24-200 receiver, try the following steps:
- No Picture/Sound:
- Check all cable connections (HDMI, component, audio).
- Ensure your TV is on the correct input source.
- Verify the receiver is powered on.
- No Satellite Signal:
- Check the satellite coaxial cable connection to the receiver.
- Ensure your satellite dish is clear of obstructions (e.g., snow, trees).
- Remote Control Not Working:
- Replace the batteries in your remote.
- Ensure there are no obstructions between the remote and the receiver.
- Reprogram the remote if necessary (refer to your remote's manual).
- Receiver Unresponsive:
- Perform a soft reset: Press the red reset button located behind the access card door on the front panel (see image in Operating Instructions).
- Perform a hard reset: Unplug the receiver's power cord from the wall outlet, wait 15 seconds, then plug it back in.
Specifications
| Feature | Specification |
|---|---|
| Model Number | HR24-200 |
| Storage Capacity | 500 GB (approx. 100 hours HD / 400 hours SD) |
| Recording Capability | Record two programs simultaneously |
| Connectivity | Ethernet, Satellite In, HDMI Out, Component Video Out, Composite Video Out, Digital Optical Audio Out, Stereo Audio Out, eSATA |
| HDMI Ports | 1 |
| Audio Output Mode | Surround |
| Dimensions (L x W x H) | 14.88 x 9.92 x 2.36 inches |
| Weight | 6.49 Pounds |
| Manufacturer | Direct TV |

Image: Close-up view of the product label, typically found on the bottom or rear of the DIRECTV HR24-200 receiver. This label displays important information such as the Receiver ID, Serial Number, Model Number (HR24-200), Manufacturing Date, and Country of Origin (Made in Indonesia).
Warranty Information
For detailed warranty information regarding your DIRECTV HR24-200 Digital Satellite Receiver, please refer to the warranty documentation provided at the time of purchase or visit the official DIRECTV website. Warranty terms and conditions may vary.
Customer Support
If you require further assistance or have questions not covered in this manual, please contact DIRECTV customer support:
- Website: Visit the official DIRECTV support website for FAQs, troubleshooting guides, and contact options.
- Phone: Refer to your DIRECTV service agreement or billing statement for customer service phone numbers.


