
1. Introduction
The FOXWELL NT644 AutoMaster Pro is a professional diagnostic scan tool designed for automotive workshops and technicians. It offers extensive vehicle coverage and advanced diagnostic functions for various vehicle systems.
Key features include:
- Covers 49 vehicle manufacturers.
- Supports models up to 2012/2013.
- Dealer-level oil service light reset functions for 32 manufacturers.
- Advanced Electronic Parking Brake (EPB) functions for 13 manufacturers.
- Compatible with OBDI and OBDII vehicles (cars, SUVs, minivans, light trucks) sold worldwide.
- Reads and clears diagnostic trouble codes (DTCs) and deactivates Malfunction Indicator Lights (MILs) from all systems.
- Requests and records live sensor data.
- Provides live data graphing and merges PID graphs for intuitive diagnosis.
- Displays freeze frame data and retrieves ECU information.
- Supports all 10 OBDII test modes, including O2 Sensor Test and Component Test.
- Includes OBDII Mode 6 functionality.
- Features a troubleshooter code for faster and easier diagnosis.
- Offers multilingual menu options and code definitions.
- Equipped with an SD card for data backup and software updates.
- Large, backlit 480x272 TFT color screen with user-friendly menu operations.
- Ergonomic and robust design for durability.
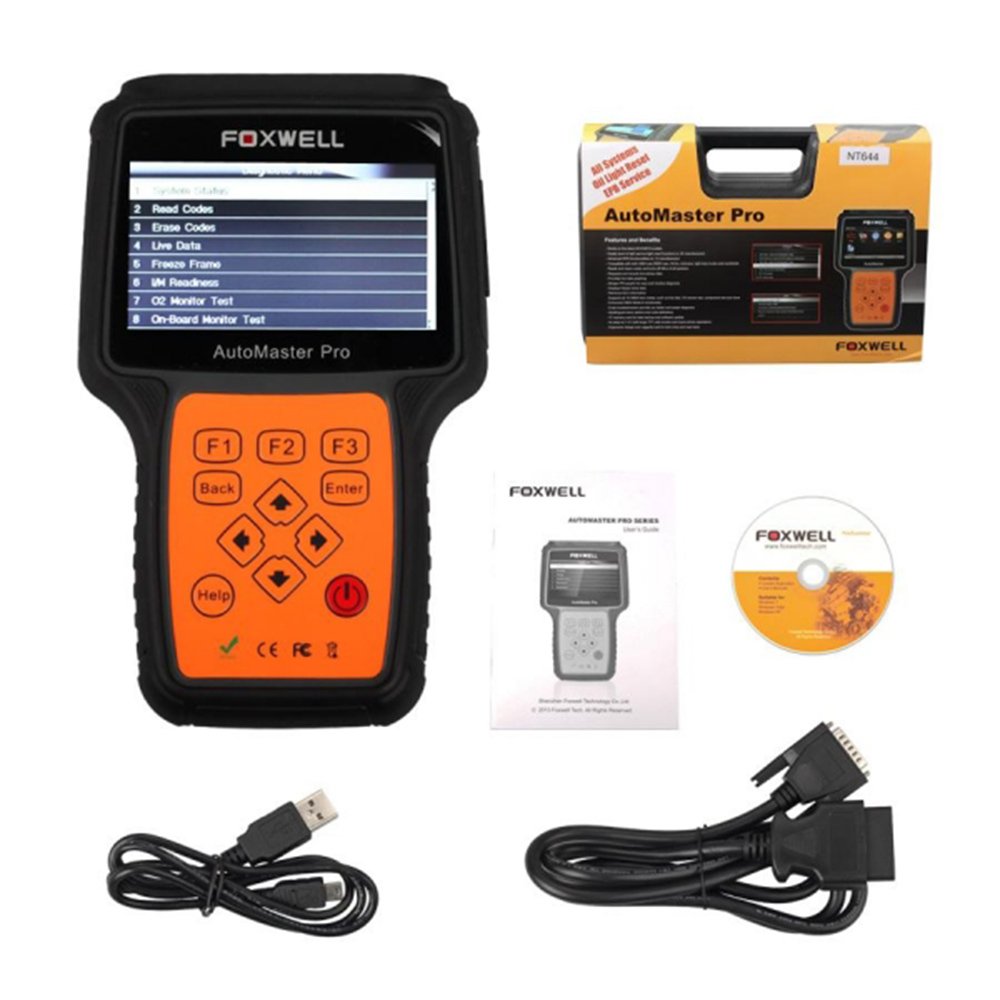
2. Setup
2.1 Package Contents
Verify that all items are present in your package:
- NT644 Scan Tool
- User's Guide
- Memory Card (SD Card)
- USB Cable
- Diagnostic Cable (OBDII connector)
- Blow Molding Case


2.2 Inserting the SD Card
Locate the SD card slot on the side of the NT644 device. Gently insert the provided memory card until it clicks into place. Ensure the card is inserted correctly to avoid damage.

2.3 Connecting to the Vehicle
- Locate the vehicle's Data Link Connector (DLC), typically found under the dashboard on the driver's side.
- Connect the diagnostic cable to the NT644 scanner.
- Plug the other end of the diagnostic cable (OBDII connector) into the vehicle's DLC.
- The scanner will power on automatically, drawing power from the vehicle's battery (8-18 volts).

3. Operating Instructions
3.1 Navigation
The NT644 features a user-friendly interface with dedicated buttons:
- F1, F2, F3: Function keys, their purpose changes based on the current screen.
- Back: Returns to the previous screen or menu.
- Enter: Confirms a selection or enters a submenu.
- Directional Arrows (Up, Down, Left, Right): Navigate through menu options and data.
- Help: Provides context-sensitive help information.
- Power Button: Turns the device on/off (though it typically powers on when connected to a vehicle).
3.2 Main Menu Options
Upon powering on, the main menu typically displays options such as:
- Read Codes: Retrieves Diagnostic Trouble Codes (DTCs) from the vehicle's control modules.
- Erase Codes: Clears DTCs and turns off the Malfunction Indicator Light (MIL).
- Live Data: Displays real-time data from various sensors and components.
- Freeze Frame: Shows a snapshot of vehicle operating conditions at the time a DTC was set.
- I/M Readiness: Checks the status of emission-related monitoring systems.
- O2 Monitor Test: Retrieves O2 sensor monitoring test results.
- On-Board Monitor Test: Retrieves results for emission-related powertrain components and systems.
- Special Functions: Accesses advanced functions like EPB and Oil Service Reset.
3.3 Performing a Diagnostic Scan
- Ensure the scanner is properly connected to the vehicle and powered on.
- From the main menu, select the desired diagnostic function (e.g., "Read Codes" or "Auto Scan").
- Follow the on-screen prompts to select the vehicle make, model, and year if required.
- The scanner will communicate with the vehicle's systems and display the results.
3.4 Using Special Functions (EPB & Oil Service Reset)
The NT644 AutoMaster Pro provides advanced functions for specific vehicle systems:
- Electronic Parking Brake (EPB): This function allows for safe and effective maintenance of electronic braking systems, including deactivating and activating the brake control system, bleeding brake fluid, opening and closing brake pads, and setting brakes after disc or pad replacement.
- Oil Service Reset: This function allows you to reset the service mileage and data intervals after an oil change or service, ensuring the vehicle's maintenance schedule is accurately reflected.
To access these functions, navigate to the "Special Functions" menu and select the desired option. Follow the on-screen instructions carefully.
4. Maintenance
4.1 Software Updates
The NT644 AutoMaster Pro software can be updated via the internet to ensure compatibility with new vehicle models and diagnostic features. Updates are free for the first 18 months from the date of purchase. After this period, a fee of 100 USD per year applies for continued updates.
To update the software:
- Remove the SD card from the NT644 device.
- Insert the SD card into a computer using a card reader.
- Download and install the Foxwell update client software on your computer (compatible with Windows 7).
- Follow the instructions provided by the update client to download and install the latest software onto the SD card.
- Safely eject the SD card from the computer and reinsert it into the NT644 device.
- The device will prompt you to update the software upon startup.
4.2 Cleaning and Storage
- Clean the device with a soft, damp cloth. Do not use abrasive cleaners or solvents.
- Store the scanner in its blow molding case when not in use to protect it from dust and physical damage.
- Keep the device away from extreme temperatures and direct sunlight.
5. Troubleshooting
If you encounter issues with your NT644 AutoMaster Pro, consider the following:
- Device Not Powering On: Ensure the diagnostic cable is securely connected to both the scanner and the vehicle's DLC. Verify the vehicle's battery has sufficient charge (8-18 volts required).
- Communication Errors: Check all cable connections. Ensure the vehicle's ignition is in the ON position (engine off or running, as required by the test). Verify the vehicle is OBDII compliant.
- Incorrect Readings or Functions: Ensure the software is up to date. Refer to the device's built-in "Troubleshooter code" feature for guidance on specific DTCs.
- SD Card Issues: Ensure the SD card is properly inserted. If issues persist, try reformatting the SD card (backing up data first) or using a different compatible SD card.
For persistent issues, refer to the manufacturer's support resources.
6. Specifications
| Feature | Specification |
|---|---|
| Display | Backlit, 480 x 272 TFT Color Screen |
| Operating Temperature | 0 to 60 ℃ (32 to 140 ℉) |
| Storage Temperature | -20 to 70 ℃ (-4 to 158 ℉) |
| External Power | 8-18 Volts (powered by vehicle battery) |
| Power Source | Electric Cable |
| Update Software OS Compatibility | Windows 7 |
| Manufacturer Part Number | NT644 |
| UPC | 721272389616 |

7. Warranty and Support
7.1 Warranty Information
Specific warranty details are not provided in the product description. Please refer to the documentation included with your purchase or contact FOXWELL customer support for warranty terms and conditions.
7.2 Customer Support
For technical assistance, software updates, or any product-related inquiries, please contact FOXWELL customer support. Contact information can typically be found on the manufacturer's official website or in the documentation provided with your device.


