1. Product Overview
The CURT Class 3 Trailer Hitch is a robust towing solution designed for a wide range of vehicles, including full-size pickup trucks, SUVs, minivans, and mid-size trucks. This hitch provides a gross trailer weight capacity of 3,500 lbs. and a tongue weight capacity of 525 lbs., making it suitable for towing utility trailers, single-horse livestock trailers, boat trailers, and large campers.
It features a 2" x 2" receiver tube opening, compatible with various hitch-mounted accessories such as bike racks or cargo carriers. The hitch is constructed with a quality steel frame and finished with a dual-coat protection system, including a liquid Bonderite coating and a high-gloss black powder coat, ensuring strong resistance against rust, scratching, and UV damage.
Key Features:
- Tested for safety in accordance with SAE J684 standards.
- Precisely welded for superior strength and fit.
- Constructed with a sleek, round-tube main body.
- Protected by a durable high-gloss black powder coat finish.
- Custom-fit design for specific vehicle models, such as certain years of the Hyundai Tucson.

Image 1: The CURT 13240 Class 3 Trailer Hitch, showcasing its black powder-coated finish and receiver tube.
2. Setup and Installation
Installation of the CURT 13240 Class 3 Trailer Hitch is designed to be straightforward for compatible vehicles. While professional installation is always an option, many users find it manageable with basic tools and a second person for assistance.
Required Tools (Typical):
- 17mm Socket Wrench (with extension for vertical bolts)
- Flathead Screwdriver (small-tipped for plastic trim rivets)
- WD-40 or similar lubricant (for exhaust hangers)
- Torque Wrench (recommended for proper bolt tightening)
- Safety Glasses and Gloves
Installation Steps (General Guide):
- Prepare the Vehicle: Park the vehicle on a level surface. For easier access, consider using ramps or a lift. Ensure the vehicle is off and the parking brake is engaged.
- Lower the Exhaust (if necessary): Locate the rubber exhaust hangers. Apply WD-40 to the hangers and carefully slide them off the metal rods. This will allow the exhaust to hang lower, providing clearance for hitch placement.
- Remove Underbody Panels (if necessary): Identify and remove any plastic underbody panels near the installation points. These are typically secured with plastic rivets that can be popped out with a small flathead screwdriver.
- Position the Hitch: With assistance, lift the trailer hitch into position, aligning the mounting holes on the hitch with the pre-drilled holes in the vehicle's frame.
- Secure the Bolts: Insert the provided bolts and washers into the mounting holes. Start with one bolt on each side to temporarily hold the hitch in place. Then, install all remaining bolts.
- Tighten Bolts: Using a 17mm socket wrench, hand-tighten all bolts. Once all bolts are in place, use a torque wrench to tighten them to the manufacturer's specified torque (typically around 40 ft-lbs, but always refer to the specific instructions included with your hitch).
- Reattach Exhaust and Panels: Slide the exhaust hangers back onto their metal rods. Reinstall any removed plastic underbody panels.
- Final Check: Verify that all bolts are securely tightened and that the hitch is properly seated and stable.
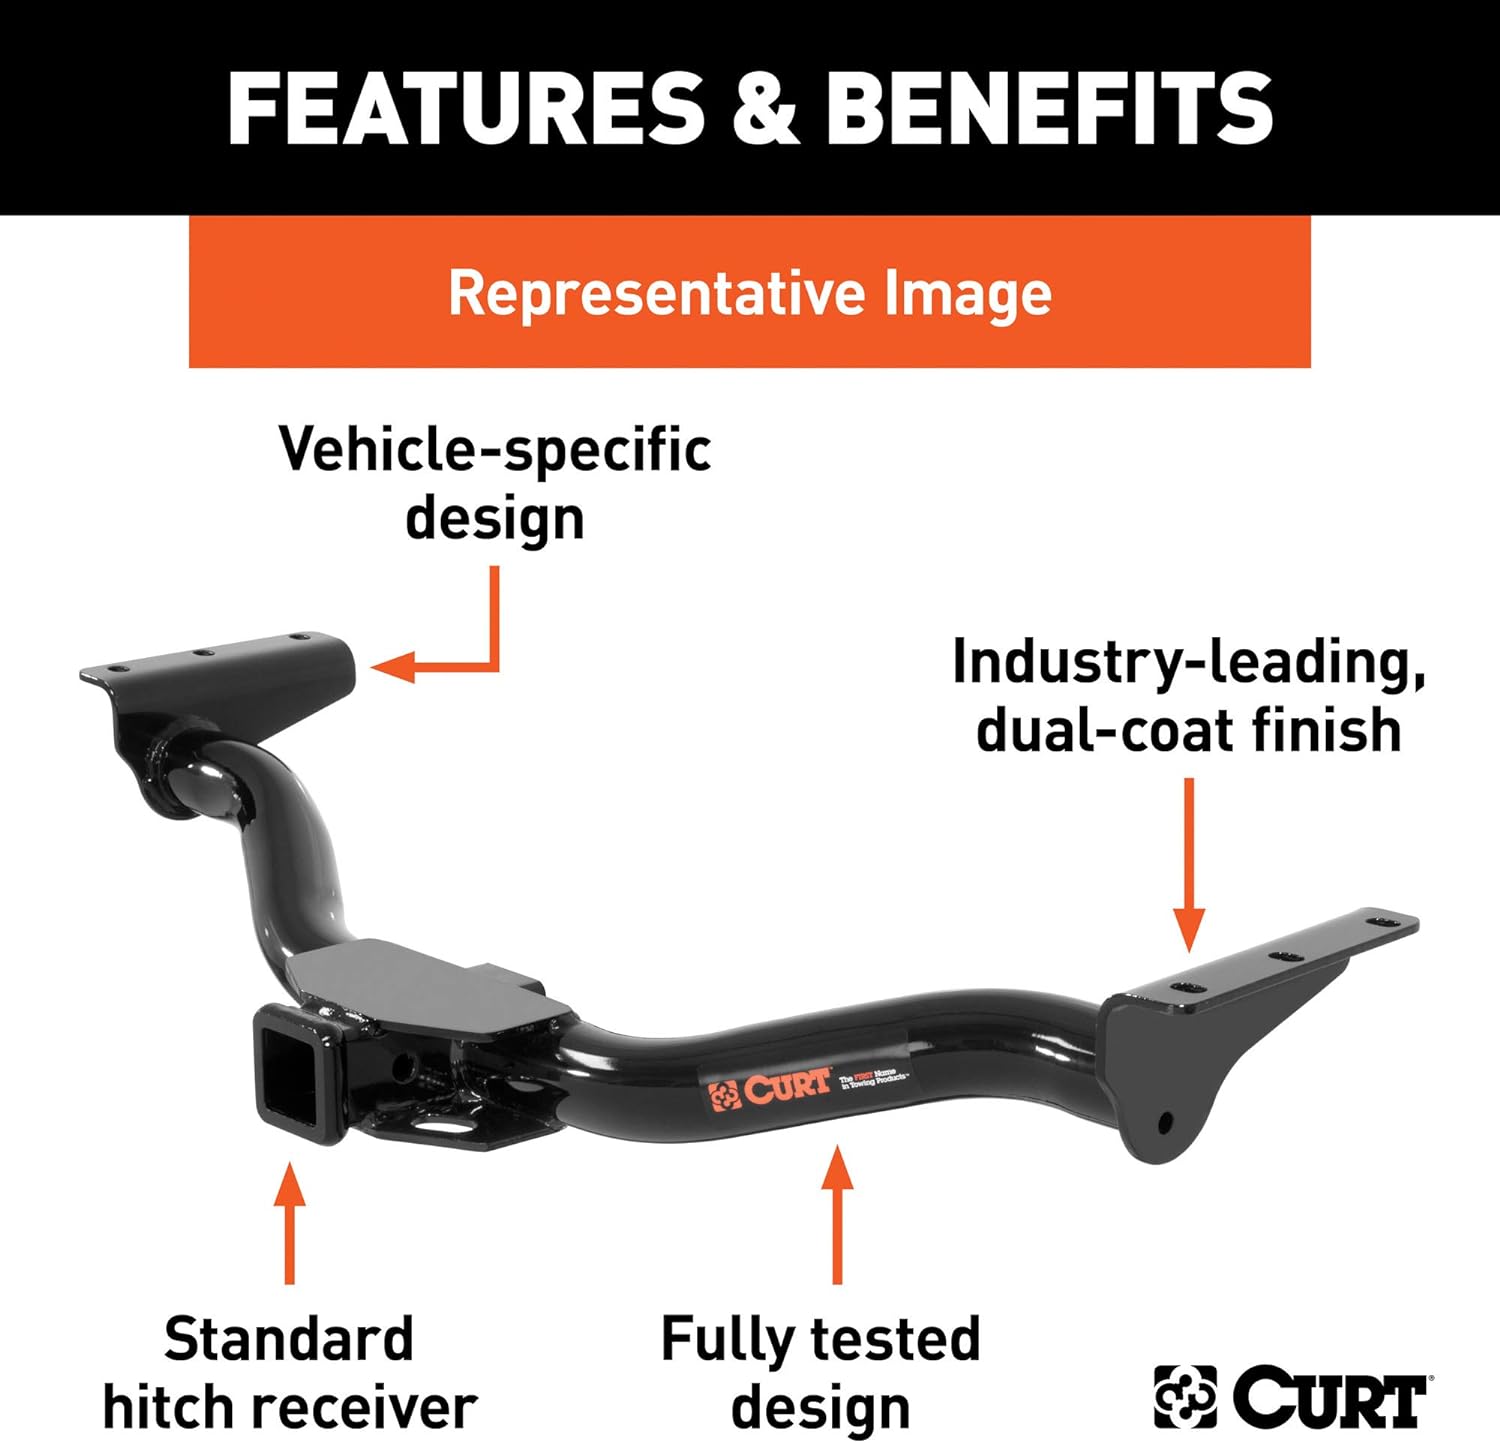
Image 2: Diagram illustrating key features such as vehicle-specific design, dual-coat finish, standard hitch receiver, and fully tested design.

Image 3: Visual representation of the 2-inch receiver tube size, indicating compatibility with standard towing accessories.

Image 4: A close-up view of the standard hitch receiver, highlighting its robust construction.

Image 5: Illustration of the industry-leading dual-coat finish process, showing parts submerged in a protective coating.

Image 6: An image depicting the rigorous testing process for the CURT trailer hitch, ensuring its strength and reliability.

Image 7: An icon indicating that no drilling is required for the installation of this CURT trailer hitch, simplifying the process.
3. Operating Instructions
Once installed, the CURT Class 3 Trailer Hitch is ready for use with appropriate towing accessories. Always ensure that the total weight of your trailer and its contents (Gross Trailer Weight - GTW) does not exceed the hitch's capacity or your vehicle's towing capacity, whichever is lower. Similarly, ensure the Tongue Weight (TW) is within limits.
Connecting a Trailer:
- Attach Ball Mount: Insert the appropriate ball mount into the 2" x 2" receiver tube. Secure it with a hitch pin and clip.
- Attach Trailer Coupler: Lower the trailer coupler onto the hitch ball. Ensure the coupler is fully seated and locked onto the ball.
- Connect Safety Chains: Cross the trailer's safety chains under the trailer tongue and attach them to the designated chain loops on the hitch or vehicle frame. This provides a backup connection in case the primary coupling fails.
- Connect Electrical (if applicable): If your trailer has lights or electric brakes, connect the trailer's wiring harness to the vehicle's towing electrical connector. Test all lights (running, brake, turn signals) before driving.
- Check Clearance: Ensure there is adequate clearance between the trailer and the vehicle, especially during turns.
Using Hitch-Mounted Accessories:
For bike racks, cargo carriers, or other accessories, simply insert the accessory's shank into the 2" x 2" receiver tube and secure it with a hitch pin and clip. Always ensure the accessory is rated for the weight you intend to carry and that it does not obstruct vehicle lights or license plates.
4. Maintenance
Regular maintenance will prolong the life and ensure the safe operation of your CURT trailer hitch.
- Regular Inspection: Periodically inspect the hitch for any signs of rust, corrosion, cracks, or damage. Pay close attention to welds and mounting points.
- Cleanliness: Keep the receiver tube free of dirt, debris, and rust. This ensures easy insertion and removal of ball mounts or accessories.
- Lubrication: Apply a light coat of grease or anti-seize compound to the hitch ball and inside the receiver tube periodically, especially before long trips or after exposure to harsh weather.
- Bolt Torque Check: Re-check the torque on all mounting bolts after the first 500 miles of towing and periodically thereafter (e.g., annually or before major towing trips). Vibrations can sometimes loosen bolts over time.
- Protective Cover: When not in use, consider using a receiver tube cover to protect the inside of the receiver from dirt and moisture.
5. Troubleshooting
This section addresses common issues you might encounter with your trailer hitch.
Common Issues and Solutions:
- Difficulty Inserting Ball Mount/Accessory:
- Cause: Rust, dirt, or debris inside the receiver tube.
- Solution: Clean the inside of the receiver tube thoroughly with a wire brush and apply a lubricant. Ensure the ball mount shank is also clean.
- Loose Hitch:
- Cause: Mounting bolts have loosened over time.
- Solution: Re-torque all mounting bolts to the specified value. If bolts continue to loosen, consider using thread-locking compound (e.g., Loctite) on the bolt threads.
- Excessive Noise/Rattling:
- Cause: Loose hitch pin, worn ball mount, or play between the receiver and ball mount.
- Solution: Ensure the hitch pin is secure. Consider an anti-rattle device for the receiver if the play is excessive. Inspect the ball mount for wear and replace if necessary.
- Rust Formation:
- Cause: Exposure to elements, especially road salt or moisture, without adequate protection.
- Solution: Clean affected areas, remove loose rust with a wire brush, and apply a rust-inhibiting primer followed by a suitable paint or touch-up coating. Regular cleaning and waxing can prevent this.
6. Specifications
| Attribute | Detail |
|---|---|
| Brand | CURT |
| Model Number | 13240 |
| Receiver Tube Size | 2" x 2" |
| Gross Trailer Weight (GTW) Capacity | 3,500 lbs. |
| Tongue Weight (TW) Capacity | 525 lbs. |
| Material | Carbon Steel |
| Finish Type | High-Gloss Black Powder Coat |
| Product Dimensions | 119.38 x 38.1 x 35.56 cm |
| Item Weight | 4.54 kg |
| Safety Standard | Tested in accordance with SAE J684 |
7. Warranty Information
CURT stands behind the quality of its products. The CURT Class 3 Trailer Hitch comes with a limited lifetime warranty, covering defects in materials and workmanship. Additionally, it includes a one-year finish warranty, protecting against issues with the powder coat finish.
For specific warranty terms, conditions, and claim procedures, please refer to the official CURT manufacturing website or contact their customer support directly. Keep your proof of purchase for warranty claims.
8. Support and Contact
For further assistance, technical support, or inquiries regarding your CURT 13240 Class 3 Trailer Hitch, please contact CURT Manufacturing through their official channels:
- Official Website: curtmfg.com
- Customer Service: Refer to the contact section on the official website for phone numbers or email support.
- Application Guide: For vehicle compatibility, consult the CURT application guide available on their website.
When contacting support, please have your product model number (13240) and purchase information readily available.


