Introduction
This instruction manual provides comprehensive guidance for using the Simplicity 1121 sewing pattern to create a pull-over maxi dress for girls. It covers pattern features, sizing, general sewing steps, and care recommendations for the finished garment. Please refer to the pattern envelope and enclosed guide sheet for detailed, step-by-step instructions specific to your chosen view.
Product Overview
This pattern allows for the creation of a child's or girl's dress, offering variations such as a maxi dress with a single large ruffle, a maxi dress with multiple rows of ruffles, or a short dress with a ruffle. The design features an elasticized bodice back and tie straps for ease of wear. This package contains one sewing pattern, available in sizes 3, 4, 5, and 6. The pattern is made in the USA.
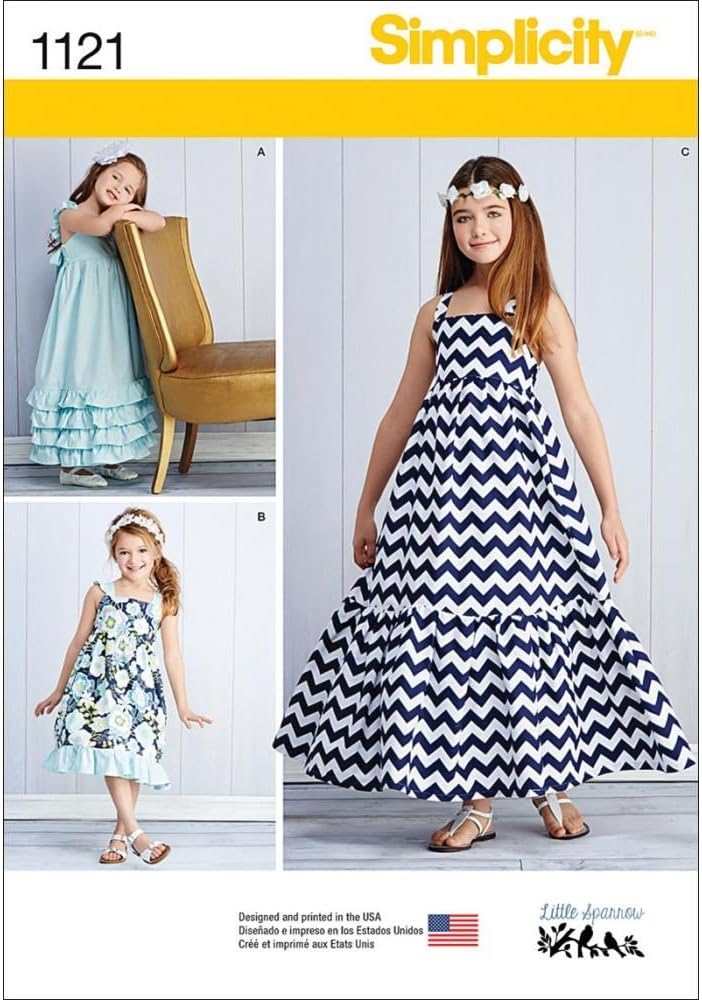
This image displays the front of the Simplicity 1121 sewing pattern envelope. It features three different views of the pull-over maxi dress for girls. View A shows a light blue maxi dress with a single large ruffle at the hem. View B shows a shorter dress with multiple ruffles and a floral print. View C shows a full-length maxi dress with a chevron pattern. All dresses have elasticized bodices and tie straps.
Pattern Features
- Includes instructions and a sizing guide to make (3) girl's dress patterns.
- Can be made in sizes 3, 4, 5, and 6.
- Pattern allows you to make a maxi dress with one large ruffle, or rows of ruffles, or a short dress with a ruffle.
- Bodice back is elastic with tie straps for easy dressing.
- Instructions are provided in English, Spanish, and French.
- All Simplicity clothing patterns are designed and made in the USA.
Sizing Information
The Simplicity 1121 pattern is designed for girls in sizes 3, 4, 5, and 6. For accurate garment fit, always refer to the detailed body measurement chart and finished garment measurements provided on the pattern envelope and guide sheet. Select the pattern size that corresponds most closely to the wearer's current measurements.
Getting Started (Setup)
- Review Pattern Instructions: Carefully read all instructions, diagrams, and cutting layouts provided with the pattern before beginning.
- Choose Fabric: Select a suitable fabric as recommended on the pattern envelope. Consider fabric type, drape, and care requirements.
- Prepare Fabric: Pre-wash and dry your fabric according to its care instructions to prevent shrinkage after the garment is made. Press the fabric smoothly.
- Select Size and Cut Pattern Pieces: Identify the pattern pieces for the desired size and view. Carefully cut out the paper pattern pieces.
- Pin and Cut Fabric: Lay out your fabric and pin the pattern pieces according to the cutting layout diagram. Cut the fabric accurately.
Sewing Instructions (Operating)
Follow the detailed sewing instructions and diagrams provided on the pattern guide sheet for precise construction. The general steps typically involve:
- Prepare Pattern Pieces: Transfer all markings from the pattern pieces to your fabric.
- Assemble Bodice: Construct the front and back bodice pieces, including any darts or seams, and create the elastic casing for the back.
- Attach Skirt/Ruffles: Gather and attach the skirt sections and ruffles to the bodice as indicated.
- Finish Edges: Hem the garment and finish any raw edges according to your chosen method (e.g., serging, zigzag stitch, French seams).
- Add Elastic and Straps: Insert elastic into the bodice casing and attach the tie straps.
- Final Touches: Press all seams and complete any remaining details.
Care and Maintenance of Finished Garment
The care instructions for the finished dress will depend on the fabric chosen. Always follow the care recommendations for your specific fabric type. General guidelines include:
- Washing: Machine wash cold or warm with like colors, or hand wash, depending on fabric.
- Drying: Tumble dry low or hang dry to prevent excessive shrinkage or damage.
- Ironing: Iron on a low to medium setting, appropriate for the fabric type.
- Storage: Store the garment on a hanger or folded neatly to maintain its shape.
Troubleshooting Common Sewing Issues
- Fabric Puckering: Check needle size, thread tension, and ensure fabric is not being stretched while sewing. Use a walking foot if necessary.
- Uneven Stitches: Verify correct thread tension for both bobbin and upper thread. Ensure the machine is threaded correctly.
- Pattern Not Fitting: Double-check body measurements against the pattern's sizing chart. Consider making a muslin (test garment) to adjust fit before cutting into your main fabric.
- Difficulty with Gathers: Use two or three rows of basting stitches for more even gathers. Pull bobbin threads gently to create gathers.
- Skipped Stitches: Replace the needle with a new, appropriate size for your fabric. Re-thread the machine.
Product Specifications
| Feature | Detail |
|---|---|
| Brand | Simplicity |
| Model Number | 1121 (US1121HH) |
| Sizes Included | 3, 4, 5, 6 (HH) |
| Media Type | Physical Pattern |
| UPC | 039363511212 |
| Product Dimensions | 6.3 x 8.27 x 0.39 inches |
| Item Weight | 1.6 ounces |
| Manufacturer | CSS Industries, Inc. |
| Date First Available | April 13, 2015 |
Support and Contact Information
For specific questions regarding the Simplicity 1121 sewing pattern, including detailed instructions or technical assistance, please refer to the contact information provided on the pattern envelope or visit the official Simplicity website. You may also find helpful resources and community forums online for sewing enthusiasts.
Warranty Information
Sewing patterns, including Simplicity 1121, are typically considered consumable items and do not come with a specific warranty. The manufacturer ensures the pattern pieces and instructions are accurate at the time of production. If you encounter any manufacturing defects with the pattern itself (e.g., missing pieces, illegible printing), please contact the retailer or manufacturer directly for assistance.


