
1. Introduction
This manual provides essential information for the safe and efficient operation of your COTEC SP-1000-148 Pure Sine Wave Inverter. This device converts 48VDC battery power into 120VAC household electricity, suitable for sensitive electronics. Please read this manual thoroughly before installation and use to ensure proper function and to prevent damage or injury.
2. Safety Information
Always observe the following safety precautions to reduce the risk of electric shock, fire, or injury.
- Qualified Personnel: Installation and servicing should only be performed by qualified personnel.
- Ventilation: Ensure adequate ventilation around the inverter. Do not block cooling vents.
- Environment: Install the inverter in a dry, cool, and dust-free environment. Avoid direct sunlight, heat sources, and moisture.
- Battery Connection: Connect the inverter directly to a 48VDC battery bank. Ensure correct polarity (+ to + and - to -). Reverse polarity will damage the inverter.
- Grounding: The inverter must be properly grounded.
- Load Capacity: Do not exceed the inverter's rated output power of 1000W. Overloading can cause damage and fire hazards.
- GFCI Outlets: The inverter features dual GFCI 120VAC outlets for enhanced safety. Test GFCI outlets regularly.
- Emergency Disconnect: Know how to quickly disconnect power in an emergency.

Image: Essential safety equipment for electrical work, including a hard hat, safety glasses, and gloves. Always use appropriate personal protective equipment when handling electrical devices.
3. Product Features
The COTEC SP-1000-148 Inverter is designed with advanced features for reliable power conversion:
- Pure Sine Wave Output: Provides clean, stable power suitable for all types of electronics, including sensitive equipment.
- Power ON / OFF Remote Control: Includes a green terminal for convenient remote control functionality.
- Input & Output Fully Isolation: Enhances safety by electrically isolating the DC input from the AC output.
- Temperature & Load Controlled Cooling Fan: Automatically adjusts fan speed based on internal temperature and load to optimize cooling and reduce noise.
- User-Friendly Interface: Designed for ease of use.
- Type 1 Indoor Aluminum Enclosure: Durable and suitable for indoor installations.
4. Setup & Installation
Follow these steps for proper installation of your inverter. Ensure all power sources are disconnected before beginning.
4.1. Mounting the Inverter
Mount the inverter in a secure, well-ventilated area. Ensure there is sufficient clearance around the unit for airflow, especially around the cooling fan and vents. Avoid mounting near flammable materials or in direct sunlight.

Image: Side profile of the inverter, illustrating its compact design for mounting. Ensure proper clearance for ventilation.
4.2. DC Input Connection (Battery)
Connect the inverter to a 48VDC battery bank using appropriate gauge cables. Use the shortest possible cable length to minimize voltage drop. Observe correct polarity: connect the positive (+) terminal of the inverter to the positive (+) terminal of the battery, and the negative (-) terminal of the inverter to the negative (-) terminal of the battery.
- Ensure all connections are tight and secure to prevent arcing and overheating.
- Install a DC fuse or circuit breaker between the battery and the inverter's positive terminal, as close to the battery as possible, for overcurrent protection.

Image: Rear panel of the inverter, highlighting the DC input terminals (42.0-66.0 VDC) and the cooling fan. Connect battery cables here.

Image: Example of battery types. Ensure your battery bank is compatible with the inverter's 48VDC input requirement.
4.3. AC Output Connection
The inverter provides dual 120VAC GFCI outlets. Plug your AC appliances directly into these outlets. Ensure the total wattage of connected appliances does not exceed 1000W.

Image: Front panel of the inverter, showing the dual GFCI 120VAC outlets and the main power switch.
4.4. Remote Control Connection (Optional)
For remote ON/OFF functionality, connect a compatible remote switch to the green terminal block on the inverter's rear panel. Refer to the remote control unit's manual for specific wiring instructions.
5. Operating Instructions
5.1. Powering On the Inverter
- Ensure all DC connections are secure and the DC fuse/breaker is closed.
- Flip the main power switch on the inverter's front panel to the "ON" position.
- The indicator lights will illuminate, indicating the inverter is operational.
- If using a remote control, ensure it is connected and activated.
5.2. Connecting AC Loads
Once the inverter is powered on, plug your AC appliances into the GFCI outlets. Start with smaller loads and gradually add larger ones, ensuring the total load does not exceed 1000W. Monitor the inverter's status indicators for any warnings.
5.3. Powering Off the Inverter
- Disconnect all AC loads from the inverter outlets.
- Flip the main power switch on the inverter's front panel to the "OFF" position.
- If the inverter will be stored or unused for an extended period, open the DC fuse/breaker to fully disconnect it from the battery.
6. Maintenance
Regular maintenance ensures the longevity and optimal performance of your inverter.
- Cleaning: Periodically clean the exterior of the inverter with a dry cloth. Ensure cooling vents are free from dust and debris. Do not use liquid cleaners.
- Connections: Annually check all DC and AC connections for tightness. Loose connections can cause overheating and power loss.
- Battery Health: Monitor your battery bank's health and charge level. A weak battery can affect inverter performance.
- GFCI Test: Test the GFCI outlets monthly by pressing the "TEST" button and then the "RESET" button.
7. Troubleshooting
This section addresses common issues you might encounter with your inverter.
| Problem | Possible Cause | Solution |
|---|---|---|
| Inverter does not turn on. | No DC input power; loose battery connections; low battery voltage; blown DC fuse. | Check battery connections and voltage. Ensure DC fuse/breaker is closed and not tripped. Recharge or replace battery if necessary. |
| No AC output. | Inverter in fault mode; overloaded; GFCI tripped. | Reduce AC load. Reset GFCI outlets. Check inverter status indicators for fault codes. Power cycle the inverter. |
| GFCI outlet trips frequently. | Ground fault detected; faulty appliance; sensitive load. | Disconnect all appliances and reset GFCI. Connect appliances one by one to identify the faulty one. Some appliances may have leakage current that trips GFCI. |
| Inverter shuts down unexpectedly. | Overload; over-temperature; low/high input voltage. | Reduce load. Ensure adequate ventilation. Check battery voltage. Allow inverter to cool down before restarting. |
| Cooling fan is loud. | High load or high ambient temperature. | This is normal operation. Ensure vents are clear. Reduce load if possible. |
8. Specifications
Key technical specifications for the COTEC SP-1000-148 Pure Sine Wave Inverter:
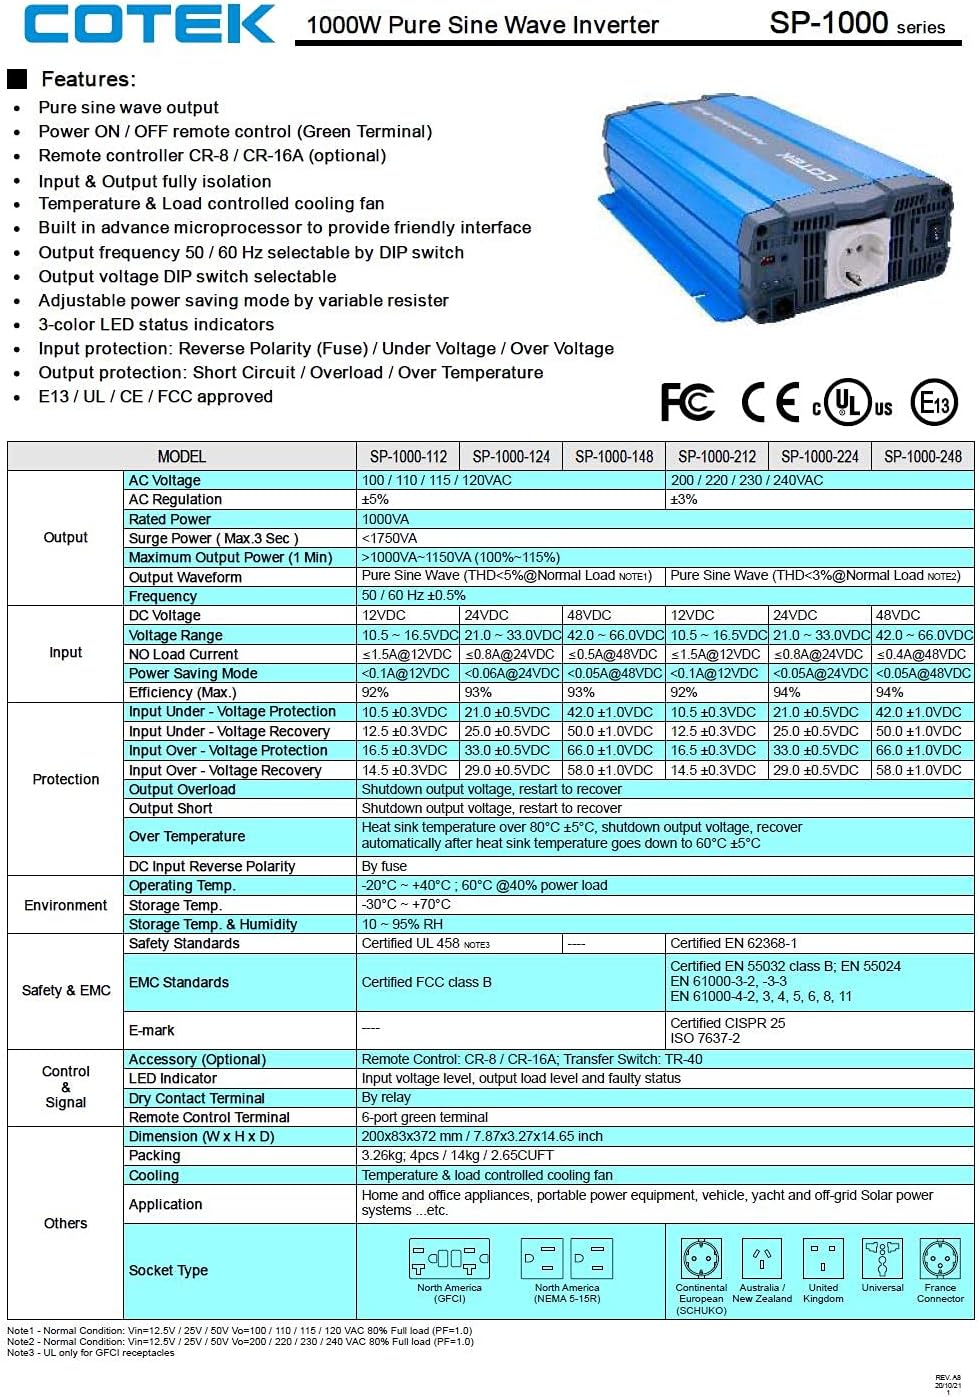
Image: Comprehensive specifications table for the SP-1000 series, including model SP-1000-148. Refer to this table for detailed electrical and environmental parameters.
| Feature | Detail |
|---|---|
| Brand | COTEK |
| Model Number | SP-1000-148 |
| Output Power | 1000 Watts (Continuous) |
| Input Voltage | 48 Volts DC (42.0-66.0 VDC) |
| Output Voltage | 120 Volts AC |
| Output Frequency | 60 Hz |
| Output Waveform | Pure Sine Wave |
| AC Outlets | Dual GFCI 120VAC |
| Cooling | Temperature & Load Controlled Fan |
| Enclosure Type | Type 1 Indoor Aluminum |

Image: Mechanical drawings with dimensions and power voltage/temperature curves for the SP-1000 series.
9. Warranty & Support
The COTEC SP-1000-148 Pure Sine Wave Inverter comes with a 2-Year Manufacturer Warranty. This warranty covers defects in materials and workmanship under normal use.
For technical support, warranty claims, or service inquiries, please contact COTEC customer service. Refer to the product packaging or the official COTEC website for the most current contact information.
Note: Unauthorized repairs or modifications will void the warranty.


