1. Introduction
This manual provides essential information for the safe and effective installation, operation, and maintenance of the Lightolier FBPPL-26 Compact Fluorescent Emergency Lighting Ballast. Please read these instructions thoroughly before proceeding with installation or use. Retain this manual for future reference.
2. Safety Instructions
WARNING: Risk of electric shock. Installation and servicing should be performed by qualified personnel only.
- Always disconnect power at the circuit breaker before installing or servicing the unit.
- This emergency ballast is designed for use with one 18-26 watt 2-pin compact fluorescent lamp with an integral starter.
- The unit must be used with grounded, UL Listed indoor fixtures, except in heated air outlets or hazardous locations.
- Ensure the ballast case is properly grounded during installation.
- Do not mate the connector until installation is complete and AC power is supplied to the unit.
- Do not use this equipment for other than its intended purpose.
Refer to all local and national electrical codes for proper installation procedures.
3. Product Overview
The Lightolier FBPPL-26 is a compact fluorescent emergency lighting ballast designed to provide temporary illumination during power outages. When AC power is present, the ballast charges its internal battery. Upon loss of AC power, the unit automatically switches to emergency mode, powering a compatible fluorescent lamp for a specified duration.

Figure 1: Front label of the Lightolier FBPPL-26 emergency ballast, indicating manufacturer details, input voltage, wattage, and safety cautions. It specifies the unit is for 120/277 VAC, 60Hz, 3.5 Watts, and uses a 3.6V High Temp Ni-Cad battery.
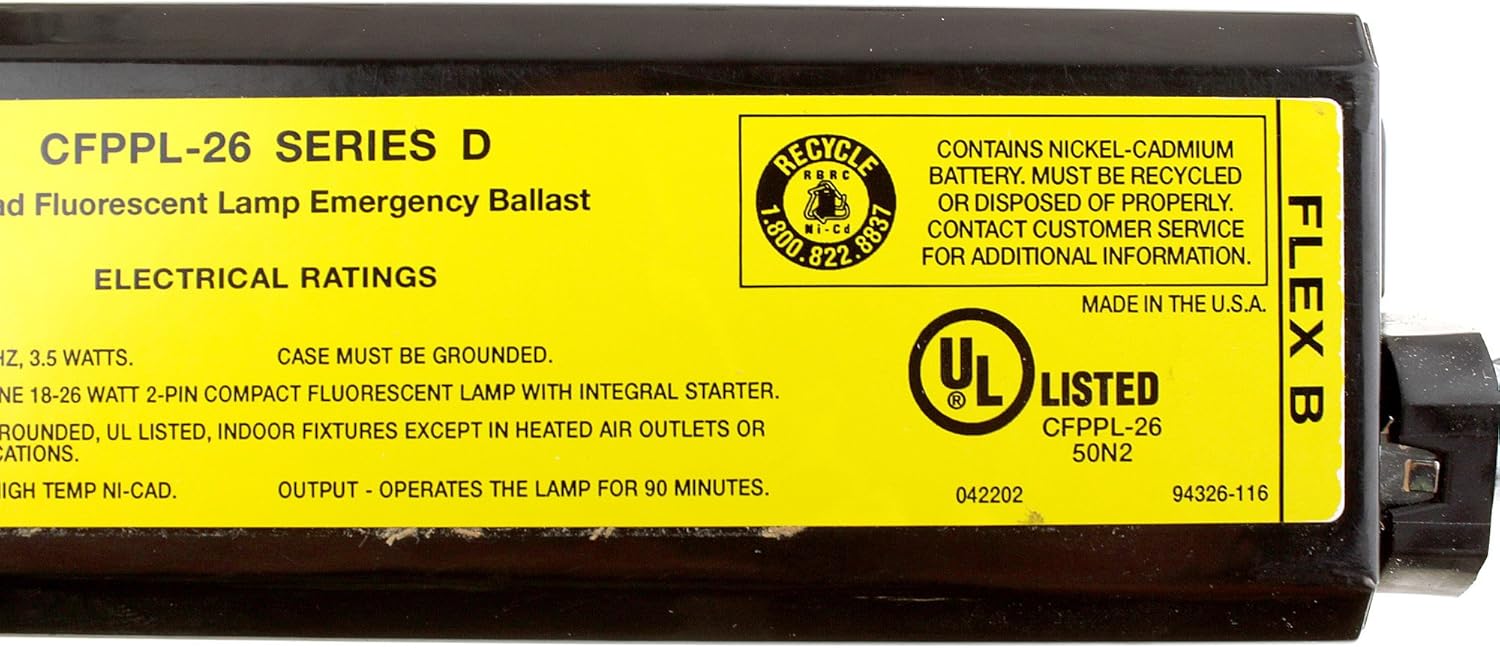
Figure 2: Rear label of the Lightolier FBPPL-26 emergency ballast, detailing the model series, electrical ratings, battery recycling information, and UL Listing. It also states the unit operates the lamp for 90 minutes during emergency mode.
4. Specifications
| Feature | Detail |
|---|---|
| Model Number | FBPPL26 |
| Manufacturer | Lightolier (Chloride Systems) |
| Input Voltage | 120/277 VAC |
| Frequency | 60 Hz |
| Power Consumption | 3.5 Watts |
| Compatible Lamp Wattage | 18-26 Watts (2-pin compact fluorescent with integral starter) |
| Emergency Operation Time | 90 minutes |
| Battery Type | 3.6V High Temp Ni-Cad |
| Dimensions (L x W x H) | 9 x 2.5 x 1.4 inches |
| Weight | 4 pounds |
| Material | Copper (internal components), Black finish |
5. Setup and Installation
Installation of the Lightolier FBPPL-26 emergency ballast requires knowledge of electrical systems. It is recommended that installation be performed by a qualified electrician in accordance with the National Electrical Code (NEC) and all applicable local codes.
5.1 Pre-Installation Checks
- Verify that the input voltage (120/277 VAC) matches the building's electrical supply.
- Ensure the fixture intended for emergency lighting is compatible with a 2-pin compact fluorescent lamp (18-26W) with an integral starter.
- Confirm that the installation location is indoors and not in heated air outlets or hazardous environments.
5.2 Wiring Instructions
- Disconnect Power: Turn off power to the fixture at the circuit breaker before beginning any wiring.
- Mounting: Securely mount the emergency ballast within the fixture or in an accessible location near the fixture, ensuring proper ventilation.
- Grounding: Connect the ballast's ground wire to the fixture's ground or an approved earth ground. The ballast case must be grounded.
- AC Input Wiring: Connect the ballast's AC input wires to the unswitched AC supply wires (120V or 277V, as appropriate). This allows the battery to charge continuously.
- Lamp Wiring: Wire the ballast to the compatible 2-pin compact fluorescent lamp according to the wiring diagram provided with the ballast (not included in this general manual, refer to product packaging).
- Final Connection: Only after all other wiring is complete and AC power is supplied to the unit, mate the connector between the ballast and the lamp circuit.
Note: A test switch (not included with ballast) is typically installed to allow for manual testing of the emergency function without interrupting the main power supply.
6. Operating Instructions
The Lightolier FBPPL-26 emergency ballast operates automatically.
- Normal Operation: When AC power is present, the ballast's battery charges. The connected fluorescent lamp operates normally via the fixture's standard ballast.
- Emergency Operation: In the event of an AC power failure, the emergency ballast automatically detects the power loss and switches to battery power. It will then illuminate the connected fluorescent lamp for a minimum of 90 minutes.
- Recharge: Once AC power is restored, the emergency ballast automatically reverts to charging mode, preparing for the next power interruption. A full recharge typically takes 24 hours.
6.1 Testing
Regular testing is crucial to ensure the emergency lighting system is functional. Perform tests in accordance with local fire and safety codes (e.g., monthly 30-second tests, annual 90-minute tests).
- To test, activate the test switch (if installed) or temporarily disconnect AC power to the fixture.
- Observe that the emergency lamp illuminates.
- After the test, restore AC power and ensure the charging indicator (if present on the test switch) is active.
7. Maintenance
The Lightolier FBPPL-26 emergency ballast requires minimal maintenance, primarily focusing on battery care and regular testing.
- Battery: The unit contains a 3.6V High Temp Ni-Cad battery. Nickel-Cadmium batteries must be recycled or disposed of properly at the end of their service life. Do not dispose of in regular waste.
- Cleaning: Keep the ballast and fixture clean and free from dust and debris to ensure proper heat dissipation. Use a dry, non-abrasive cloth.
- Inspection: Periodically inspect the unit for any visible damage, loose connections, or signs of overheating.
- Battery Replacement: Ni-Cad batteries have a finite lifespan. If the unit fails to provide 90 minutes of emergency illumination during testing, the battery may need replacement. Contact a qualified technician for battery replacement.
8. Troubleshooting
If the emergency lighting system does not function as expected, refer to the following troubleshooting guide:
| Problem | Possible Cause | Solution |
|---|---|---|
| Emergency lamp does not illuminate during power outage/test. |
|
|
| Emergency lamp illuminates for less than 90 minutes. |
|
|
| Normal lamp operation is affected (flickering, dim). |
|
|
For issues not resolved by the above steps, contact a qualified electrician or Lightolier customer support.
9. Warranty and Support
For warranty information and technical support regarding your Lightolier FBPPL-26 emergency lighting ballast, please refer to the documentation provided at the time of purchase or contact Lightolier customer service directly. Contact details can typically be found on the manufacturer's official website or product packaging.
When contacting support, please have your product model number (FBPPL26) and date of purchase available.


