1. Introduction
The Dell Universal Adapter DA100 is a compact and versatile connectivity solution designed to expand the port options of your laptop. This adapter connects to your laptop via a USB-C port and provides multiple output ports, including HDMI, VGA, Ethernet, and a USB 2.0 port. It is ideal for users who need to connect to various peripherals such as external monitors, projectors, wired networks, and USB devices.
2. Setup
2.1 Package Contents
- Dell Universal Adapter DA100
2.2 Connecting the Adapter to Your Laptop
- Locate an available USB-C port on your laptop.
- Connect the integrated USB-C cable from the Dell Universal Adapter DA100 into the USB-C port on your laptop.
- The adapter should be automatically recognized by your operating system. If prompted, allow any necessary driver installations. For optimal performance, ensure your system's USB-C drivers are up to date.
2.3 Connecting Peripherals
Once the adapter is connected to your laptop, you can attach your desired peripherals to the corresponding ports on the adapter:
- HDMI Port: Connect an HDMI cable from your monitor or projector to the HDMI port on the adapter.
- VGA Port: Connect a VGA cable from your monitor or projector to the VGA port on the adapter.
- Ethernet Port: Connect an Ethernet cable from your network router or switch to the Ethernet port on the adapter for a wired network connection.
- USB 2.0 Port: Connect USB devices such as a mouse, keyboard, or external storage to the USB 2.0 port on the adapter.

Figure 1: Dell Universal Adapter DA100 with HDMI and VGA ports visible.
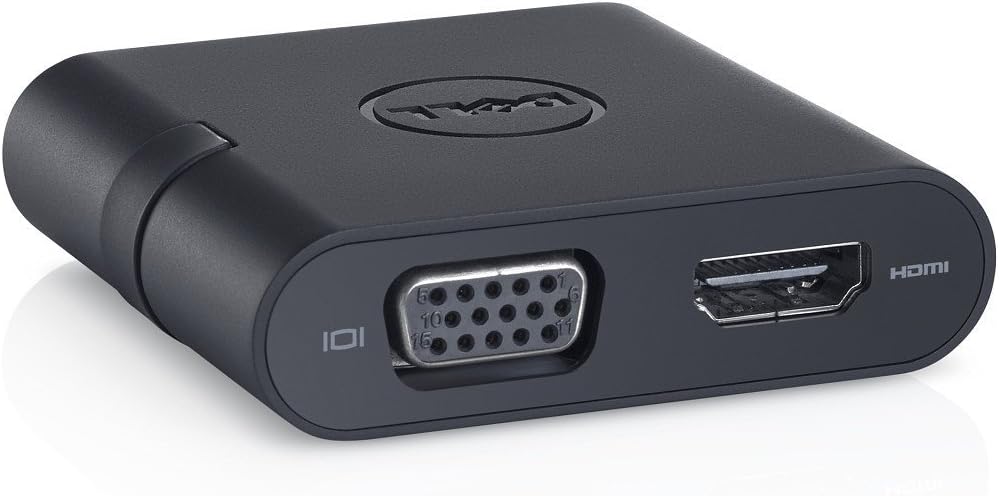
Figure 2: Dell Universal Adapter DA100 with Ethernet, USB-A, and its integrated USB-C host connector.
3. Operating the Adapter
3.1 Display Output
The adapter supports both HDMI and VGA outputs for connecting external displays. You can use one display output at a time.
- Connecting an HDMI Display: Plug an HDMI cable into the adapter's HDMI port and the other end into your display. Your laptop should detect the new display. You can then configure display settings (extend, duplicate, or second screen only) through your operating system's display settings.
- Connecting a VGA Display: Plug a VGA cable into the adapter's VGA port and the other end into your display. Similar to HDMI, your laptop will detect the display, and you can adjust settings as needed.
3.2 Network Connectivity
For a stable and fast internet connection, use the Ethernet port:
- Connect an Ethernet cable from your network source to the adapter's Ethernet port. Your laptop should automatically establish a wired network connection. Verify network status in your operating system's network settings.
3.3 USB Device Connectivity
The USB 2.0 port allows you to connect various USB peripherals:
- Plug your USB device into the USB 2.0 port on the adapter. The device should be recognized by your laptop.
4. Maintenance
4.1 Cleaning
To clean the adapter, gently wipe it with a soft, dry, lint-free cloth. Avoid using liquid cleaners, aerosols, or solvents, as these may damage the device.
4.2 Storage
When not in use, store the adapter in a cool, dry place away from direct sunlight and extreme temperatures. The integrated USB-C cable can be neatly tucked into the adapter's body for compact storage.
4.3 Handling
Handle the adapter with care. Avoid dropping it or subjecting it to strong impacts. Do not attempt to disassemble the adapter, as this will void the warranty and may cause damage.
5. Troubleshooting
5.1 No Display Output
- Ensure the adapter's USB-C cable is securely connected to your laptop.
- Verify that the HDMI or VGA cable is firmly connected to both the adapter and the external display.
- Check the input source on your external display to ensure it is set to the correct HDMI or VGA input.
- Update your laptop's graphics drivers and DisplayLink drivers (if applicable).
- Restart your laptop.
5.2 No Network Connection via Ethernet
- Confirm the Ethernet cable is securely connected to both the adapter and your network router/switch.
- Check your laptop's network settings to ensure the Ethernet connection is enabled and configured correctly.
- Try a different Ethernet cable to rule out cable issues.
- Update your laptop's network drivers.
5.3 USB Devices Not Recognized
- Ensure the USB device is properly inserted into the adapter's USB 2.0 port.
- Test the USB device by connecting it directly to your laptop (if possible) to confirm it is functional.
- Try connecting a different USB device to the adapter to see if the port is working.
- Some high-power USB devices may require an external power source, which this adapter does not provide.
5.4 Adapter Not Recognized by Laptop
- Disconnect and reconnect the adapter from your laptop's USB-C port.
- Try connecting the adapter to a different USB-C port on your laptop, if available.
- Restart your laptop.
- Ensure your laptop's operating system and USB-C drivers are fully updated.
6. Specifications
| Feature | Detail |
|---|---|
| Model Number | DA100 |
| Host Connection | USB-C (compatible with USB 3.0 host systems) |
| Video Output | 1x HDMI, 1x VGA |
| Network Port | 1x Ethernet (RJ-45) |
| USB Data Port | 1x USB 2.0 (Type-A) |
| Dimensions (LxWxH) | 11.2 x 4.7 x 1.6 inches |
| Weight | 1.6 ounces |
| Color | Black |
| Compatible Devices | Laptops with USB-C port |
7. Warranty Information
For detailed warranty information regarding your Dell Universal Adapter DA100, please refer to the warranty documentation included with your purchase or visit the official Dell support website. Warranty terms and conditions may vary by region and product.
8. Technical Support
If you encounter issues that cannot be resolved using the troubleshooting steps provided, please contact Dell Technical Support for further assistance. You can find contact information and additional resources on the official Dell support website.


