
1. Introduction
The SATLink WS-6933 is a professional DVB-S/S2 satellite meter designed for quick and accurate alignment of satellite dishes. It features a 2.1-inch LCD screen, an integrated beeper for signal lock, and supports various measurement types including signal strength, quality, BER, and PWR. This manual provides detailed instructions to help you effectively use and maintain your device.
2. Safety Information
- Always use the provided 12V/1A DC adapter for charging.
- Do not expose the device to extreme temperatures, moisture, or direct sunlight.
- Avoid dropping the device or subjecting it to strong impacts.
- Do not attempt to disassemble or repair the device yourself. Refer to qualified personnel for service.
- Keep the device away from children.
3. Product Overview
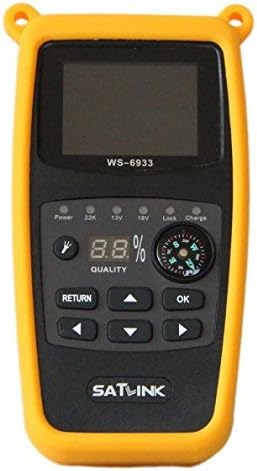
The SATLink WS-6933 satellite meter, shown in its yellow silicone protective case. It features a 2.1-inch LCD screen at the top, displaying 'WS-6933'. Below the screen are indicator lights for Power, 22K, 13V, 18V, Lock, and Charge. A digital display shows '8.8%' for 'QUALITY', alongside a small compass. The control panel includes 'RETURN', 'OK' buttons, and directional arrows (up, down, left, right). The 'SATLINK' logo is visible at the bottom. This image provides a clear view of the device's front panel and its key components.
Key Features:
- 2.1" LCD Screen for clear readings.
- Input Frequency range: 950 ~ 2150 MHz.
- Input Level: -65 ~ -25 dBm; Input Impedance: 75 ohms.
- Measurement Types: Signal strength, quality, BER (Bit Error Rate), and PWR (Power).
- Audible tone for signal lock indication.
- Supports DISEQC 1.0/1.1 and 22 kHz.
- LNB Power: 18V/13V (Imax 300mA).
- Integrated beeper.
- Includes a 7.4V/800mAh Lithium-ion battery.
- Maximum operating time: 3 hours.
- 12V/1A DC Adapter for charging.
- USB port for software upgrades.
- Comes with a UK power supply, USB cable, and silicone case.
4. Setup
- Charge the Device: Before first use, fully charge the internal Lithium-ion battery using the provided 12V/1A DC adapter. The 'Charge' indicator light will illuminate during charging.
- Connect to LNB: Connect the LNB (Low Noise Block) cable from your satellite dish to the 'LNB IN' port on the WS-6933.
- Power On: Press and hold the 'Power' button to turn on the device.
- Select Satellite (if applicable): Use the navigation buttons (up/down arrows) to select the desired satellite from the pre-programmed list, if your model supports this feature.
5. Operating Instructions
Signal Measurement:
- Initial Connection: Ensure the device is connected to the LNB and powered on.
- Adjust Dish: Slowly adjust the azimuth and elevation of your satellite dish. Observe the signal strength and quality readings on the 2.1-inch LCD screen.
- Signal Lock: When a signal is detected and locked, the 'Lock' indicator light will illuminate, and an audible beep will sound. The screen will display the signal quality percentage.
- Optimize Signal: Fine-tune the dish position to achieve the highest possible signal quality and strength readings.
- Check Parameters: The device displays signal strength, quality, BER, and PWR. Use these metrics to ensure optimal alignment.
DISEQC and 22 kHz Support:
The WS-6933 supports DISEQC 1.0/1.1 and 22 kHz tone for switching between multiple LNBs or satellite dishes. Refer to your satellite system's configuration for proper setup and selection within the device's menu.
Software Upgrades:
The USB port allows for software upgrades. Connect the device to a computer using the provided USB cable and follow the instructions from the manufacturer's official website for updating firmware.
6. Maintenance
- Cleaning: Use a soft, dry cloth to clean the device. Do not use liquid cleaners or solvents.
- Storage: Store the device in a cool, dry place away from direct sunlight and extreme temperatures when not in use.
- Battery Care: To prolong battery life, avoid fully discharging the battery frequently. Charge the device regularly, even if not in active use.
- Silicone Case: Keep the silicone case on the device to protect it from minor impacts and scratches.
7. Troubleshooting
| Problem | Possible Cause | Solution |
|---|---|---|
| Device does not power on. | Battery is discharged. | Charge the device using the provided DC adapter. |
| No signal reading. | Incorrect LNB connection; Dish not aligned; Incorrect satellite selected. | Check LNB cable connection; Adjust dish alignment; Ensure correct satellite is selected in the device menu. |
| Weak signal quality. | Dish misalignment; Obstruction; LNB issue. | Fine-tune dish alignment; Check for obstructions (trees, buildings); Inspect LNB for damage. |
| Device freezes or malfunctions. | Software issue; Temporary glitch. | Perform a soft reset (power off/on); Check for available software updates via USB. |
8. Specifications
| Feature | Specification |
|---|---|
| Brand | SATLINK |
| Model Number | WS-6933 |
| Color | Black |
| Product Type | Professional Satellite Meter |
| Screen Size | 2.1 Inches |
| Input Frequency | 950 ~ 2150 MHz |
| Input Level | -65 ~ -25 dBm |
| Input Impedance | 75 ohms |
| Measurement Types | Signal Strength, Quality, BER, PWR |
| LNB Power | 13V/18V (Max 300mA) |
| Battery Composition | Lithium-ion |
| Battery Capacity | 7.4V/800mAh |
| Max Operating Time | 3 hours |
| Power Adapter | DC 12V/1A |
| USB Port | For software upgrades |
| Rechargeable Battery | Yes |
| Date First Available on Amazon.com.be | July 9, 2022 |
9. Warranty and Support
This product is covered by a standard manufacturer's warranty. For specific warranty terms, duration, and support inquiries, please refer to the documentation included with your purchase or contact the manufacturer directly. Keep your proof of purchase for warranty claims.
For technical support or further assistance, please visit the official SATLink website or contact their customer service department.


