
1. Introduction
The SATLINK 6933 is a portable satellite pointer designed for efficient installation and alignment of satellite dishes. It supports DVB-S and DVB-S2 HD transponders, providing real-time signal strength and quality measurements. This manual provides essential information for setting up, operating, maintaining, and troubleshooting your device.
2. Product Overview
2.1 Key Features
- Supports DVB-S and DVB-S2 HD transponders (950 - 2150 MHz).
- Ultra-fast response time for satellite acquisition.
- Displays measured values in dBµV and percentages on a bar display.
- Large LED screen for improved visibility in sunny conditions.
- Compatible with universal LNB and Ku-band.
- DiSEqC 1.0, 1.1 support for up to 16 LNBs.
- Automatic azimuth and elevation angle calculation (requires location coordinates input).
- Integrated 8.4 V/800 mAh battery, providing up to 3 hours of operation.
- Satellite editing tool for managing satellite and transponder lists.
- Software update capability via USB port.
- Multi-language menu (12 languages including English, French, German, Spanish).
2.2 What's in the Box
- 1 x SATLINK WS-6933 Satellite Pointer
- 1 x Power Adapter (EU plug)
- 1 x USB Data Cable
- 1 x User Manual (English)

Figure 1: Contents of the SATLINK 6933 package.
3. Safety Information
- Do not expose the device to rain or moisture.
- Avoid extreme temperatures.
- Do not attempt to open or repair the device yourself. Refer to qualified service personnel.
- Use only the provided power adapter for charging.
- Keep out of reach of children.
4. Setup
4.1 Initial Charging
Before first use, fully charge the device using the provided power adapter. Connect the adapter to the 'DC IN' port on the side of the device and plug it into a power outlet. The 'Charge' indicator light will illuminate during charging.

Figure 2: DC IN and USB ports.
4.2 Connecting the Device
- Connect the LNB cable from your satellite dish to the 'LNB IN' port on the top of the SATLINK 6933.
- If connecting to a receiver, use a short coaxial cable to connect the 'TO REC' port (if available, or directly to the LNB IN if not using a receiver for power) to your satellite receiver.
- Turn on the device using the power switch located on the side.
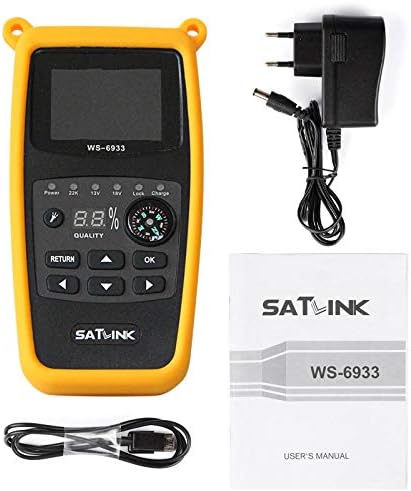
Figure 3: Power switch and LNB connection point.

Figure 4: Connection diagram for satellite dish alignment.
4.3 Initial Configuration
- Language Selection: Navigate to 'System Setup' from the main menu to select your preferred language.
- Enter Location Coordinates: For automatic azimuth and elevation angle calculation, enter your current location's GPS coordinates (latitude and longitude) in the 'System Setup' menu.
- Satellite Selection: From the main menu, select 'Satellite Database' and choose the desired satellite you wish to align your dish to.

Figure 5: Main menu display.
5. Operating Instructions
5.1 Navigating the Menu
Use the arrow keys (Up, Down, Left, Right) to navigate through menu options and 'OK' to confirm selections. The 'RETURN' button typically takes you back to the previous screen.
5.2 Satellite Signal Finding
- After selecting your desired satellite, navigate to the 'Signal Find' option in the main menu.
- The screen will display signal strength (dBµV) and quality (percentage) on a bar graph.
- Slowly adjust your satellite dish's azimuth (horizontal) and elevation (vertical) until the signal strength and quality readings are maximized. The device may also emit an audible tone, which increases in pitch as the signal improves.
- Once optimal signal is achieved, carefully tighten the dish mounting bolts to secure its position.
Video 1: Demonstration of the SATLINK 6933's operation for signal finding and channel scanning.
5.3 Transponder Management
The 'TP Manager' option allows you to view, add, edit, or delete transponder frequencies for selected satellites. This is useful if satellite data is outdated or if you need to add custom transponders.
5.4 Software Updates
The device supports software updates via its USB port. Download the latest firmware from the official SATLINK website and follow the instructions provided with the firmware package. Typically, this involves copying the update file to a USB drive and connecting it to the device.
Video 2: Guide on how to perform a software update on a similar SATLINK device.
5.5 Changing OSD Language
To change the On-Screen Display (OSD) language, navigate to the 'System Setup' menu and locate the 'OSD Language' option. Select your desired language from the available list.
Video 3: Instructions on how to change the OSD language on a similar SATLINK device.
6. Maintenance
6.1 Cleaning
Wipe the device with a soft, dry cloth. Do not use liquid cleaners or solvents, as they may damage the casing or internal components.
6.2 Battery Care
- To prolong battery life, avoid fully discharging the battery frequently.
- If storing the device for an extended period, charge it to approximately 50% and store in a cool, dry place.
- Recharge the battery every few months to prevent deep discharge.
6.3 Software Updates
Regularly check the manufacturer's website for new software updates. Updates can improve performance, add new features, or fix bugs.
7. Troubleshooting
7.1 No Signal or Low Quality Reading
- Check Connections: Ensure all cables (LNB to device, device to receiver) are securely connected.
- Power Supply: Verify the device is sufficiently charged or connected to power. Ensure the LNB is receiving power (indicated by 13V/18V lights).
- Correct Satellite Selected: Confirm that the correct satellite is selected in the device's menu.
- Obstructions: Check for any physical obstructions (trees, buildings) blocking the line of sight to the satellite.
- LNB Fault: A faulty LNB can cause signal issues. If possible, test with a known working LNB.
- Dish Alignment: Make very small, slow adjustments to the dish's azimuth and elevation. Even a millimeter can make a difference.
7.2 Outdated Satellite Data
If the device's pre-programmed satellite data is outdated, you may need to manually update transponder frequencies via the 'TP Manager' or perform a software update via USB. Refer to reliable satellite information websites for current transponder details.
7.3 Device Not Powering On
- Ensure the battery is charged.
- Check the power switch is in the 'ON' position.
- If connected to an external power source, verify the adapter and outlet are working.
8. Specifications
| Brand | SATLINK |
| Model Number | 6933 |
| Color | Black |
| Functions | Satellite Pointer |
| Tuner Type | DVB-S |
| Connections | USB, LNB, DVB-S, SAT, RF |
| Dimensions (L x W x H) | 8 x 4 x 17 cm |
| Weight | 500 grams |
| Battery | 8.4 V/800 mAh (Integrated) |
| Operating Time | Up to 3 hours |
9. Warranty and Support
9.1 Warranty Information
This product comes with a manufacturer's warranty. Please refer to the warranty card included in your package or contact the retailer for specific details regarding warranty coverage and duration.
9.2 Technical Support
For technical assistance, software updates, or further inquiries, please visit the official SATLINK website or contact their customer support. Contact information can typically be found on the manufacturer's website or in the product packaging.


