1. Introduction
Thank you for choosing the Laserliner VideoScope XXL L/L082115A. This recordable inspection camera is designed for visual inspection of inaccessible areas. It features a 5-meter flexible probe with an integrated camera and LED lighting, a 3.5-inch color LCD display, and recording capabilities for both still images and video. Please read this manual thoroughly before operating the device to ensure safe and correct usage.
2. Safety Instructions
Always observe the following safety precautions to prevent injury or damage to the device:
- Do not use the device in explosive atmospheres or near flammable gases or liquids.
- The camera probe is waterproof (IP67) but the main unit is not. Avoid exposing the main unit to moisture.
- Do not bend the camera probe sharply or apply excessive force, as this may damage the internal wiring.
- Ensure batteries are inserted with correct polarity. Remove batteries if the device will not be used for an extended period.
- Keep the device out of reach of children.
- Do not attempt to open or modify the device. Repairs should only be performed by authorized personnel.
3. Package Contents
Verify that all items are present in your package:

Image 3.1: The Laserliner VideoScope XXL L/L082115A inspection camera with its complete set of accessories, including the main unit, 5-meter flexible probe, USB cable, video output cables, microSD card, and software CD.
- Laserliner VideoScope XXL Main Unit
- 5-meter Flexible Camera Probe (Ø 9mm)
- USB Cable
- Video Output Cables (RCA)
- MicroSD Card (4GB)
- Software CD
- 4 x AAA Batteries
- User Manual (this document)
4. Product Overview
4.1 Main Unit and Display

Image 4.1: The main unit of the VideoScope XXL, highlighting its 3.5-inch color TFT LCD display for clear viewing of inspection footage.
The main unit features a 3.5-inch color TFT LCD display for real-time viewing of the camera feed. Control buttons are intuitively placed for easy navigation and operation.
4.2 Camera Probe

Image 4.2: A detailed view of the camera probe tip, showing its 9mm diameter and indicating its waterproof capability, suitable for wet environments.
The flexible camera probe has a diameter of 9mm and is 5 meters long. It is equipped with adjustable LED lighting at the tip to illuminate dark inspection areas. The probe is waterproof (IP67), allowing for use in damp or submerged conditions.
4.3 Ports and Connectivity
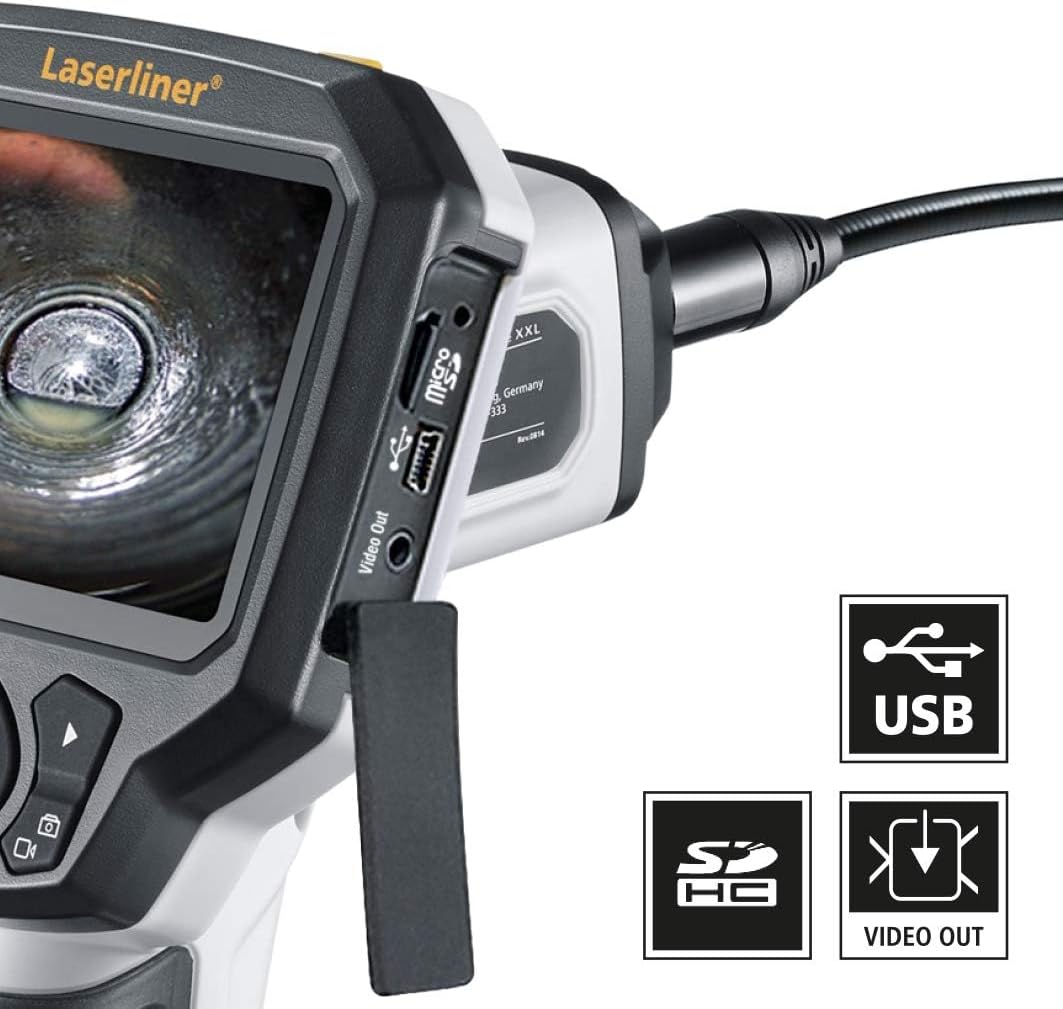
Image 4.3: Side view of the main unit, clearly showing the USB port for data transfer, the SD card slot for storage, and the video output port for external display connection.
The device includes a USB port for connecting to a computer, an SD card slot for storing recorded media, and a video output port for connecting to an external monitor or TV.
5. Setup
5.1 Battery Installation
- Locate the battery compartment on the handle of the main unit.
- Open the battery compartment cover.
- Insert 4 AAA batteries, ensuring correct polarity (+/-).
- Close the battery compartment cover securely.
5.2 Connecting the Camera Probe
- Align the connector of the camera probe with the port on the top of the main unit.
- Gently push the connector in until it clicks into place. Ensure a secure connection.
5.3 Inserting the MicroSD Card
- Locate the SD card slot on the side of the main unit (refer to Image 4.3).
- Insert the provided microSD card with the gold contacts facing down, until it clicks into place.
6. Operating Instructions
6.1 Powering On/Off
- To power on: Press and hold the Power button until the display illuminates.
- To power off: Press and hold the Power button until the display turns off.
6.2 Menu Navigation
Use the directional buttons (Up, Down, Left, Right) to navigate through menu options. Press the OK button to confirm a selection. The ESC button typically returns to the previous screen or exits a menu.
6.3 Adjusting LED Brightness
While viewing the live camera feed, use the Up and Down buttons to adjust the brightness of the LED lights on the camera probe tip.
6.4 Taking Photos
- Ensure the device is in photo mode (indicated by an icon on the display). If not, press the mode button to switch.
- Position the camera probe to capture the desired image.
- Press the OK button to take a photo. The image will be saved to the microSD card.
6.5 Recording Videos

Image 6.1: The display of the VideoScope XXL indicating that video recording is active, showing a timer and a 'REC' icon, with the date and time stamp.
- Ensure the device is in video mode.
- Press the OK button once to start recording. A 'REC' icon and timer will appear on the display.
- Press the OK button again to stop recording. The video will be saved to the microSD card.
6.6 Playback
- Enter playback mode using the mode button.
- Use the directional buttons to browse through saved photos and videos.
- Press OK to view a photo or play a video.
- Press ESC to exit playback.
6.7 Connecting to a Computer (USB)
- Power off the VideoScope XXL.
- Connect the main unit to your computer using the provided USB cable.
- The device should appear as a removable storage device on your computer, allowing you to transfer files from the microSD card.
6.8 Connecting to an External Display (Video Out)
- Connect the provided video output cables to the Video Out port on the main unit and the corresponding input ports on your external display (e.g., TV, monitor).
- Power on the VideoScope XXL. The live feed should now be visible on the external display.
6.9 Typical Applications

Image 6.2: Illustrates the inspection camera being used to examine a drain pipe system within a residential setting, showing its utility for plumbing diagnostics.

Image 6.3: Depicts the inspection camera in use for examining heating, ventilation, and air conditioning (HVAC) ducts in a large commercial or industrial environment.

Image 6.4: Shows the inspection camera being utilized for automotive diagnostics, specifically for examining components underneath a vehicle on a lift.

Image 6.5: Illustrates the inspection camera being used to check a ventilation grate in a bathroom, demonstrating its versatility for home maintenance tasks.
The VideoScope XXL is suitable for a wide range of inspection tasks, including:
- Plumbing inspections (drains, pipes)
- HVAC system inspections (ducts, vents)
- Automotive diagnostics (engine bays, chassis)
- Electrical conduit inspections
- General home maintenance and inspection of hard-to-reach areas
7. Maintenance
7.1 Cleaning
- Main Unit: Wipe the main unit with a soft, dry cloth. Do not use abrasive cleaners or solvents.
- Camera Probe: After use, especially in dirty or wet environments, gently wipe the probe with a damp cloth. Ensure the camera lens is clean for clear images.
7.2 Battery Care
- Remove batteries if the device is not used for an extended period to prevent leakage.
- Replace all batteries simultaneously with new ones of the same type.
7.3 Storage
Store the device in a cool, dry place, away from direct sunlight and extreme temperatures. Keep the probe coiled loosely to avoid kinks or damage.
8. Troubleshooting
| Problem | Possible Cause | Solution |
|---|---|---|
| Device does not power on | Dead or incorrectly inserted batteries | Check battery polarity; replace with fresh batteries. |
| No image on display | Probe not connected properly; damaged probe | Ensure probe is securely connected. If problem persists, contact support. |
| Cannot record photos/videos | No microSD card; full microSD card; card error | Insert microSD card; delete old files or use a new card; format card (if option available). |
| Image is too dark/bright | LED brightness setting incorrect | Adjust LED brightness using the Up/Down buttons. |
| External display not working | Incorrect cable connection; wrong input selected on display | Verify video cable connections; select correct AV input on external display. |
9. Specifications
| Feature | Detail |
|---|---|
| Model Number | L/L082115A |
| Display | 3.5" Color TFT LCD |
| Probe Diameter | 9 mm |
| Probe Length | 5 meters |
| Waterproof Rating (Probe) | IP67 |
| Video Capture Resolution | 1080p |
| Storage | MicroSD card (4GB included) |
| Connectivity | USB, Video Out |
| Power Source | 4 x AAA Batteries (included) |
| Product Dimensions | 11.81 x 7.48 x 7.09 inches |
| Item Weight | 2.89 pounds |
| Manufacturer | Laserliner |
10. Warranty and Support
For warranty information, technical support, or service inquiries, please refer to the warranty card included with your product or visit the official Laserliner website. Contact details for customer service are typically available on the manufacturer's website.


